Pulling rooted cuttings from the propagation bed.
“Normal” rooted cutting harvesting.
Normally you stick Softwood Cuttings in June and they are rooted in four to eight weeks. If you remove them from the bed right away you can do so without doing any root damage, so it’s okay to remove them during the growing season. You can simply dip your hand in the sand, working it under the roots then gently raise a group of rooted cuttings and tease the roots apart easily by shaking away the sand.
Don’t the roots get all tangled up when the cuttings are stuck so close together?
No they don’t. I’ve never had a problem with roots being that tangled. When you root in sand, the sand easily falls away and it’s very easy to separate the rooted cuttings.
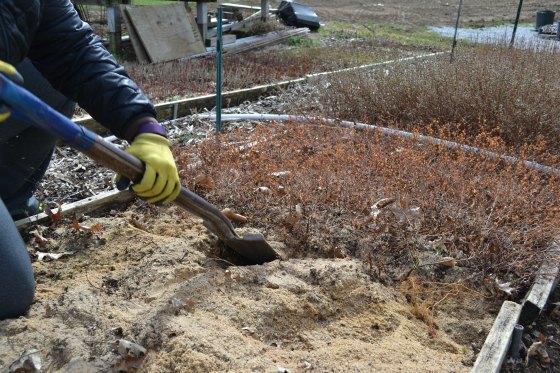
Loosening rooted cuttings from the propagation bed.
This is extreme rooted cutting harvesting.
The rooted cuttings in this bed have been in there for way too long simply because we rooted so many we ran out of room to put them once potted. Leaving them in the bed too along allows them to root into the soil belong the sand which isn’t a huge problem, but it does mean that you have to wait to remove them until they are dormant because many roots have to be cutting in order to get them out of the bed.
Doesn’t cutting the roots harm the cuttings?
No. Cutting the roots doesn’t harm the plants, as long as the plants are dormant when this is done. In Ohio our dormancy period starts around Thanksgiving after we’ve had at least one really hard freeze and continues through the winter into early spring. Once the plants make new leaves the dormancy/digging season is over until late fall.
As you can see in the above photo I am using a spade to cut the roots below the sand, where they entered the soil below the bed. Once cut I pry the spade upward to further loosen the cuttings so they can be removed.
I have to say it again, had we been able to remove these sooner, I wouldn’t need any tools at all, I could simply lift them out with my hands.
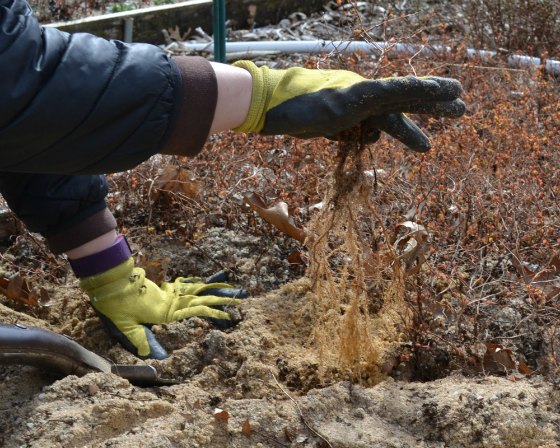
Well rooted.
As you can see, these cuttings are very well rooted. So much so that we will trim the roots before potting them.
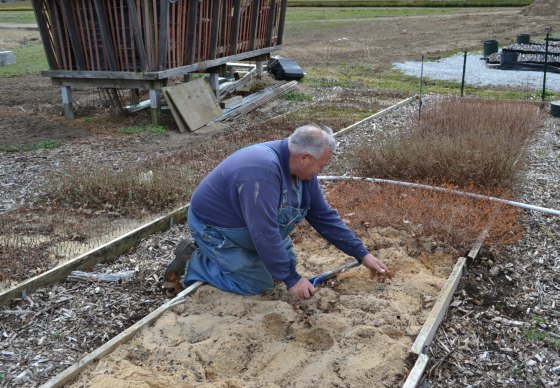
Racing Mother Nature’s ticking clock.
If you look closely you can see that many of these plants are starting to make tiny leaves. A month early! Normally we’d have until mid April or even late April to getting this kind of digging done, but February and March have been warmer than normal and things are way ahead of schedule.
No dilly dallying allowed!
This is important. Really, really important. This work has to be done now. Right now. Every single plant that we have to dig has to be done right now. It can’t wait! The plants are making leaves and everything that needs to be dug has to be dug immediately before they leave out.
While the girls are upfront working on getting these cuttings out of the beds Duston and I are out back digging hundreds of Japanese maple trees. All we are doing is bare rooting the trees, tying them in bundles then heeling those bundles in the potting soil pile until we can find time to get them potted.
Same with the cuttings. We are not potting them. We are removing them from the beds, taking them in the building where we can work on a table, then the roots are trimmed, the tops are trimmed, they are then tied in bundles with rubber bands, then taken back outside and heeled in large pots filled with potting soil. We’ll make time to pot them later, but right now it’s all about getting them out of the beds and pruned.
Prune, prune, prune, prune. Dog gone it prune your plants!
The worst thing in the world you can do to your rooted cuttings is to not prune them. It completely ruins them! I made a movie about this and I am Clearly Aggravated in this Movie about Pruning! I prune my rooted cuttings as soon as they are rooted with hedge shears! I just whack the tops off. Seems brutal, but it’s good for them.
Heeled in? What do you mean heeled in?
I’ll snap a photo the Japanese maples that we heeled in, remind me to get that added to this page. Basically all we do is take the bare root plants, make a hole in the potting soil pile, or in the ground if need be, put a bunch of plants in one hole, then thoroughly cover the roots with soil, being sure to eliminate any air pockets. Roots exposed to air for any time at all will die.
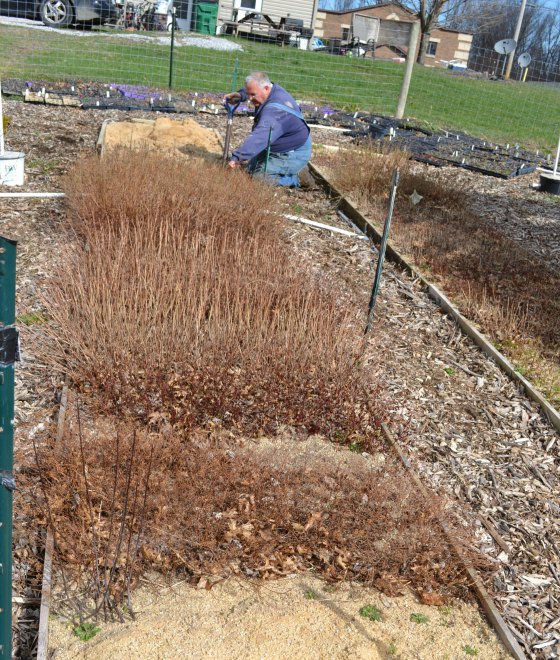
Pulling Rooted Cuttings.
Right now we have four beds full of rooted cuttings and One Bed Full of Hardwood Cuttings that are Still Rooting. That’s a tad too many. The bed that I am working on here, those cuttings have been in this bed for two years, they’ve been trimmed in the bed at least two or three times, now it’s time to get them out. Past time really. The bed behind me, those cuttings haven’t even been in that bed for a year yet. I’d love to get those out now but I’m not sure that we’ll have the time, we have so much else going on. But we’ll get three beds cleaned out this week.
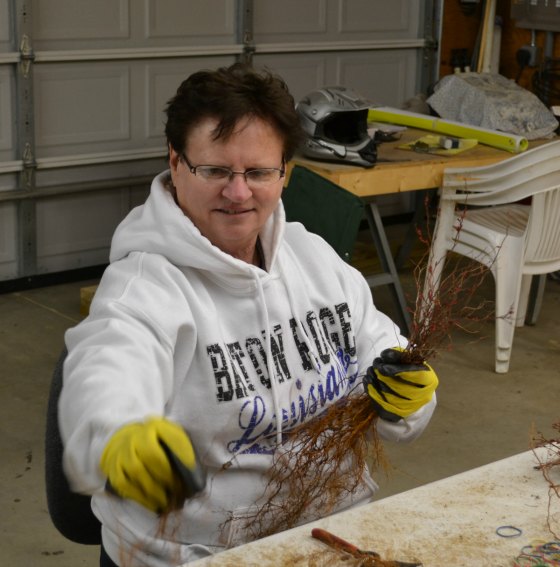
Do not look at Pam’s hair!
Makes no sense to do your hair if you are going to work in the nursery right? But when I whipped out the camera she wasn’t all the pleased being the model. So don’t look at her hair okay? Girls!
But she’s pretty happy, our fifth grandchild was born while she was doing these cuttings!
So instead of looking at her hair check out the bundle of plants that she is putting together. Wildly roots, wildly tops.
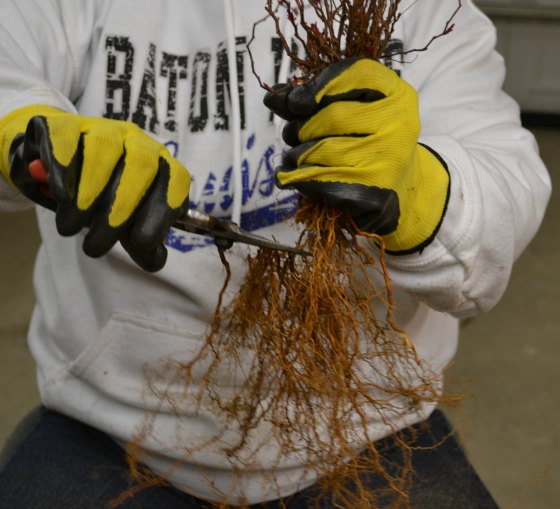
Root Pruning.
As you can see, we are doing some serious root pruning on these rooted cuttings. It’s much better to cut them rather than have them all bunched up in a ball in the container when you pot them. Pruning them stimulates new root growth, encouraging the plants to quickly establish themselves in the container once potted.
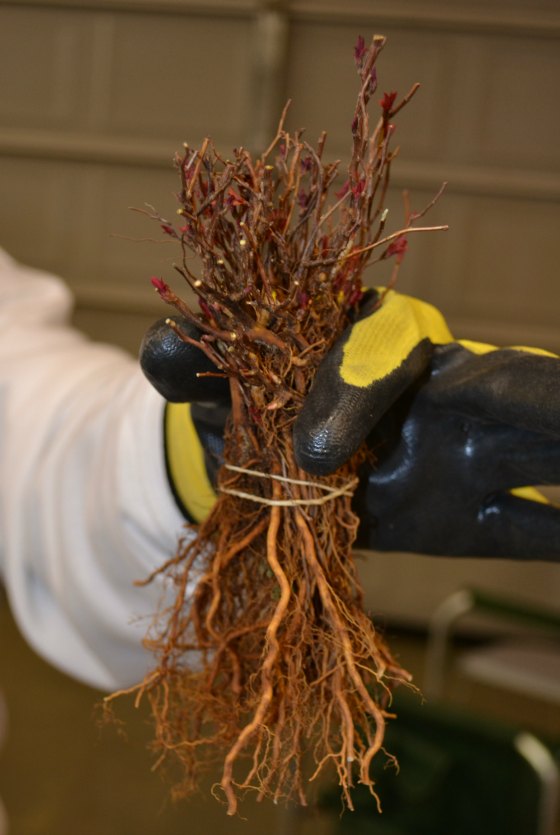
Rooted cuttings, trimmed and bundled.
The finished product!
All trimmed up, both top and bottom! As you can these Gold Flame Spirea still have nice, but trimmed roots and we have cropped the tops pretty close. Trimming the tops is really important. That’s what makes for nice full plants. You have to trim them hard when they are small.
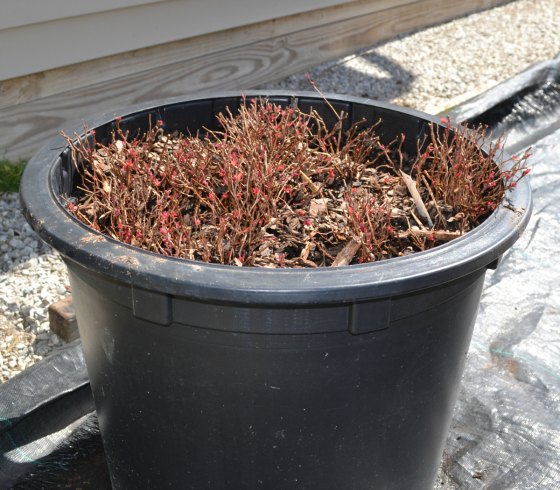
Rooted cuttings heeled in.
Into the bucket they go!
Once the rooted cuttings are bundled and trimmed we put as many bundles as we can fit into a large nursery pot and cover the roots with potting soil and keep them watered until we can pot them. Doing all of this ahead of time makes potting a breeze for all of these reasons
- When we have a few minutes or an entire day to pot we don’t have spend time removing the cuttings from the beds and trimming them.
- I am building a New Potting Station Up Front where customers enter the nursery. That way we have work to do in between customers.
- Any and all trauma that the rooted cuttings might experience in the process happened while dormant. In these pots they will leaf out but we won’t leave them there long enough to root in. Moving them from the big pot to individual pots will be a harmless transition for the plants.
- We can pull as few as just one of cuttings to pot instead of hundreds that might dry out when a customer shows up and we have to leave the potting station.
There you have it, lots of important tips about when and how to remove cuttings from the sand propagation beds.
Hi Mike,
I have a question about potting the roots after they come out of the sand after a few weeks. This will take us into the fall. Can I pot the roots (Quince and Forsythia) directly into a pot and leave them outside for the winter until next spring? I do not have anywhere to make a larger bed, They would have to be individual pots. This is my first attempt as I am a newbie gardener.
Paula,
You could but waiting until very early spring might be the better option. Do half and half and see which works best for you.
Mike,
I tried cuttings from a Crepe Myrtle for the first time and successfully got one to root in sand. It is budding now, but I don’t know when to replant it in potting soil. Should I leave it in the sand until spring or pot and prune now? Should I leave the pot in the house or keep it outside this winter? I live in zone 6B.
Thanks
Dave,
I’d leave it until early spring, outside for the winter.
Okay, I currently have it in a bread pan with sand sitting on the window sill. Would it be alright to leave it in the pan and move it outdoors this month when the weather cools a little? Next year I will use your outdoor sandbed method. Thanks so much for your help!
Dave
Dave,
The bread pan needs lots of drainage holes. When dormant I’d simply plant it in the ground.
Thanks so much Mike!
Dave
Hey Mike! Been enjoying your YouTube videos for a while and am currently rooting a bunch of things using your sand method.
Per the method, I have maybe 2 to 4 leaves left on a 6″ stem, but after about two weeks all the leaves fall off. I’m afraid to pull and see if I have any roots yet.
Is it normal for the leaves to fall off?
Chris,
I guess it depends what you are rooting and when. Typically with softwood cuttings, done in late spring, you need the leaves to stay on. But hardwood cuttings done in winter or late winter, you don’t need leaves. Spring is coming so get ready for softwood cuttings, see this http://mikesbackyardnursery.com/2015/01/easy-summertime-plant-propagation-techniques-can-home/
Dearest Mike,
YOU ARE AWESOME!! Seriously, you are a Fountain of Knowledge and so generous with it, thank you very much. My question is, I have willow cuttings, purple sand cherry cuttings, and other
hardwood cuttings that have rooted and are growing indoors. Are they doomed? I wasn’t able to get them right in the sand like I wanted, hence the growth. The new growth is only around 4 to 6 in tall, and the roots are about 1 to 2 inches long. I’m worried about them. Please tell me they will be alright. Thanks so much!
Kimberly
Kimberly,
At this point you have to keep them inside until mid spring when danger for freeze is past. Until then you’ll have to make sure they have enough light.
Can Helebours be hard wood rooted?
Jack,
My guess would be no. Softwoods or division.
Mike, I took some cuttings from a neighbors who moved and left many Arborvitae’s they were beautiful before they left but I don’t know if I took cuttings from them too late or not, when I was cutting some cuttings from them I noticed that they were starting to dry, was this too late of a decision to take cuttings from them or not, it was very late summer when I took those cuttings and I put them in sand as you have directed in your earlier videos, and I kept them moist but not soggy I noticed that they started to root but only a few of them upon checking to see if they would give some resistance which they did I started to pull and noticed two had a fungus on them which should not of happened as I vented the bag as you have instructed to do on your videos, did I do something wrong here or because they started to die before I took the cuttings from the host plants, I am confused; they did start to root and a few were ready to move to pots and I did as I say vent the bag
Darrell,
We do Arborvitae in August when the temps are still warm to keep the rooting medium warm. They can be done later, but the bag method has it’s downsides and one of them is too much humidity. We do everything like this with great success; http://mikesbackyardnursery.com/mikes-plant-propagation-kit/
My name is Bob Bales from Montana. I have to grow a cutting from my clematis which is in full bloom right now. A beautiful almost solid display of purple blossoms 12 feet high. If I am not successful I will lose face with my girl friend who wants the same display at her house.
Is it too late for cuttings now? Do you have to use sand? How about rooting hormone?
Bob,
You can do them now, yes use rooting compound, a well drained potting soil mix should work. See this; http://mikesbackyardnursery.com/2015/01/easy-summertime-plant-propagation-techniques-can-home/
In a 100 mile radius of Kansas city, where is an operation such as you advocate,where i could pay a visit? Your videos are great, however, I want to see the real thing. Please reply to my email address,
I have a habit of losing things on the laptop. Thank you. Cap Carl
Carl,
Best thing for you to do is invest $7.00, test drive our members area and meet people from all over the country including your area. But I can’t share that information here and I don’t do Email, I don’t even go to the office.
Hello Mike! I live in New Mexico, & I came across your videos and website while searching how to grow more plants in my area. I love live in a low valley & nothing but weeds. Pines, safe, cactus, & few select trees grow. Couldn’t honestly tell you what kind of trees they are. But it is close to Halloween now, so is there any way I can propagate clippings from a few of my trees now? I don’t like the barren look around my property as I am from Michigan where there is lots of greenery. Please let me know if anything can help me out.
Amanda,
We are coming up on hardwood cutting season so lots of things can be done that. But if you intend to later sell these plants you really need to read my rant, it’s really important. For years and years and years this has been my rant;
http://freeplants.com/rant.htm
This about doing hardwood cuttings. http://mikesbackyardnursery.com/2015/01/easy-winter-time-plant-propagation-can-home/
Mike, I am about to give cuttings a try. I am in Utah and it is the end of August. I have all the supplies for the tub/plastic bag/sand rooting bed option, but I live in an area without shade. I have no area on my 2.5 acres where I can count on shade for the entire day. Can I put the tubs, covered in plastic bags, in my garage? It’s plenty warm in there but there isn’t much light unless I open the doors and window blinds.
Also, should I be prepared to move these cuttings from a tub to a rooting bed? How long until burning bush and juniper cuttings would be ready to pot if cut today? Once they are potted, how long until they are ready to sell? I”m trying to get an idea of what kind of timeframe we are looking at until we can advertise plants for sale.
Thank you!
Alisa,
I want you to be successful at this but your timing is a little off for the plants that you are considering. Yes, they should be fine in the garage until fall, then uncover them and just place them outside, uncovered in a protected area. Burning bush root really easily in June, but it still takes about 6 weeks for them to root, then they are relatively slow growers. Same for Junipers. Junipers done now might not be rooted until next August.
Other plants are much easier. Especially flowering shrubs. See these two links for sure since fall is approaching and keep in mind, in our members area you can buy all kinds of unrooted hardwood cuttings during the fall and winter months. http://backyardgrowers.com/join
Summer: http://mikesbackyardnursery.com/2015/01/easy-summertime-plant-propagation-techniques-can-home/
Winter: http://mikesbackyardnursery.com/2015/01/easy-summertime-plant-propagation-techniques-can-home/
21 Plants that are Easy to Grow and Sell Like Crazy
The following 21 plants are really easy to grow and they sell like hot cakes. They always have been really good sellers and they always will be really good sellers. And this list is just the tip of the iceberg when it comes to plants that you can grow and sell that people want to buy.
1. Forsythia
2. Red Weigela
3. Varigated Weigela
4. Pink Flowering Weigela
5. Red Twig Dogwood
6. Fragrant Viburnums
7. All Flowering Viburnums
8. Potentilla
9. Dappled Willow
10. Pussy Willow
11. Daylillies
12. Hosta
13. Huchera
14. All kinds of Perennials
15. Armeria
16. Boxwood
17. Japanese Hollies
18. English Hollies
19. Rhododendrons
20. PJM Dwarf Rhododendron
21. Hydrangeas
22. Rose of Sharon
23. Dwarf Alberta Spruce
24. White Dogwood trees
25. Chinese Dogwoods
26. Blue Rug Juniper
27. Gold Flame Spirea
28. Gold Mound Spirea
29. Ornamental Grasses of all kinds
30. Crimson Pygmy Barberry
31. Rosy Glow Barberry
Okay, that’s 31 and I could go on forever.
Here are some plants for warmer zones, 8,9, and 10
Fragrant Tea Olive,
Gardenia,
Camellia,
Azalea,
Jasmines
Palm trees
Tropical Hibiscus
Burgundy Chinese Fringe Flower
Bogainvilla
Owari & Hamlin Oranges
Satsuma
Kumquat
Azalea (out the wazoo down here)
Crepe Myrtle (ditto)
Lilies
Camelias
amaryllis
hybrids such as Blossom Peacock and Papillo
Japanese Pieris
Satsuma’s
Star gazer lilies
Crape Myrtles of all kinds
Gardenia varieties-evergreen
Azalea varieties-evergreen & deciduous(native)
Camellia varieties-evergreen
Fragrant Tea Olive-evergreen
Nandina varieties-evergreen
Loropetalum/Chinese fringe flowers
Chase Tree
Abelia -so many new exciting varieties -good for zones 6-10!
Viburnums
Daphne
Cleyera-evergreen
Burning Bush/ Euonymus varieties…
Spirea -especially Bridalwreath, Little Princess, Goldmound…
Butterfly Bushes
Jasmines (vines-Carolina, Confederate)
Confederate Rose
Lady Banks Rose
Anise (check out Florida Sunshine)
Holly-Soft Touch/Sky Pencil/Youpon/Burfordii….
Crape Myrtles
Japanese Magnolias(Saucer, Betty, Royal Star…)
Southern Magnolias
Dogwoods
Red Buds
Japanese Maples
Evergreen hedge trees/shrubs
Leyland Cypress
Murray/Arborvitae
Japanese Cedar(cryptomeria)
false cypress(Chamaecyparis…)
Junipers-Blue Rug, Sargentii, Blue Point,…
Trees:
Chinense Pistache
Fruitless Mulberry
Weeping Willow
Live oak
Red oak
Catalpa
Vitex (or Chaste Tree)
Desert Willow
Shrub:
Nellie R Stevens
Wax Myrtle
Red Tip Photinia
Korean Boxwood
Radicans Gardenia
Loropetalum
Yaupon Holly
Perennials:
Salvias
Sedums
Butterfly Bush
Reeves Spiraea
Van Houtti Spiraea
Vines:
Honeysuckle (coral)
Crossvine
Star Jasmine
I know this is an older post, but perhaps you will see this anyway. I just want to say that I am continually amazed at how willing you are to share your gardening knowledge. I am SO glad my sister told me about you!
Just reading your posts is inspiring. You’re a great guy, Mike, and like so many others have said, Thank you, Thank you, Thank you!
Judy,
You are welcome. I appreciate your kind words.
Mike,
My name is Ray Shields. I joined the BGBC for a month back in April. I watched many of your videos and read many of the posts. I wanted to see if I could root some soft cuttings before going even further with the program. I proceeded to construct two containers I would use for rooting. One is a small fish tank type as described in one of your videos … I use this one for smaller perennial cuttings. The other is about 4×5 cover by a pvc and plastic structure. Both use a coarse sand as growing medium. Both are located in fairly shady areas of my property.
I live in northern VA so I took my soft cuttings around mid May. I dipped the cuttings in rooting solution for 5 min and then stuck. Occasionally checked over past 3 weeks to ensure they were not getting dry. I thought I was doing everything right.
Unfortunately, as you can see from the pics…. The cuttings do not seem to root. The look good for first two weeks but then show signs of browning and then fade completely.
I have tried cuttings from various perennials ( salvia, catmint, phlox, and lavender, etc ) and numerous shrubs ( spiraea, sweet spire, shamrock holly, cherry laurel, burning bush, etc) that are in my garden.
I can send you pics directly if that will help. I am a bit frustrated … What am I doing wrong?
Would appreciate you advise.
Thanks
Ray Shields
[email protected]
Ray,
I cannot review pics here, that’s what the members area is for. You might have been a little early, but not that much. Trust me, this works great if you get it right. Most of us use this system because it is so predictable. http://mikesbackyardnursery.com/mikes-plant-propagation-kit/
I guess I was thinking that one of three things might be going wrong:
1. I am using the wrong root simulator. I am using a 4-10-3 product call Root & Grow. I let them sit in the diluted solution for about 5 minutes before sticking.
2. The cuttings are getting too warm… While I have them in a shady area… they do get some morning sun. In Northern,Va we go from 60s to 90s in one day.
3. The cuttings are drying out…. I go check on them every other day or so but only water when the sand appears to be getting dry. I do not have the watering system that you do.. Should be thoroughl soaking the sand each time or just misting to get the plants wet?
Thanks for helping me
Ray
Ray,
You might have taken your cuttings too early. I hope to start cuttings next week, June 6th. The rooting product is probably okay but something with zero nitrogen like Dip n Grow would be better. But the sand in your set up should never really get dry because what you need is very high humidity all the time. The method you are using works, but http://mikesbackyardnursery.com/mikes-plant-propagation-kit/, is far more predictable. Which is why I did this post a few days ago, http://mikesbackyardnursery.com/2016/05/its-all-about-arithmetic-and-believing-in-you/
When I water cuttings in a set up like yours I soak the sand so it can’t pull moisture from the air and I water them daily if not twice a day.
Hi Mike,
We’re having a similar problem here in upstate South Carolina. We took about 200 +/- japanese maple cuttings, kept them in the plastic bag covered moist sand filled container. We used a rooting compound, took the cuttings on June 23rd, checked for moisture level every few weeks, they look great, but recently pulled some to check for roots and there are none. We were quite puzzled and a little sad. What are your thoughts?
Cheryl,
Japanese maples are rarely done by cuttings. Even if they do root they don’t typically do well. Most are grafted on to seedlings. You tackled one of the most difficult of plants to propagate.
Mike,
My name is Ray Shields. I joined the BGBC for a month back in April. I watched many of your videos and read many of the posts. I wanted to see if I could root some soft cuttings before going even further with the program. I proceeded to construct two containers I would use for rooting. One is a small fish tank type as described in one of your videos … I use this one for smaller perennial cuttings. The other is about 4×5 cover by a pvc and plastic structure. Both use a coarse sand as growing medium. Both are located in fairly shady areas of my property.
I live in northern VA so I took my soft cuttings around mid May. I dipped the cuttings in rooting solution for 5 min and then stuck. Occasionally checked over past 3 weeks to ensure they were not getting dry. I thought I was doing everything right.
Unfortunately, as you can see from the pics…. The cuttings do not seem to root. The look good for first two weeks but then show signs of browning and then fade completely.
I have tried cuttings from various perennials ( salvia, catmint, phlox, and lavender, etc ) and numerous shrubs ( spiraea, sweet spire, shamrock holly, cherry laurel, burning bush, etc) that are in my garden.
I can send you pics directly if that will help. I am a bit frustrated … What am I doing wrong?
Would appreciate you advise.
Thanks
Ray Shields
Mike, what can I do to keep my plants looking good if I dig and potted them now? I have some 2 yr old spirea, weigela that I need to get potted for a town wide market May 21. I had surgery with a 6 weeks recovery that has kept me stationary. Will the plants look good by then if I pot them tomorrow (storms today)? Thank you so much for your invaluable help.
Terry,
If you have to dig them out of a bed of sand and they are rooted into the ground below, chances are they are going to suffer. If you can move them without damaging roots they should be fine. Pot them and put them in the shade and water well. If you think they might suffer, do just a few to see how much they wilt down.
I stuck some sticks in a pot and soaked the soil and put them in a trash bag in the shade to keep the moisture constant. One thing I noticed was that, as the soil never dried out, the sticks started to bloom and grow, but then due to the heavy, constant moisture a fuzzy mold began growing on the sticks. I don’t know if that is good or bad, but I opened the bag to release some of the moisture, but then the soil dried out and they died. How do you prevent the mildew or should I even care to? Will that mess up the rooted cuttings? My understanding after reading a lot on your site is that the soil needs to be constantly moist, but without an intermittent watering system, all I had was the wet soil in a closed bag model. In your quick and dirty guide to getting rooted cuttings, you stuck them in wet sand and stuck them in a bag and said to stow them away. Do you have to do anything to that container or just let it stay closed up till it roots?
Michael,
In a closed bag sand might be better. Mold/fungus is not good and it will ruin your cuttings. In the perfect world, http://mikesbackyardnursery.com/mikes-plant-propagation-kit/, they get air flow and moisture. It makes all the difference in the world. More here; http://mikesbackyardnursery.com/2015/01/easy-summertime-plant-propagation-techniques-can-home/
Looking to propagate Lombardy Poplars, can I successfully do this from cuttings?? How long might this take? It is springtime, and trees with which I’d like to take cuttings are just now budding..
Todd,
Your timing is terrible. Lombardy poplar can be grown as cuttings but that season is just now coming to a close. Try some anyway, it’s likely to work. See this http://mikesbackyardnursery.com/2015/01/easy-winter-time-plant-propagation-can-home/
I was afraid you were going to say that… Thanks anyway Mike for your time…
Hi, Mike. Is there a basic “budget” programmable timer you would recommend for use with a small sand prop bed? I don’t have the budget or Physical ability to go large-scale, just a small “hobby” setup to stretch our modest landscaping budget. Maybe we can try this on a larger scale if our “little experiment” works out. I see all kinds of timer options on Ebay and other sites, but choosing the “right one” seems a bit daunting. Is there a minimum number of spray intervals that would be acceptable? Thanks much!
Kevin,
I don’t make timer recommendations because we sell the equipment along with instructional videos here; http://mikesbackyardnursery.com/mikes-plant-propagation-kit/. If you start out with the right equipment, it will work. No doubt about it, with this system cuttings are super easy to root. Other methods? They work, but not really on a predictable basis.
Wow…..Thanks for this!
I unthinkingly threw out my Osmocote bag from last season and now I see many types available!
What kind do I get?
And….what is the brand/type that you recently said is cheaper than Osmocote?
Can you propagate dogwood trees? How?
Janice,
White dogwood trees are typcially and fairly easily grown from seed. Pink dogwood trees the other types of dogwood trees are grafted or budded onto a white seedling. Online they sell “pink dogwood” trees. This is a complete farce in my opinion. The chances of you getting a pink dogwood from seed are probably one in a million.
Have you taken root cuttings from a “Paper Bush”?
Any advise would be appreciated.
I live in Greenville SC (upstate south Carolina)
Rod,
I have not but how to go about doing so is described here http://mikesbackyardnursery.com/2015/01/easy-summertime-plant-propagation-techniques-can-home/
Looks like those rooted cuttings are in full sun. Are they protected by some type of screen during the day? I believe I heard this on one of your videos that they needed to be in a shaded area.
Rennee,
It really depends on the climate you are in. If you are in a really hot place like Alabama or Texas then yes, you should provide some shade for your cuttings. I’ve used shade then last year I did not and it worked fine. However, we are here all day during the summer and beside the propagation system you see here, http://mikesbackyardnursery.com/mikes-plant-propagation-kit/, we also run sprinklers on the cuttings during the heat of the day for a few minutes during the really hot times of the day. So in short, some temporary, rigged up shade can help and does give them some protection, especially if you are not around during the day.
Thanks Mike I was surprised that you answered right away — or at all. I’m really looking forward to tomorrow and signing up for the club. I live in St. Louis, MO and it gets pretty hot here in the summer so I guess I do need to rig up some type of shade protection.
I know you offer the club membership on a trial basis for $7. What if you do that and you then want to join the club — is the $7 subtracted from your $67 monthly membership? If not — I would like tomorrow to just sign up for the $67 for 9 month program.
I have many questions and would like to jump right in with the forum of members.
Thanks again for taking the time to answer my question.
Rene,
No, the $7.00 is not subtracted that covers the first 30 days. Since the payment system is automated we can’t change it. That’s why we offer a discount for those that want to pay it all up front, but we really only have those two options. Trust me, in the long run that $7.00 plus the 9 payments will be the best money you ever spent if you are serious about this. We have members who have sold tens of thousands of plants in our members area. You’ll be amazed at how quickly many things sell out.
Do I have to wait to pay tomorrow? Can I start today!
Also my biggest fear is the message board being sold out — sold out — sold out alot. When deals are this great — people jump on them quickly — leaving nothing but sold out signs everywhere. I know you can’t guarantee that not happening but is this what you see alot?
Renee,
The plants in our Buy/Sell Area, http://backyardgrowers.com/join, do sell out quickly but they are always replaced with another offer from a different or the same seller. $997 offer is on this page, http://mikesbackyardnursery.com/2015/10/backyard-nursery-tools-of-the-trade-things-to-turn-you-into-a-successful-grower/
What is the discount for paying it all upfront? I just saw $999 for the entire thing minus $200 it said. Is that what you are talking about?
Renee, the offer on this page is $997 after the discount has been applied. This is a $1,200 value.
I like your posts. Knowledgeable! Common sense! Entertaining!
I do grapevines.