 Saving seeds to use for the next year’s garden is not difficult once you understand the process. As more people turn to gardening to supplement their food source, saving seeds is a great way to save money and eat healthier.
The following is a step by step guide to saving seeds for beginners.
Selecting the Plants
The process starts by selecting the best plants from which to gather seeds. Some plants are easier to harvest seeds from than others. Lettuce, peas, peppers, beans, and tomatoes are all good choices for beginners.
These plants each have self-pollinating flowers. This means that the seeds from these plants will need very little treatment before they are stored. Seeds from self pollinated plants will also produce plants exactly like the parent plants.
Eggplant and Endive also produce seeds that are self pollinated.
Many plants have male and female flower parts. Making sure that the pollination process is not contaminated is trickier. Some plants are also pollinated by the wind or insects.
Melons, pumpkins, and cucumbers can be cross pollinated by insects and are also more difficult for beginners. Selecting seeds from hybrid plants may work, but the new plants will not be exactly the same as the old ones.
The new plant will be a new combination of various good and bad traits from the original plant. Whether you plan to save seeds from plants that self pollinate or not, be sure to select seeds from the best tasting fruits and vegetables.
Harvesting the Seeds
Once the best plants have been selected, the next step is harvesting the seeds. This step must be done at just the right time and in the proper way. The following are instructions for harvesting seeds from a variety of plants.
1. Peppers
Peppers are probably the easiest seeds to save and a good place for beginners to start. When saving pepper seeds wait until the pepper is fully ripe, even a bit wrinkled, before harvesting the seeds.
Cut the pepper in half. The seeds are located on the center stem. Lightly brush the seeds to remove them from the stem. Individually separate each seed before letting them dry.
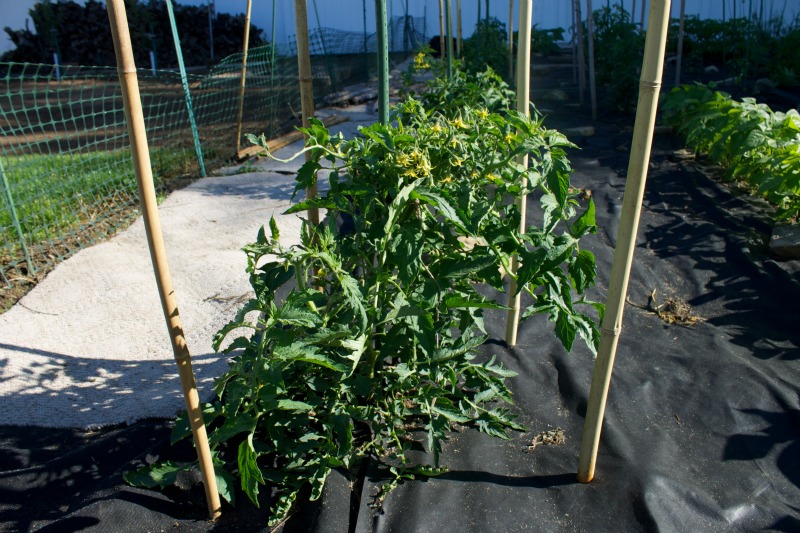
2. Tomatoes
 When saving tomato seeds use seeds only from fully ripe tomatoes. Then make sure to scoop out all the gel and gooey material surrounding the seeds. Put the gooey mixture along with the seeds in a glass container.
Add some water to the container and swirl it around a few times each day. This mixture will ferment in less than a week. The process is complete when the seeds sink to the bottom of the container.
All of the bad seeds and gooey material will stay on top. The seeds can then be rinsed off and left to dry. Rinse the seeds several times to make sure all the residue has been completely washed away.
Place the seeds on a screen or glass plate. It can take several weeks for the seeds to fully dry out. Cucumber seeds must be fermented in the same way to properly prepare them for storage.
3. Beans and Peas
Bean and pea pods should be crusty and brown before harvesting. This means you will harvest beans and peas to save the seeds several weeks after you would harvest them for eating.
Place the seeds on a screen or woven basket. Stir them every few days. When they are completely dry break open each of the pods and store the seeds.
4. Lettuce
Try to save lettuce seeds from a variety of plants. This way you will get diversity in the type of plants you will grow from the seeds the following year.
Some plants are naturally more resistant to excessive rain while others will not survive a rainy season. Some plants are more resistant to excessive sun and heat while others will wilt if it’s a very hot summer.
If you save seeds from only one plant and get a very wet or very hot summer you may lose your entire crop. It is essential to save seeds from a variety of lettuce plants and not rely completely on one type.
A stalk will grow from the top of each lettuce plant. This stalk will eventually turn into a flower and self pollinate. It will then turn into a puff ball similar to what dandelions turn into. It is now time to collect the seeds.
There are several ways to do this. The easiest is to grab the white puffs in your fingers and pull them out. The tiny seeds will be at the end of the puffs. Put the puffs with the seeds at the end in a container.
During the next several days shake the container. When the dried lettuce flower cracks open, the seeds will come out. The seeds are then ready for permanent storage. Keep the container in a cool, dry place.
5. Melon
Keep in mind that several varieties of melons will cross pollinate. Be sure to plant only one kind of melon in your garden if you’re using any for seeds. Pick melons when they are ripe.
Let them sit inside for a day to two so the seeds can mature further. Spoon out the seeds and wash them in water. Pour melon seeds and water through a screen. Let the seeds dry out on the screen.
A screened in porch is a good place to let the seeds dry. They need to be in a place under a roof and protected from the elements but still exposed to a little wind.
If they are left to dry inside, keep them in a breezy area with the windows open. Make sure there aren’t any mice in the area where the melon seeds are drying. Mice will eat melon seeds.
Storing the Seeds
Make sure the seeds are completely dry or they will most likely rot during storage. Seeds that move easily and don’t stick together are usually dry. Heat and humidity will destroy even the best seeds.
Store the seeds in airtight containers. Glass containers are usually best. The seeds may be put in a paper envelope within the glass container. Keep the seeds in a dry, cool area.
One way to keep seeds dry is to put a couple tablespoons of dry milk wrapped in facial tissues in the bottom of the same container as the seeds. It is recommended to replace the dry milk about every six months.
It is also important not to store seeds in areas that may come in contact with sunlight. This means they should not only be stored inside but in areas away from windows.
There are lots of ways people store their seeds. They can be kept in plastic baggies in the refrigerator. Seeds can also be stored in paper envelopes that are kept in shoe boxes.
If there isn’t room in the fridge, storing them in a dry basement is a good idea. Pepper, tomato, and lettuce seeds are extremely small and may need to be kept more carefully than other seeds.
Washed out vitamin or pill bottles are good ways to store these smaller seeds.
Make sure to label each container with the specific name and the dates they were collected. Most seeds will be good for several years if harvested and stored correctly.
Some seeds like onions, chives, and parsley are only good for one year.
Using the Seeds
When you’re ready to plant the seeds remove them from the fridge or basement. Allow the entire container to warm to room temperature before removing the seeds.
If the seeds are removed too quickly condensation may cause the seeds to clump together. No matter how well the seeds are stored not all will survive.
Test the quality of your seeds by trying to germinate a few in a moist paper towel. Spread the seeds out evenly and then cover with another damp paper towel.
If the seeds are healthy they should break open within a week. As soon as the seeds have broken open and growth has begun the seeds can be planted.
How would you plant Peach & Plum seeds ?
Thomas,
I’d plant them in fall and let them stratify over winter. Outdoors.
Mike,
Thank you for all of your advice and videos. I have learned so much. I live in Houston Texas and have a very small veggie garden. So far it looks like we will have a good crop of tomatoes, bell peppers, squash and potatoes.
Thanks again.
Debbie
You’re welcome Debbie. Happy growing!
mike or anybody, i have always had a passion to start my own nursery and in saying this i have always been an excellent green thumb @ growing by cuttings/ dividing ect… i have always wondered about hosta seeds? can a person save the seeds n will they grow? please let me know ASAP. I HAVE A BUNCH DRYING AND AM WANTING TO KNOW IF IM WASTING MY TIME???
If a plant has signs of fungus can you still use the seeds?
Sam, possibly, but I’d prefer to collect seeds from a healthy happy plant.
Like Mike said is best, maybe even some resistance in the healthier plants.
If you have to save seed from fungus infected plants a quick dunk in 5-10% bleach should help prevent the fungus from carrying over to next season. Rinse them off, dry thoroughly and store in a cool dry dark place until next Spring.
We save Southern Field Pea seeds and it saves a bundle! Have seeds to share with anyone. Just for the cost of mailing.
my taters didn’t come up good this year either.
Thanks for the useful info. I just started my garden. Beets came up, taters didn’t.
Mike I love all your posts and truly appreciate that you are generous enough to share so much information with us. Love this one about saving seeds…very good tips. Thanks.
Thank you for all your posts and e-mails they are always timely. Do you save seeds from arugula? I find they just keep coming up and although I love it it’s not always staying where I want! I’ve been trying like you to loose weight and it seems the more bitter greens I eat in the morning the better I do all day. Arugula is my favorite- I can even eat dandelion greens with them.
Love reading your newsletters and helpful hints.
Some great tips, Mike!
I’ll share one of my little tips: I always save those little silica packets that come in shoe boxes, purses, etc. and place them in the jar with my envelopes of seeds to keep the moisture away. They last for years!
I use those too. You can also recharge those in a warm oven, check my seed saving video on YouTube.
Do you plant the seeds that you have sprouted in the paper towels or just the remaining seeds?
Leona,
Just use tweezers to pick out the sprouted seeds and carefully plant them making sure to not plant then too deep.