Last week I realized that I need a couple of portable sprinklers that I could easily move around but they had to be high enough to clear small plants so I would get good coverage. Those tripod sprinklers that you can buy are nice but they are expensive, and I had some that were made of steel piping that rusted on the inside and completely plugged up the stand to the point it was worthless.
So I got to thinking. Usually not a good thing, but I have a lot of used nursery pots and a big rock pile that we keep adding more and more rocks to. So I combined all of those ingredients, added a little concrete and some PVC piping and my problem was solved.
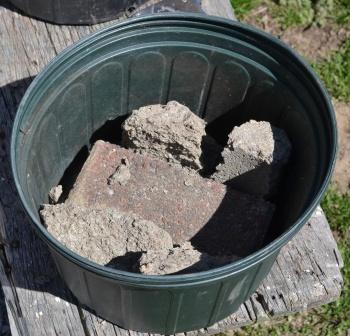
Step 1. Put some rocks, bricks etc. into the bottom of an old nursery container.
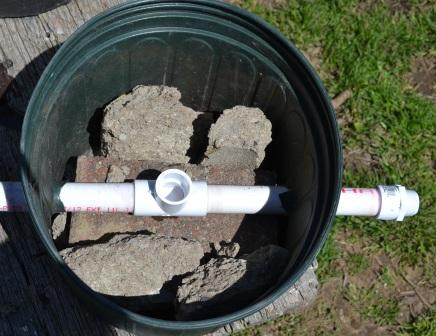
Step 2. Put a hole or two in the side of the nursery container. I just made a slit with my knife then using a small torch I softened the plastic and pushed the PVC pipe through the plastic container. I probably didn’t need to warm or melt the plastic but it was a good reason to play with fire.
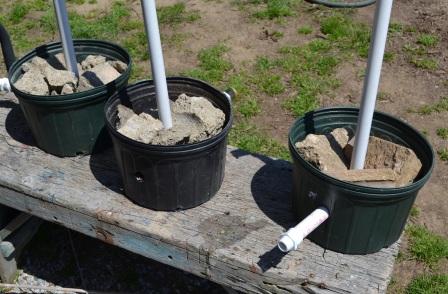
I made three sprinkler stands. This one I put a Tee in the middle of the pot so I could actually hook a hose to each end so I could run two sprinklers on the same hose connection. Usually a garden hose will only supply two of these oscillating, impact sprinklers.
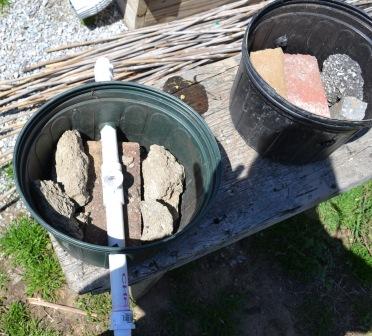
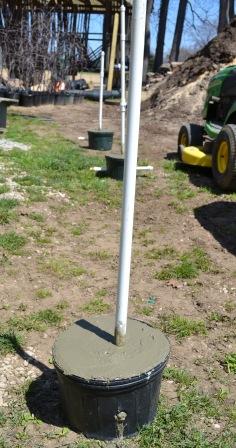
Step 3. After I had the PVC pipes in place I put more rocks or brick pieces on top of the pipes filling up buckets almost to the top. Then I added some ready mix concrete to hold the whole shebang together.
As you can see here after I put the holes in the pot I decided to put an elbow on two of these instead of a tee so I’d only have one hose connection. But these are for the nursery so a little cement dripping out the hole just gives it character. And yes, I do know this is crooked. After I got the photo (for you folks!) we moved these inside where the floor was level and make sure they were nice an straight before the concrete set up.
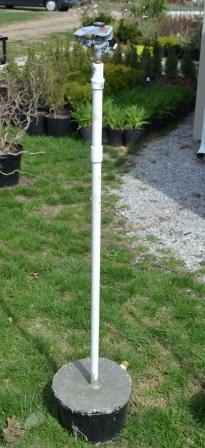
On top of these sprinkler stands I can change out the sprinkler head if I want. This is an impact type sprinkler head but I’ve also got Wiz Heads and Wobbler heads if I want a 360 degree pattern. On the ends of these PVC pipes you have to glue on a fitting that converts the PVC to a pipe thread, then onto that you have to thread on an adapter that converts the pipe thread to a garden hose type fitting. So you’ll have a few bucks tied up in brass fittings. Your hardware store has the fittings. Tell em Mike sent ya. They don’t know me but it will get them to wonderin.
So . . . what did I do wrong? Okay, I’ll tell ya.
I wish I had put one of those $4.00 fence posts in the pot next to PVC pipe. That would have supported the PVC pipe and protected it when you move it around. Had I put the fence post in, then I could just grab the fence post and carry these were ever I want them. But without it, it would be pretty easy to snap off the PVC pipe because that concrete is heavy.
In the nursery I use the fence posts driven into the ground, then I just tape the stand pipe to fence post and it works great.
But that’s how we learn things. I did it wrong, now you get to do it right.
Here’s a video I did on how my entire irrigation system is setup at my nursery…
I’m wondering, do y’all know how to work with PVC pipe? You know cutting the pipe, removing burrs and ruff edges, cleaning the PVC and gluing it? Do you know how to do all of that? Do you need a video about how to do that?
Well, is this helpful? Post your questions and comments below.
Hi Mike and Duston,
Thanks for the beautifully detailed and comprehensive automatic spray watering system.
I’ve a couple of questions: first, how do you get over the issue of overhead watering when the sun is shining (as its automatic the system won’t know the weather conditions) and second, as I have very limited space, I’m assuming your system is for the larger grower, hence your details on running a spur from the water main and bypassing the domestic supply so you have decent pressure..
I’m currently just using my domestic supply (happily not metered!) with hoses from the outside tap to take the water to each bed and attached soaker hoses for within the beds.
With thanks and kind regards,
Isobel
Isobel,
We water all day in the hot sun as do the 100 very large wholesale growers around me. It’s not an option and better than watering at night when fungal issues creep. Way too much is made of watering during the hot sun.
Cutting PVC pipe is easy enough with a hacksaw, even a sharp pruning saw, however using any kind of saw will leave rough edges that will need to be removed for a clean tight joint.
The best tool is a PVC pipe cutter, readily available at any hardware store, and not very expensive. The blade is very sharp, usually stainless steel, and when properly closed is shielded to avoid any accidental injury. Properly cared for they will last a lifetime.
Regarding the use of PVC pipe, there are numerous types, sizes, and fittings available, and your local hardware or plumbing store rep will be more than glad to help you in selecting what will work best for your project. Note that for any pressure usage, the joints will ALL have to be glued. ALWAYS use a PVC pipe primer (usually purple), and the proper glue after the primer has dried (just a few minutes). There is a special ‘blue’ glue for potable water, not necessary if only for garden use.
You could use ABS pipe for the stand pipe, AND handle, as ABS is black with a thicker wall, much more resistant to breakage. It is a bit more expensive, but will withstand years of sunlight exposure where standard white PVC will eventually break down and require replacement. Note that standard PVC pipe is intended for underground and enclosed use, however some stores also carry a UV resistant type for above ground/exposed use.
The most common pipe sizes are 1/2″ and 3/4″, and come in 2 thicknesses, called ‘schedules’, which are schedule 40 and schedule 80. Avoid using ‘thinwall’ PVC as it’s very flimsy, not intended for any pressure usage, and much harder to deal with as far as cutting, even with using a PVC pipe cutter! As most pipe comes in 20′ lengths, ask the store rep to cut it down to sizes you can handle in your vehicle. Some will even cut it into lengths you specify for your standpipes. Also note that in many cases, they may have some that are leftover cuts, and I’ve had great luck in getting some of those FREE with a purchase of full lengths.
Short standpipes (up to 18″) can use either ‘schedule’, but for best results always use a thicker walled pipe for any height above that.
Be absolutely sure to completely drain all water from the pipes before any freeze!
Hope this helps you all!
About gluing those PVC joints: the primer and glue comes in small cans with a ‘swab’ in each. It dries very fast, so prompt joining is essential. For both the primer and the glue, swab about 1″ around the end, AND inside the fitting with the primer first, then after that has dried, swab both parts the same with the glue and IMMEDIATELY insert the pipe into the joint using a rotating pressure until fully seated. On a warm day the joints will be fully ‘cured’ in about 8 hours, after which they will be ready for use under normal pressure. For high pressure, give them 24 hours to cure.
Of course Larry is correct in this post, but I have to share that I often glue PVC and start running water through it in a matter of minutes. Probably not the best idea, but that’s often what I do and in warm weather it holds just fine.
I was reading ur “Easy Plant Propagation “book but I can’t get to the section to buy plants from me by.
Members not me by
what about thick rebarb? if u buy a 12-20ft stick and cut it down into sections u would have $1.20 or less in each Post, then u could tie it to the pvc pop before pouring concrete. this will give u that backbone you want at a cheaper prices then $4. of course they might not look at nice and might make your hands rusty, but so will the fense post after a few months of water all the time.
Jay,
Bend the rebar at a 90 degree angle so you have a handle for moving the sprinklers around.
The guy across the street has that basic system except his is just pvc running the length of the yard with those thingies that hold the sprinkler heads every 10 feet or so. Then he runs other pvc pipe up about 2 feet with sprinkler heads stuck on them and connects the hose, and runs a timer. He never waters his front lawn at all. Comes on every night at 9pm, you can hear it.
Course it helps if you’re in the Pipe fitters Union for 30 years
Well, I made more mistakes than you did. I put my PVC pipes into the ground…Didn’t work out so well. They weren’t mobile, they didn’t stand up very long and broke off. Thanks for the video. I’ll use the pots and try this again.
Any pointers to battle low pressure? thanks…
‘Just had a thought after reading through other comments re. difficulty with moving the concreted buckets around.
When you are making the holes through the sides for the piping, you could also make another pair of holes a little further away and slide in an axle to take a pair of cheap wheels (Harbor Freight). Then all you would need to do once you have disconnected the water, is to tip the bucket onto the wheel using the fence post and wheel it to the new location. I will check at Harbor Freight and see if I can come up with a suitable pair of wheels. This might do well for the ladies who are alone and don’t have the heft to lift a bucket of concrete.
Great idea.
I will go to Harbor Freight and get some wheels because your have a very good plan for women who don’t have a strong person around to move the sprinklers around. Mike’s sprinkle system will work for me and the wheels are going to make it better.
I love all the stuff you put out Mike. Ever since I first bought the book/DVDs I have saved them and now have 124. It is very comforting to have you make the mistakes so’s we can follow on and not do the same thing. I have been reluctant to join the club before now (couldn’t afford it being retired and on a fixed income) but now I have some support so next time it is offered – I’ll be there.
Many thanks for all your enthusiasm – it generates more at this end.
Gordon
Great posted information mike, when you film your plant potting area can you tell us a little about what type of plant is growing in your containers . keep the mondays with mike posting going , we all look forward to them. frank in northern new york
Great idea about the fence post. I believe you’re talking about a T-post? I need to fix me up a couple of these. Thanks, Mike
Pam love, love the hat. You are a great woman out there helping your man and he is great for lowering the potting bench for you. I get a catch in my get a long from bending at the waste too.
Mike great info on the sprinkler heads and I love the home made stands and your honesty about how to make it better with the fence post.
I think there a lot of women out there doing the nursery by themselves who with a little direction on the PVC from you could do it without hiring someone. Thank you for all your information!
I like your homemade sprinklers. Think I’ll make one for my garden. Thanks Mike.
if you mix perlite in with the concrete, it will be lighter but heavy enuf to steady the sprinkler
Mike,
TSC carried a water sprinkler head last year that fit on top of a metal fence post. It had it’s own fitting for a garden hose. Drive the steel post in the ground, attach the hose to the coupling and fit on the top of the steel post. It looks similar to the yellow plastic caps for the farm fence posts. All in one piece and is easy to do and remove for other areas. It was also very affordable. Did a great job of spraying a small pasture area during the dry season. THe head is an adjustable head for the spray pattern. Leave the fence posts in place and move the spray head.
Just posted on another thread but was wondering if anyone knew what the gpm (gallons per minute) are on the intermittent misting system if used the way Mike says. 10 seconds every 10 minutes from 8:00 am to 8:00 pm. I only have a 165 gallon irrigation system so I need to figure out how many gallons per day I would be using. Any help with this would be greatly appreciated. I need to know if I need to upgrade to a 300 gallon sistern.
God Bless,
Lori
Hi Mike!
You know, this would probably work to make a sprinkler for the kids to run under, too! If you used a 360 degree head 1/2 of the spray circle could be for the kids and the other half could do the garden!
Hi All,
You might be able to use a piece of steel rebar to support your sprinkler. Just drive a piece of steel rebar part way into the ground and tape the upright pvc pipe to it.
Thanks and good luck,
Steve Messerschmidt
Hi Mike,
I am very interested in the things you teach. I am wondering one thing… Will your system work with houseplants? If so do you have wholesale sources for these plants? If so I will definitely be joining your excellent group of positive upbeat people.
God bless,
Jan Vafa
Redmond WA
mike; i plumbed my house when i built it an not a leak
since i did the job ( 35 ) years ago good luck.
i knw how to do a lot of thingd but am not able now to
do abnything. i sure enjoy you news an get a kick out
of some of this mail you get just keep up the good news
we may be 87 years young but i am nt too old to learn.
GOD BLESS YOU MIKE
great video again mike! That’s some farmer ingenuity there. Ducktape, baling wire and now pvc pipe in a rock bucket can fix most any problem.
I know how to work with PVC. I don’t know if you need to make a video on it since there is a great plenty of them on Youtube. Couldn’t hurt to have another one showing how to make these and work with PVC.
God Bless.
Jason
We have an older made Carport or Boat cover unit made from 1″ metal angle that is 9′ x 16′ x 7′ high with two wheels on one end so tahe it can be moved if needed.
We covered it with a free throw away white canopy which we rigged to roll up on the sides giving access to all the plants in containers on free wooden pallets in two rows inside and a 1 1/2′ walkway between them.
We call it our Biggie Hoop House! If you have access to a welder and other tools you can make your own.
I will takea photo of it if anyone is interested.
Al n Gary
Don’t know if I entered this correctly so here it is again.
Hi Al,
I for one would love to see a photo!
Jan Vafa
Redmond WA
would really like to try that. would appreciate the plans. live on a trailer lot ,sounds like a really great way to cover plants in the winter months,[numerous plants]thanks mary
Forgot to mention that we installed a 1/2″ PVC pipe down the middle ,top of the Biggie and with 6 GREEN misting heads we got from Lowe’s that just screw into the holes in the pipe.
A PVC valve at the hose connection regulates the water flow just as you want it.
I agree with everyone else about the video. Fire up that camera, Mike!
Ditto!
As always Mike, another great idea.. But I am not so good at picturing someting I hae never worked with before so a video woud do it for me. Love your site.
Bingo, just what I’ve been trying to figure out how to do. Going to Lowe’s right now to get some PVC. Can’t wait for my neighbor to say “Where did you get that”. Might even make a couple extra and sell them.
thanks for all your articles. they are always really informative. I like your sprinkler idea. I think I will make some to use in my garden.
Great idea Mike, but not at all feasible here in San Antonio and South Texas. We are about ready to go to stage 3 water restrictions which means about 5 hours of sprinkler system watering one evening per week. (Can’t sprinkler water during daylight hours cuz almost half the water evaporates before it hits the plants) Given that and the fact that our pot plants dry out pretty much daily here and you can see where that would lead. I pretty much water by hand and/or use soaker hoses for all my watering needs. I am trying drip irrigation but due to the high mineral count in our local water supply I think the tiny holes may clog up too fast with calcium deposits, but I’ll keep experimenting.
Great idea.
Just a word of caution, cover them or put them inside during the Winter, otherwise the exposed plastic may become brittle.
Mark,
Great point, when not using them keep them out of the sun and winter weather. PVC holds up pretty well, but eventually the sun will take it’s toll for sure.
Hi, Mike! It seems that the rest of these folks know what they are doing with pvc pipe, but I don’t. I use it to stake tomatoes, and various other plants around here, but when it comes to actually cutting it and utilizing it for a project, I’m lost. A video would be greatly appreciated. Thanks so much for your ongoing encouragement and great ideas!!!!
Mike
you didn’t mention that you should use a heavy schedule of pvc pipe for your upright or a brace of some kind to keep the pipe from vibrating with the impact sprinkler. maby schedule 80 or 40
Bill
Love the videos..So what size and rating PVC do you use ? 1/2″ sch 40 and what size container..3 gallon ? TY
As always Mike, your DIY blogs are timely and inspirational. PVC can be cut with anything from a fishing line or any number of hand or power saws but the best thing I’ve found to make clean quick cuts (no deburring/flying/sticking PVC chips or dust to deal with) is with a racheting PVC pipe cutter. I have one I purchased from Amazon.com (Wolerine PST002) but a similar cutter can be had at Harbor Freight for 6 bucks or less.
I use the oscillating impact type sprinkler heads that have a stake in them to stick in the ground, my upgrade is 3/4 electrical metal conduit cut in half to 5′ and then a pair of 1″ hacksaw slits to key the sprinkler into, the easy way to install the conduit in the ground is make a water jet with a piece of 1/2″ black pipe with a hose adaptor on one end, if you want to get fancy you can use a tee and a couple of pipe nipples and a valve to make a t handle and shut off at the jet. assemble the jet, stretch the hose to where you ant the sprinkler, hold the jet upright with the open on the ground, turn the water on and push the jet down to make your hole, remove the jet and insert the conduit in your hole, it will tighten up with a little time
I’ve watched and helped my husband around here doing things with PVC pipe BUT that is why I have a husband—–to do these things for me. I just have to beg a lot.
Mike,
I just found the video on misting beds:). I knew I overlooked it.Nice sprinkler stands and I agree with you that a post next to the pipe would add strength.
Mark
Another great idea! Will make a few.I do know how to work with pvc pipe- have built two of my own homes on acreage but some people who thinkthey know how to do pvc pipe don’t really (like my brother in law who didn’t do purple primer or take off burrs and had his sprinler system repair job fly apart). I think people would enjoy a video.
As it happens, I learned to work with PVC when I bought my home. I finished several fun projects with good results, just not plumbing, this is better left to the professionals.
What about Tomatoes Mike? They don’t like overhead watering, or so I’ve read. Would you drip line those, or is this new thinking which means its ok to use these stands and overhead water the entire vegetable garden?
Sue,
Lots and lots of people grow tomatoes and do not have drip irrigation. Water early in the morning that way the sun has a chance to dry the leaves and fruit. Wet leaves at night is not what you want.
I love the idea but I am afraid if I ran a sprinkler over my garden spot I would encourage the weeds on my home sweet weed farm. as it is I use a soaker hose under mulch. keeps my city water bill down too.
I don’t spend that much money. I just attach a small platform to the top of an 8 foot $2.00 treated post and attach a small based oscillating sprinkler to it with a hose attached, which i can extend with additional hose lenghths. I have old muck buckets where I stick the pole after nailing in 4 nails at the bottom for grab, dump the ready mix, add water and let it harden, while keeping the pole strait with a couple of boards set against the top edge of the muck bucket. I normally use soaker hoses, working of a somewhat complicated manifold system and the overhead sprinklers only while we go on a trip and have a friend tend to watering for a couple of summer weeks
Mike, this is a great idea! I have tio move sprinklers around, and it will be helpful to just put a sprinkler in place and leave it alone thanks, Marlow
I like this idea and I have all the materials except the sprinkler heads. Thanks!
So Mike, where is the video?? I got the picture ok, but not sure about the cutting, and finishing the PVC… Thanks for your ideas, I have looked at the standing sprinklers at the feed store, and you’re right, really expensive… Naoma
Great Idea. This is a simple idea to get the water where I want it. Thanks.
What a fabulous idea!
I tell ya, Mike, you and your readers are full of great ideas, and right on time! I’m still working my way thru the composting letters you got, and now you’ve already answered my sprinkler question! This year I’ve decided to abandon some of my drip system because the dogs have taken great pains to bring me sections of it over the winter and will not tell me where they got it. It’s a mess. Expensive too. So, overhead it is…and this should work wonderfully! Thanks!
Kaite,
At one time I thought about drip, but with a few overhead sprinklers I can cover a lot of ground. Drip is good in a flower bed where you are walking, digging or rototilling, but in an open garden I know it won’t work for me. And your dogs. Aren’t they cute?
Use a 2 wheeler, hand truck, dolly, whatever they are called in your part of the country, to move them around with if you don’t put the post or something in the bucket to carry them. Or if you are like me and beginning to get some age and don’t want to or can’t carry them.
I will definitely keep this idea in mind when I get my nursery big enough to need overhead watering.
Working with PVC piping? Yeah, I know what I am doing but I bet there are others that could benefit from a video.