Mike's Backyard Nursery

The Most Fun You Can Have With Your Bibs On!

  • Home
  • Recommended Tools
  • Products
  • Categories
    • Business
      • Backyard Nursery
      • Bestselling Plants
      • Marketing
    • Gardening Tips
      • Compost
      • Containers
      • Diseases
      • Fertilize
      • General
      • Landscaping
      • Lawn
      • Pests
      • Protect
      • Pruning
      • Weeds
    • Nurseries
    • Plant Propagation
      • Cuttings
      • Division
      • Grafting
      • Seed
    • Rural Living
    • Tools
  • Contact
  • About Mike
You are here: Home / Rural Living / DIY Chicken Waterer

DIY Chicken Waterer

Updated : November 21, 2014

10 Comments

You can create your own 5-gallon chicken waterer  for less than $5.

chicken waterer suppliesStep 1: Obtain Items and Hardware
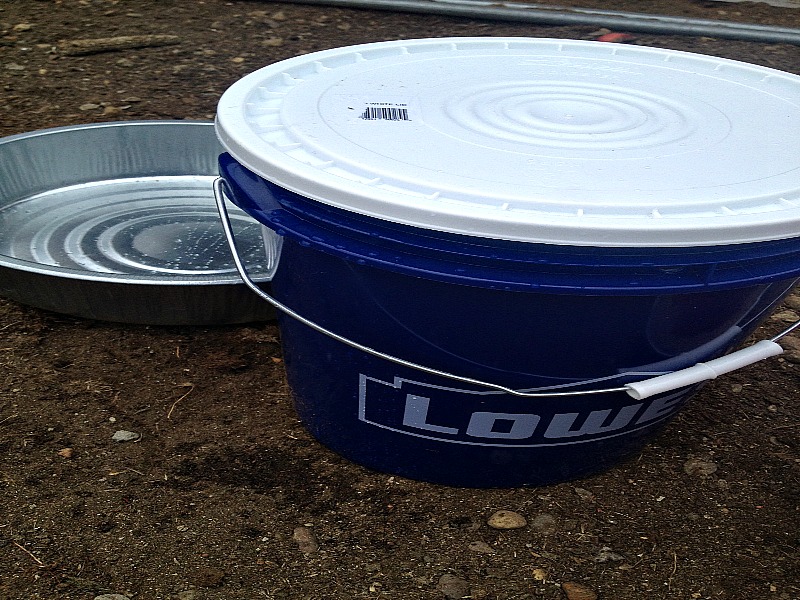
  • 5 Gallon bucket
  • 1 Gallon Utility pan-the one I used was a 1-gallon utility pan from Tractor Supply.
  • 3/8″ drill bit for drilling water holes
  • drill
  • marker
  • safety glasses

chicken waterer drill the holes
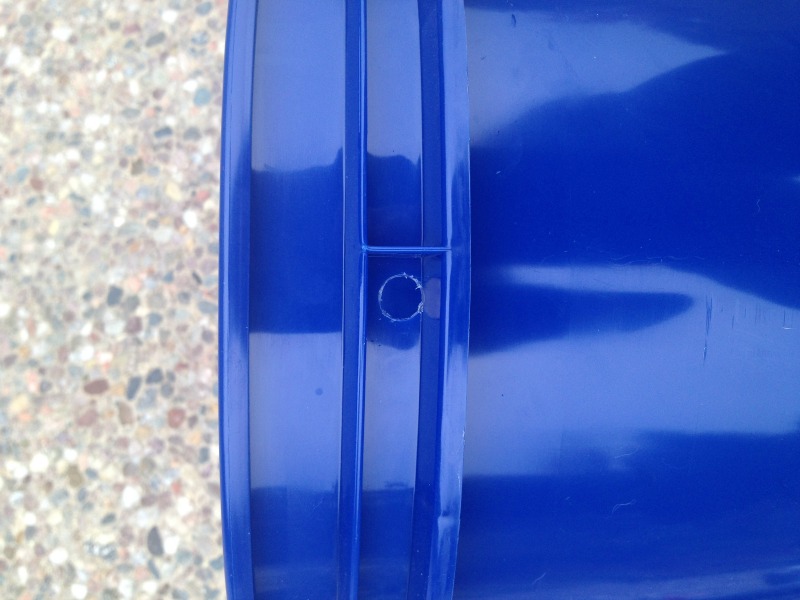
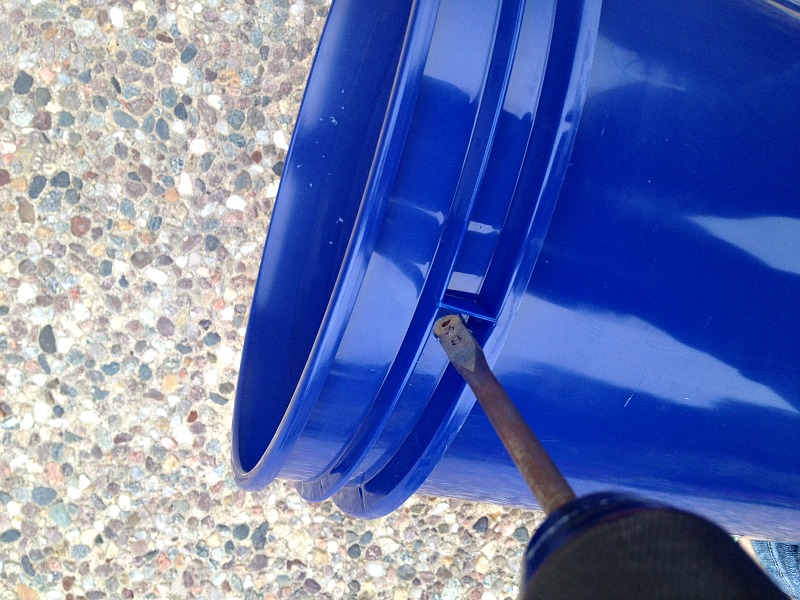
Step 2: Draw where you want the holes to be and then drill the holes

You will need to only drill two holes in this bucket near the TOP of the bucket.  One hole opposite the other one.

chicken waterer drilled hole

Step 3: Fill the bucket with fresh water

Make sure to fill it below the holes, otherwise you will wear water while walking the bucket back to the coop.  You can fill it to however full you would like.  But, remember, 5-gallons of water is pretty heavy.

Step 4: Put on the lid

chicken waterer with lid

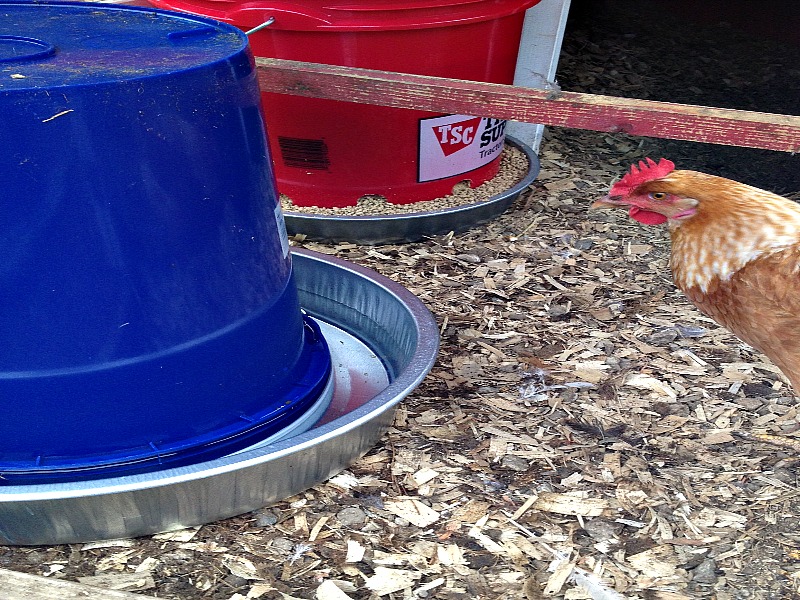
Step 5: Flip bucket into the watering pan

Flip the bucket so that the lid is on the bottom and quickly place it in the metal pan.  Water will start to come out of the holes you created in the side of the 5-gallon bucket.

chicken waterer in panThe nice thing with the smaller size holes is that the water doesn’t gush out.  It will flow nicely until the water is just above the holes and a vacuum is created in the bucket.  Just make sure to place it on a nice, flat surface.

completed chicken waterer

ABOUT THE AUTHOR:

Crystal Panek is now a stay-at-home mom (aka, a domestic goddess).   She spends her time taking care of her family, home, dogs and chickens.  She is a self-proclaimed jack-of-all-trades and loves to spend her time working with her hands and being creative with “junkyard” finds – refurbishing them and bringing them back to life.

Take a gander at these posts...

  • Pittsburgh Steelers Fans
  • Wedding Photos
  • Notes from our Branson Vacation
  • Me, the Grandkids, and the Train!
  • “Grammaw’s” Baked Bean Recipe

Comments

  1. April Miles says

    October 23, 2016 at 10:43 pm

    tried this and the water kept seeping over the sides, so what we did is get a 5 gallon bucket and lid and I ordered chicken nipples online, then i drilled holes in the bottom of the bucket, used plumbers tape on the chicken nipples and screwed them into the holes. Then I cut a hole in the middle of the top just the right size for a water hose to fit in, then hung it in the coop and filled it with water. They help themselves whenever they want. It will last for about a week depending on the weather and amount of chickens you have. To clean it just take it down, take the top off and run a scrub brush inside, rinse, hang and refill. cost me less then $10 to make 2 of these for my chickens!

    Reply
    • Anonymous says

      April 30, 2017 at 6:28 pm

      Your holes to high, The water as it fills should stop as it reaches the top of the holes.

      Reply
  2. Bill says

    October 13, 2016 at 7:40 pm

    How do you stop the chickens from sitting on top and pooping into the water?

    Reply
    • mo says

      October 14, 2016 at 11:06 am

      Put a funnel on top

      Reply
  3. Warren says

    October 10, 2014 at 11:51 pm

    Here is the link for the water heater we used it half of last winter (spend the first half trying all kinds of things)

    there are a couple of alterations/adaptations:

    1. You can add a timer to adjust the heat.

    2. You can add a heat sensor/electrical switch to cut energy use.

    3. You can change bulbs to adjust heat

    This person has many good ideas

    Reply
    • Warren says

      October 10, 2014 at 11:52 pm

      Oh yea, the link would be good

      http://www.the-chicken-chick.com/2011/11/make-cookie-tin-waterer-heater-under-10.html

      Reply
  4. Warren says

    October 6, 2014 at 10:54 pm

    Ok Mike, that is a great, simple design. For those of us living in climates where the temp gets down below freezing I can send you a link that shows you how to make a heater for that 5 gal. bucket for under 10 bucks if you want.

    Reply
    • JJ says

      October 7, 2014 at 10:04 am

      I would love the directions for the heater! Any chance you could send them to me?

      Reply
      • Sharon says

        October 7, 2014 at 10:08 am

        We are doing a project on the heater! Stay tuned!

        Reply
  5. Eddie Reed says

    October 3, 2014 at 10:51 pm

    These makes me want move back to a farm. I’m 79 and still make a garden, I lived on a farm when I was 11 years old for a year. I Loved it.
    Eddie

    Reply

Leave a Reply Cancel reply

Your email address will not be published. Required fields are marked *

Young trees planted in organized rows, sunny landscape.

15 Fast-Growing Trees to Transform Your Yard Quickly

Posted On March 23, 2025 By Duston

The Donkey Bucket Challenge (Watch Video)

Posted On December 6, 2024 By Duston

How to Make Money Growing and Selling Mums (Chrysanthemums)

Posted On September 28, 2024 By Duston

Hydrangea cuttings stuck close together.

My Month-By-Month Plant Propagation Guide

Posted On August 24, 2024 By Duston

Mike’s Plant Farm Spring Ad

Posted On May 15, 2024 By Mike

Mike’s Big Perennial Bed by the Month.

Posted On April 27, 2023 By Mike

$180.00 per Square Foot? Is it really possible?

Posted On March 28, 2023 By Mike

Rooted cuttings of variegated weigela in bunches to harden off.

Over Wintering Rooted Cuttings.

Posted On January 8, 2023 By Mike

Mike's Big Perennial Bed.

Mike’s Big Perennial Garden

Posted On January 8, 2023 By Mike

A Profound Thank You from Mike.

Posted On September 1, 2022 By Mike

Recent Posts

Finnegan keeping the sun off his head.

An Old Guy, Two Donkeys, a Puppy and a Hammock. What could possibly go wrong?

… Read Full Article

This upside down donkey is a hoot!

An Upside Down Donkey and Cute Puppy.

You can see more of the donkeys here. And more silly donkey stuff here. Questions, comments, mean things to say? Post them below and I will respond. Until then, by any and all means stay inspired! … Read Full Article

'Rockin Raspberry' Bee Balm.

‘Rockin Raspberry’ Bee Balm.

Wow! I planted four of these 'Rockin Raspberry' Bee Balm in the perennial garden at the nursery last summer and look at them now. They are in bloom right now, end of June here in northern, Ohio and every person that sees them asks about them. This beauty … Read Full Article

'Bubblegum Blast' Bee Balm.

‘Bubblegum Blast’ Bee Balm

This beautiful Bee Balm is part of the 'Sugar Buzz' series. I planted these in my perennial bed last summer and this year they are beautiful and blooming like crazy! They grow from 16" to 24" tall, are hardy from zone 4 through zone 8. They love full sun … Read Full Article

Blue Angel Hosta.

‘Blue Angel’ Hosta.

'Blue Angel'hosta is by far one of my favorite blue hostas. A big hosta like this in a perennial bed covers a lot of area and that keeps a ton of weeds at bay! These giant heart shaped leaves are very slug resistant. We have this plant in full sun. With … Read Full Article

Copyright © 2025 · Hill Country Digital Media, LLC · Privacy Policy · Earnings Disclaimer · Terms of Service