Hydroponics is simply growing plants in water without soil. In commercial settings liquid nutrients are utilized for this style of growing plants.
This is a step by step guide for creating a very simple and extremely effective hydroponic garden system. You can use this system to create a miniature indoor hydroponic garden or to propagate indoor and outdoor plants.
Things you will need to start your Hydroponic Garden:
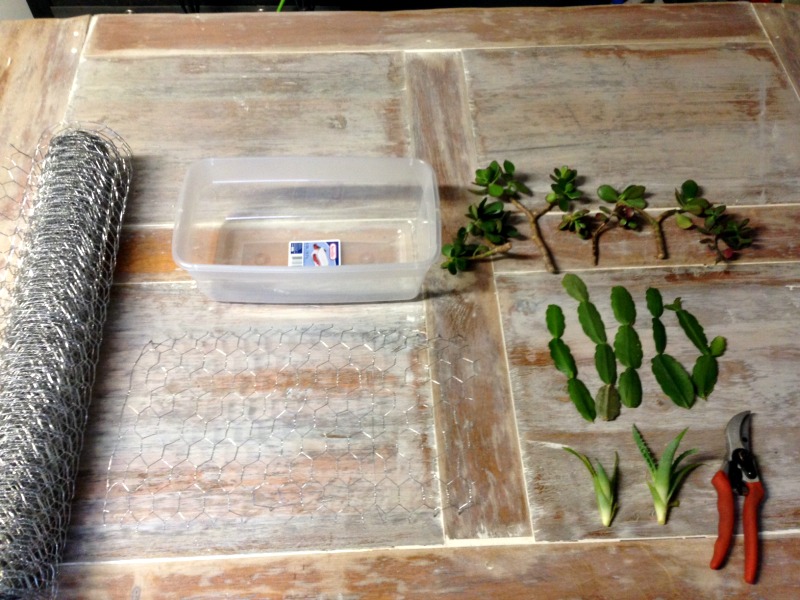 Watertight plastic container that is wide and shallow, pair of wire cutters or clippers, flexible wire mesh, cuttings, and water.
Step 1: Cutting Wire Mesh to Fit
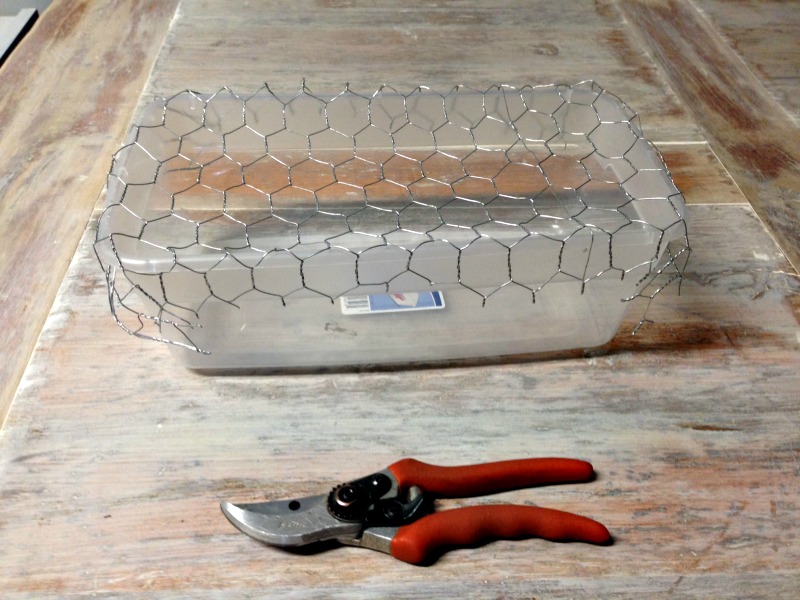 Cut a small pattern of wire mesh that fits over your container and leaves enough extra to fold over the sides. Once you place the wire mesh over the container hold it in place with one hand and fold over the sides with the other, slowly working your way around the entire circumference.
Step 2: Place Cuttings in Position
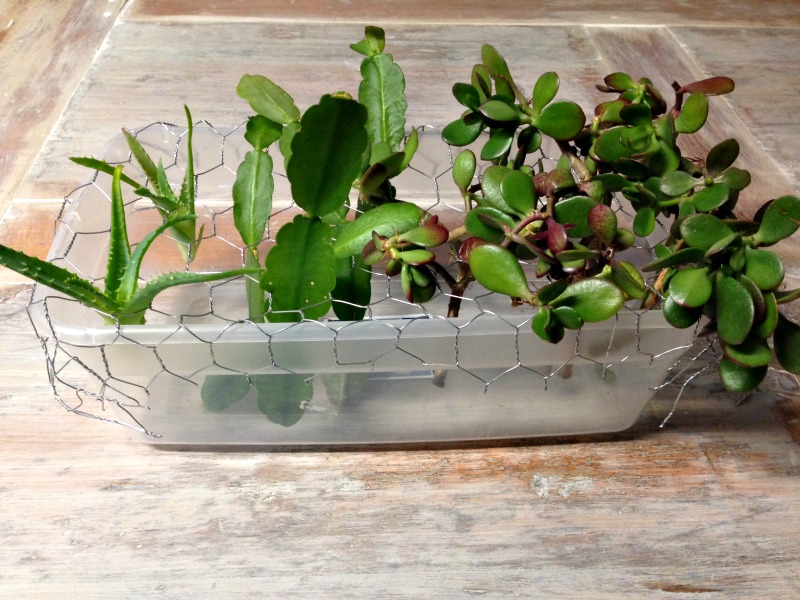 Take several cuttings from plants you like. The cuttings should be about 3-5 inches in length and have at least 2 leaves.
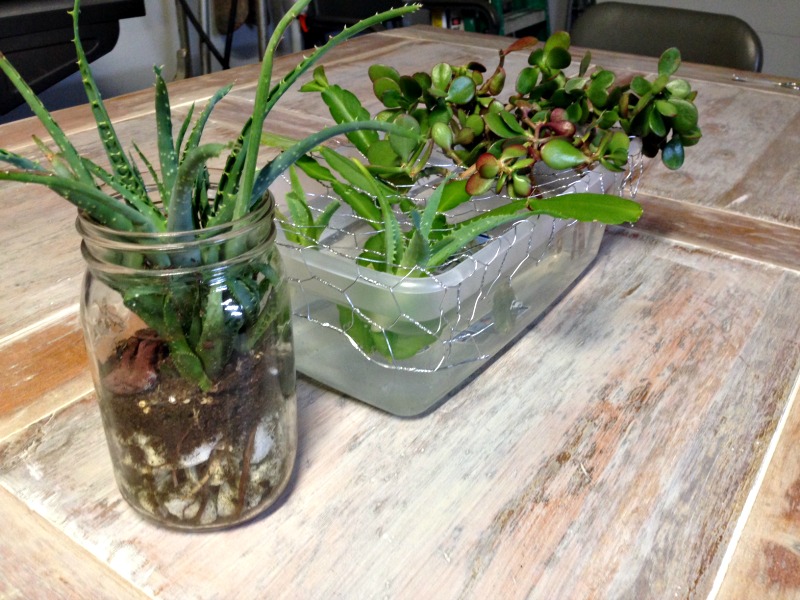
Plants that are fleshy like Jade plant or Hydrangea or common indoor plants like African violet or Spider plant work very well with this type of setup. In this picture Jade plant, Aloe vera, and Thanksgiving Cactus have been used. Take cuttings that will have enough stem to fit down past the mesh by at least an inch or two.
Start placing your cuttings through the wire mesh and the mesh will catch the leaves and hold the cuttings in place.
Step 3: Fill with Water
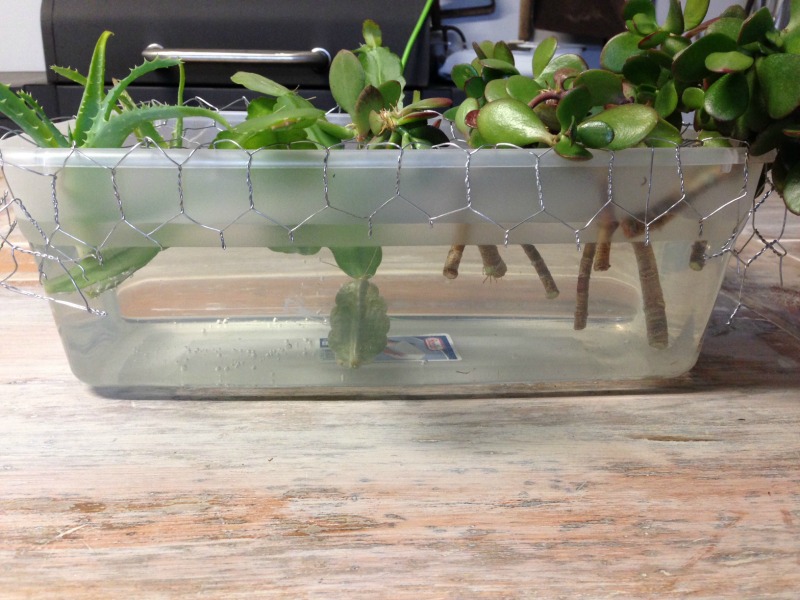 Fill the container with water so that it reaches to just slightly under the wire mesh. The plant stems will now slowly start to develop new root nodes along the stems. Place container in a sunny warm location near a window or under a grow light.
Step 4: Allow Roots to Develop
 The cuttings will take 2-4 weeks to develop depending on the type of plant. Certain plants can take months, however if you choose many indoor varieties new roots will develop quickly.
Once plants have rooted you can transfer them to smaller mason jars filled with water and have a year round Hydroponics display. The initial container arranged ahead of time can also be a long term garden display.
You can also use this system to propagate plants that will be later potted in soil.
Step 5: Experiment
Take time to experiment. You can do a little research online before hand or see what plants work the best by trial and error. Some plants can stay in water for a very long time and continue to develop. Other plants need to be potted in soil at some point.
About the Author:
Jonathan Aflatooni is the co-owner of Blacklotus Landscaping LLC, a residential and commercial maintenance and installation company. Jon has many years of practical experience in the field, from propagating his own collection of plant life to creating and designing new landscapes. He looks forward to sharing with a wider audience some of the insights and knowledge he has gleaned along the way.
I am trying to find some rooted cuttings that i can plant and use for liners.I want to stay with shrubs.I live in zone 8.Where can i find some at this time
I find it hard to get water-rooted cuttings into dirt without their dying. any suggestions?
Karen,
I think there is a difference between a water rooted cutting and hydroponics, but I don’t use hydroponics. This article was contributed by another author. It’s best to not trying rooting in water. Instead use sand or a mixture of peat and perlite. All of my cuttings are rooted in sand and do tens of thousands of them. More here http://www.freeplants.com/homemade-plant-propagation.htm
Mike, where do you get sand, and what grade is it??
Arlene,
My sand comes from R.W. Sidley in Thompson, Ohio and I think it’s silica 400.
http://mikesbackyardnursery.com/2015/10/exactly-what-is-and-where-do-i-find-coarse-sand-for-rooting-cuttings/
It seems funny to me that a dirt farmer would go dirtless
Something else to try …
Besides cuttings, you can also sprout some seedlings
by cutting some regular sponge into pieces slightly
larger than holes in wire.
Put seeds in the sponge and stick through wire into
water. Once they have sprouted, transfer to small trays
or pots. This works best if you ‘do’ use a light source.also.
I love that idea!
How do you plant form seed with this hydroponic method?
Michele, read what Art posted!
“Something else to try …
Besides cuttings, you can also sprout some seedlings
by cutting some regular sponge into pieces slightly
larger than holes in wire.
Put seeds in the sponge and stick through wire into
water. Once they have sprouted, transfer to small trays
or pots. This works best if you ‘do’ use a light source.also.
Mike, I have been doing this I was a kid. Only to give to my friends or if I wanted more of my own houseplants. His is a much better way of doing it. All my window sills and where ever I could find a place has little bottles, cups, or anything that will hold enough water to plant in. It works great but doesn’t look very pretty and have to keep moving them around to clean. I am going to try his idea and I like the idea with the chicken wire to hold them up.
Have a gr day.
4oz REGULAR PEROXIDE PER GALLON OF WATER. ANTI-BACTERIAL, ANTI- FUNGAL AND IT BREAKS DOWN INTO OXYGEN AND WATER- GIVING OXYGEN TO THE ROOTS
HI, If you don’t have wire mesh, you can substitute ordinary grocery onion or lemon mesh bags. Only you will have to secure them with a rubber band around the sides of the plastic container to prevent them from falling into the plastic container. I sometimes use these mesh bags at the bottom of the flower pot to prevent dirt from seeping through . I recently received another great idea for the bottom of the pot. Use coffee filters at the bottom of the pot to prevent dirt from leaking.
I grow lettuce and baby bok choy indoors all winter hydroponically using the Kratky method. There is a lot of info on the web if you just enter Kratky and lettuce. Cost is minimal as all you need is a water tight container, a piece of foam board, some net pots and rock wool inserts. I grow under plain standard 4 ft shop lights and have a fresh salad every night. MHP Gardener on you tube has excellent information on method and fertilizer requirements/formulas.
I have heard that willow slips encourage root development in other cuttings. It would be interesting to try. Right now, I’d have to dig down through several feet
of snow to get willow cuttings…hmmmmm
Some comments were raised about nutrients and changing water. Water changes when water looks gross. If you don’t want to have to pick up the tub to dump outside or down a drain, some people drill a small hole/bulkhead and use an aquarium airline hose. Simply unroll the hose, turn the pep-cock, water drains, fill back up behind it. You can get real fancy or not. My main comment is about nutrients. If you are using hydroponics to root cuttings, why add nutrients? Most root starting is done in soil-less media. After the first new true leaves appear after rooting, a little nutrient can be added, but mostly you want to wait until you pot them up. If you are “raising” your plants hydroponically, then you need to monitor nutrients closely, and there are guides for various kinds of plants raised hydroponically that will tell you how much and how often to add nutrients. Oh…some people like to toss in an air stone to move water around to encourage good oxygen/co2 exchanges….
What type of nutrients and how much do you put in the water?
Choose a nutrient solution made for hydroponics, not ordinary fertilizer. Avoid “organic” solutions, which may decompose and make caring for your system more complicated. Because the needs of your system vary with tomato variety and mineral content of your water, you may need to adjust the amount or type of nutrient solution you use. To begin with, however, follow the instructions on the packaging to determine how much you need to add to the reservoir.
Less is best
Down and dirty hydroponics …
You can go very scientific and monitor everything,
or you can simply do it the simple trial-and-error way.
Have had great success with both.
In answer to your question, you can actually use a
solution you make yourself with MiracleGro
Try a little at a time and test what works best for you.
Hydroponic gardens are a cool way to observe plants’ growth. There’s a lot you don’t see when your plant is growing in the soil. It’s pretty simple to make if you have wire mesh around, too.
Sam | http://www.hanoverconcrete.com/buildingproducts.html
Hydroponic Garden- how offtin do you need to change the water?? i would try what you did with the wire and plastic container
Every Seven Days
When you are trying to decide when to change your nutrient reservoir in your hydroponic recirculation system, there are a few things to consider. The size of your reservoir, the amount of nutrients remaining in the solution, ph, and how clean the water is. If your water looks gross, it probably is gross. Gross water = Gross plants. Gross deserves a capital G for that equation.
The bigger your reservoir the further you can go between res changes(Res change is short for water/nutrient reservoir change ). Big reservoirs may be more forgiving then a small reservoir. Small reservoirs may change by hundreds of ppm in a single day. Hydroponic systems require close monitoring of nutrient levels to avoid burning plants. If your reservoir loses water to evaporation make sure to top it off with plain water or a very low ppm solution. Res changes mostly apply to recirculating systems. Non-recirculating or “run to waste” hydroponic systems only require you to change the solution every two weeks. The nutrient solution stays clean and the PH is maintained in a non-recirculating system. The most important part of a good hydroponic system is a clean nutrient reservoir.
I have had great success with hydro . At one time had 50 milk bottles (gallon) and I planted lettuce from seed. It was priceless to see all of them blooming into full heads. And they were delicious.
Byron
i think this is really neat. i’m going to try this. i enjoy all the things mike wright about. thank you.
I’m going to try this!