How To Build a Potato Box From Pallets
MATERIALS NEEDED
2 to 4 Pallets: look for pallets that have many intact boards that are held on by no more than about 6 nails each. This will make it easier to pry the boards loose. The more boards on the pallet the better, in case of splitting while prying, and because we need a lot of boards… and thus the 3rd and perhaps 4th pallet. Also, make sure your pallet is free from any kind of liquid or other contaminant that you do not want in your garden. These pallets are safe to use from the manufacturer use unless something has spilled on them in use, etc.
Hammer: You will use both the hammer end and the prying end, so a regular hammer is needed.
Hatchet: This does not need to be sharp as it will only be used to wedge.
Typically, pallets will have 2 sets of cutouts in their 3 crossbeams, that are there so a pallet jack may be used to lift and carry the pallet and its heavy contents.
This project relies on that one side of 2 pallets be completely filled in with boards so we can build a potato box frame that will hold dirt, so you if are using a standard pallet, keep this in mind. With standard pallets we will be filling in the side without the pallet jack cutouts (circled in red in photo above).
This project might be easiest if the pallets you use do not have the cutouts. I have found these types of pallets in my area, but they are uncommon. They are a little smaller than normal sized pallets, and I will use 1 of them in this project in conjunction with 1 normal sized pallet with the pallet jack cutouts.
CONSTRUCTION
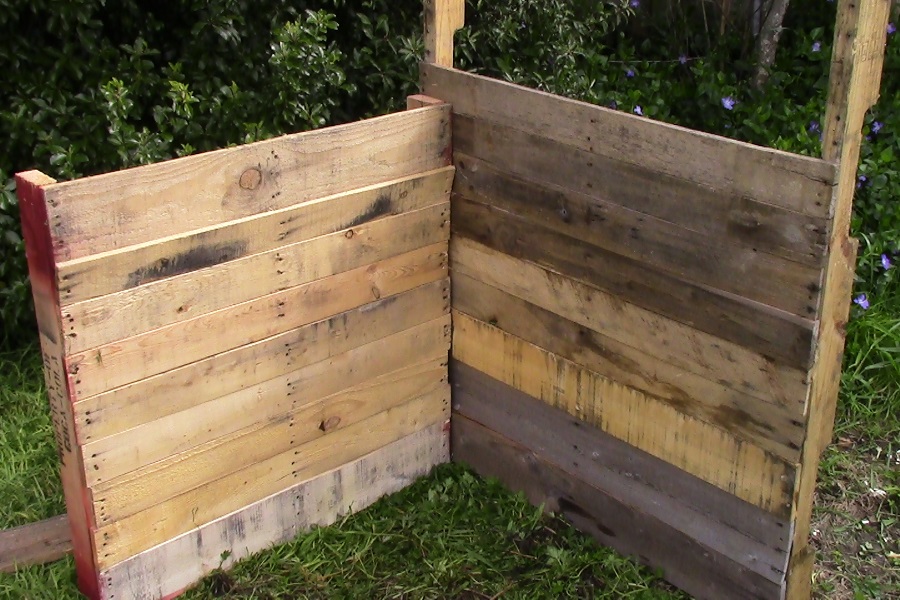
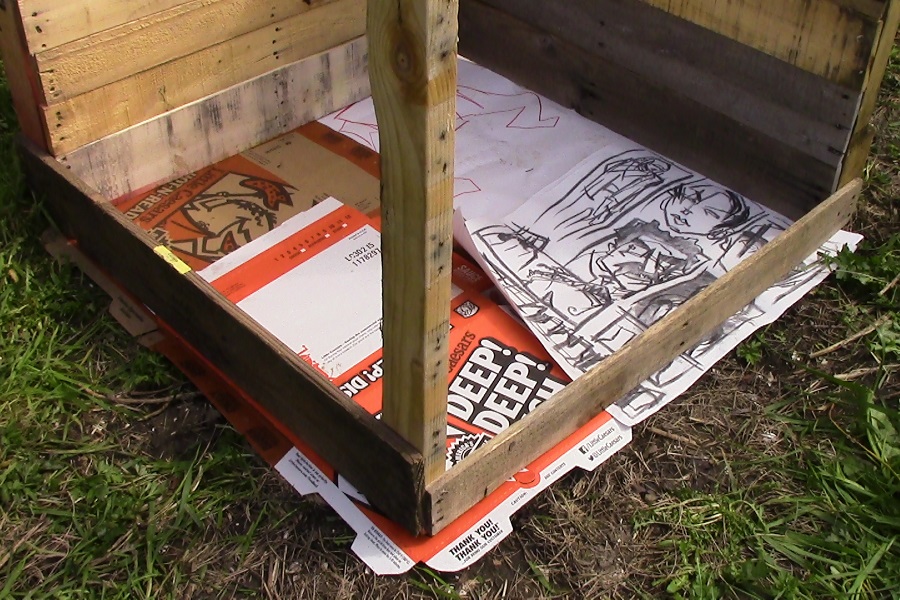
The idea is to remove all the boards from 1 side of 2 pallets so they can be used to fill in the other side, so we need to remove all the boards from both sides of the pallets except for the 2 end pieces on the side without the pallet jack cutouts (if the pallet you are using has them of course). You also want to remove the center crossbeam… to the effect it looks something like this:Image 4
Step 1:
Step 1 will be about removing the boards, and have been detailed the same as here in a previous article (http://mikesbackyardnursery.com/2015/03/make-a-raised-garden-bed-out-of-pallets/). If you are familiar with this method of prying with a hammer and hatchet, or have another method that works for you, skip ahead to the next step.
Set your pallet up against a wall or something that will support your prying at the boards with your hatchet and hammer.
Being careful not to split the wood too much, hit your hatchet in between the end of a board and the cross beam it is nailed into. Pry back and/or forth. Move the hatchet around, trying different angles until you are able to pry. I press with my foot at the base of the pallet to help keep it from moving around while I wedge and pry.
Each pallet is different. Some have thicker boards than others, but this one I am using in this example has very thin boards, so I am wedging with the hatchet at each corner. It helps to hit the side of the hatchet near its butt end with the hammer if it isn’t moving back and forth easily.
Once you have wedged enough room with the hatchet around the nails so as to be able to wedge the hammer in, replace the hatchet with the pry end of the hammer and use the back of the hatchet to hammer the hammer into the wedge. This will widen the wedge and give your prying more leverage. Do this around a nail. Then gently pry the board and nail together away from the cross beam. If it begins to crack, stop and move to the other nail. Work gently when prying… this technique requires strength but also finesse.Once you have one end of the board free repeat Steps 2 and 3 at the other end of the board.
Gently use the pry end of the hammer to free the center of the board. Now you have removed 1 board.
Repeat until you have all the boards removed from the side of the pallet with the pallet jack cutouts. This step assumes that there are 2 end boards on the other side holding the frame together.
Now, repeat on all remaining boards, except for the 2 end boards, on the side of the pallet where you will be reattaching the boards flush against each other to keep the dirt in.
On the 2 remaining end boards, repeat the same technique on the center of the boards until you have removed the center crossbeam.
The nails at the ends of the removed boards may be usable as is, the ones in the middle of the board can be hammered out or hammered flush with the board. Hammer the nails out of the ends of the boards if they have dull points or are too bent to be used as is.
Step 2:
Start at one end and begin nailing the boards into the frame flush against each other.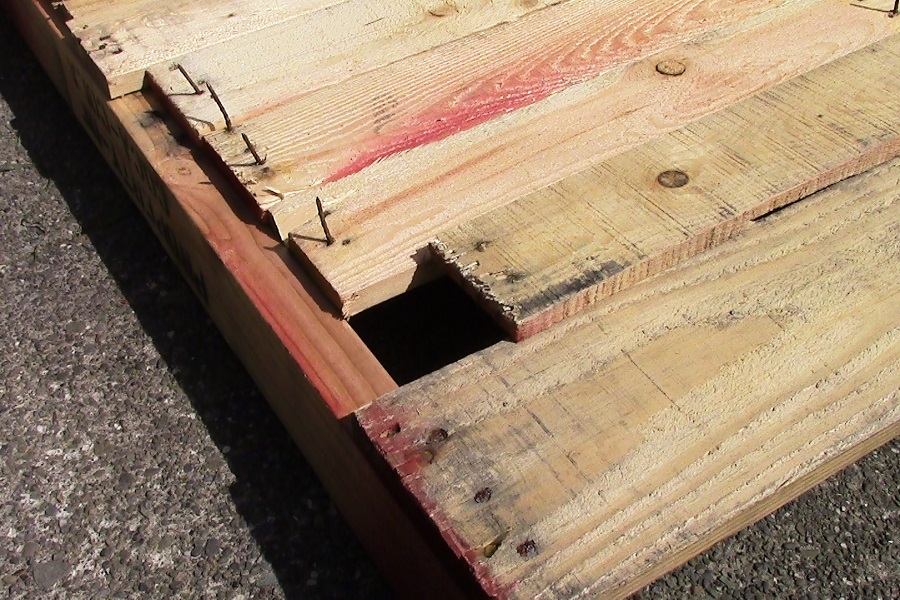 Since you should have several boards to choose from, lay them out as you would be nailing them to get the best fit… and if there is no best fit, you should remove the end board and make room. My example here shows a fit that is close enough, it doesn’t have to be perfect just so long as the dirt will not fall out… and even so, since it will be near the top, which you don’t have to fill up with dirt to anyway. Nail in the boards.
Repeat the necessary steps until you have 2 filled in frame walls.
 Step 3:
Set the 2 wall frames squarely together where you want your potato box. Because we are reusing the nails from the pallets which aren’t long enough to go through 2 crossbeams, the wall frames must be placed so the nails can go through a board into a crosspiece.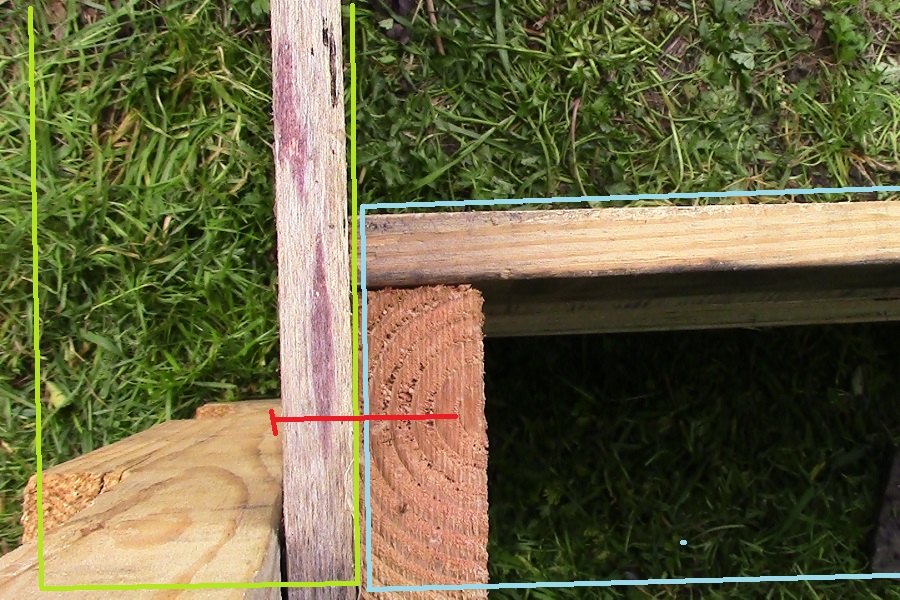
Step 4:
Nail 2 boards into the end of a crossbeam (you removed one of these from the center of a pallet) to create a corner for the box, and attach it to the exposed ends of the wall frames, so it looks like as shown in the photo above.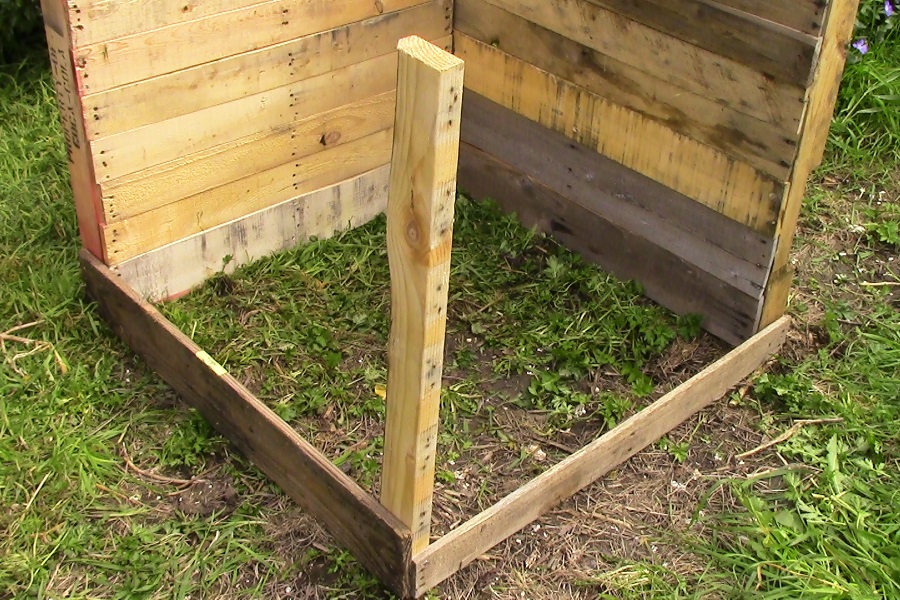
Step 5:
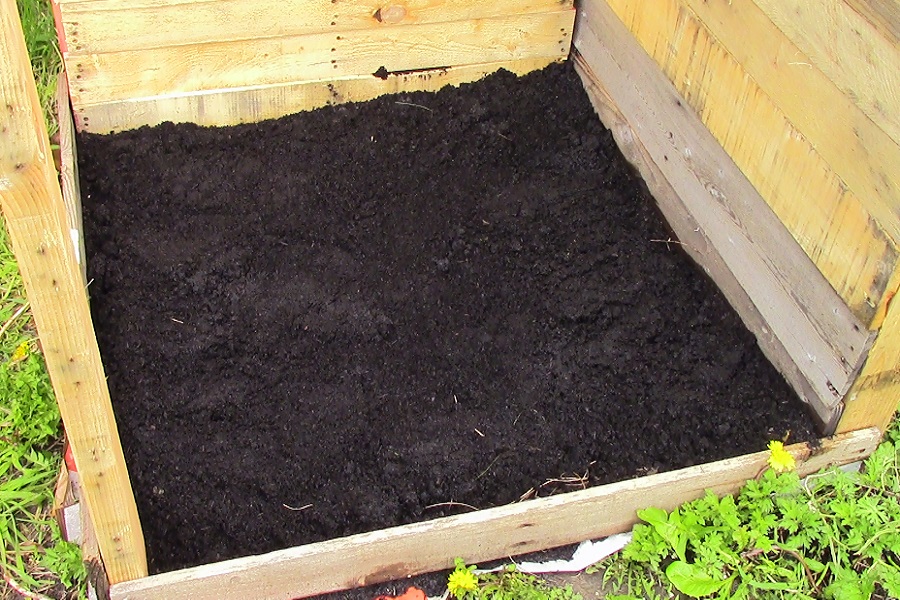
Place cardboard or other paper down under the potato box to help prevent weeds from growing through from the dirt underneath. The thicker the better. It also helps to overlap the areas with cardboard out of the box area, so the cardboard helps prevent weeds from coming up at the edges.
Put down a layer of soil into the potato box. A 5 gallon bucket full is the amount I used here.
Step 6:
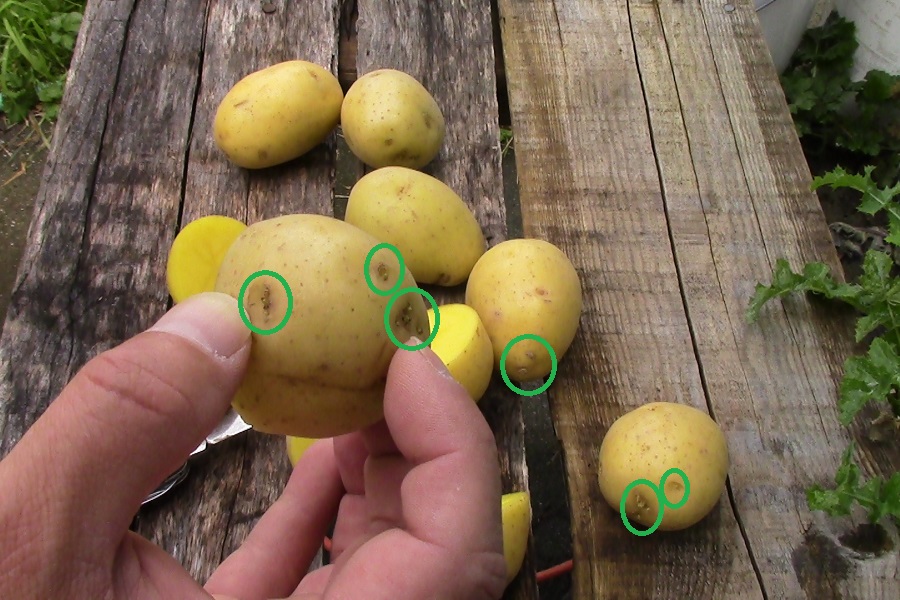
Get the variety of potato you want to grow and if you don’t already know this… notice the “eyes” (circled in green in below photo)… these are where the potato will send out its foliage from.
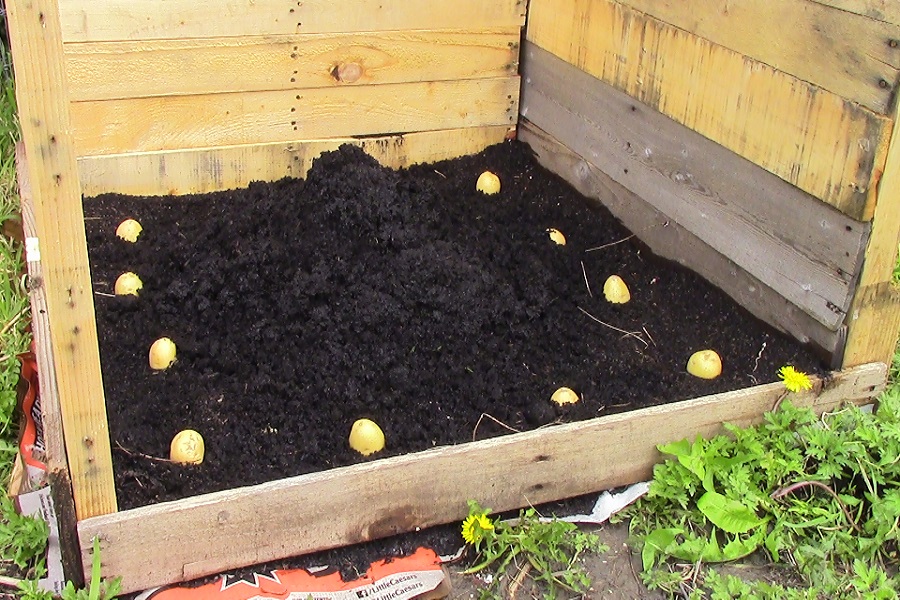
 You can plant the potatoes intact, but I chose to cut mine in half so I wouldn’t have to buy as many.
 Step 7:
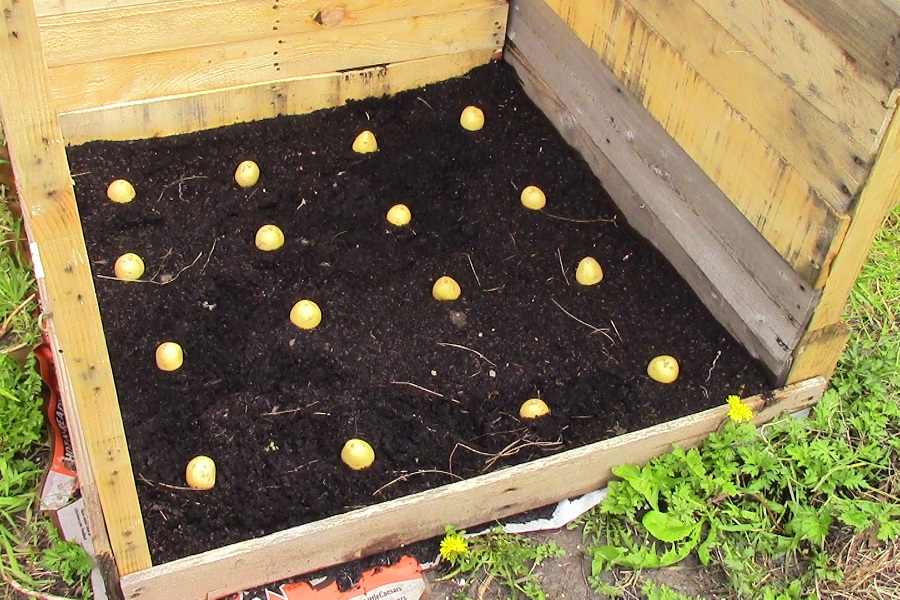
Cover your potatoes with soil. They only need to be covered, so a 5 gallon bucket full may be just enough. Spread the soil around level or only cover the potatoes.
 Step 8:
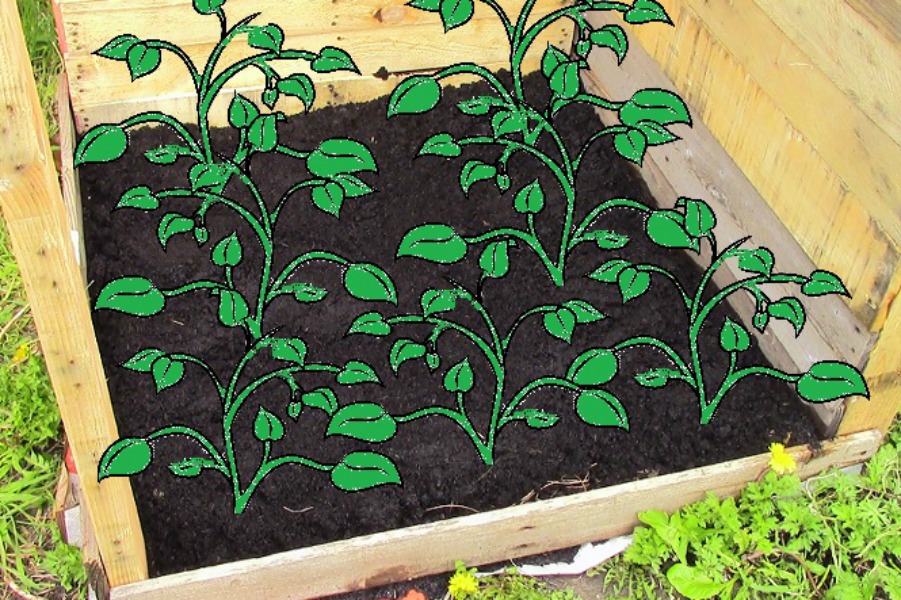
When your potatoes grow enough that they are a few inches above the width of another board, attach another board to each of the 2 exposed sides.
 Fill in around the plants with soil leaving enough height exposed to the sunlight that they continue growing fast.
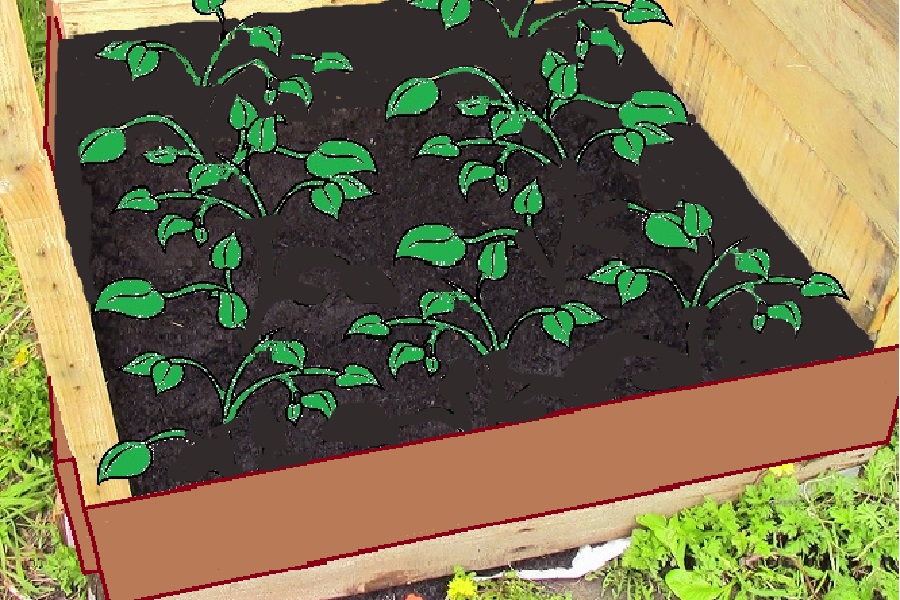
Keep adding boards and soil (Step 8)whenever the plants get high enough that they are a few inches above a board width in height.
At the end of the growing season, remove the boards on one side of the box, one by one from top to bottom revealing many potatoes… and ENJOY!
About Troy Boylan
Ecoculture Village Founder & President; Anthropology BA, Interdisciplinary Studies: Ethnobotany BS. Two things I think are worth anything at all… all things wilderness and ecoculture.
Hi Mike,
I have a suggestion.
Being an ex-farmboy.. that moved to the city.. first let me tell you this is a great idea for community garden growing. I do find that sometime the potato plants can grow so fast that they can become leggy. My idea is to put fencing wire across the top of the box to support the plants as they grow some height. It doesnt need adjusting unless the plants do grow faster than anticipated. The wire should be at least 6-8 inches above the ground they are growing from.Be sure and fasten it in a way you can adjust as you ad a board or remove it when you are “dismounting” the box to harvest during the summer. I remember when we had a garden the plants could grow as high as 18″ and we would bank the soil around the plants to support them and it would also allow the potato’s to grow a little closer to the top. But as the little boy as I was, it still seemed that they would grow so deep I felt I was digging to “well I will be nice” and leave that place to the readers imagination. But the harvest was so worth it when we dug the potatoes in the mid to late summer. WOW !! Potatoes galore.
By thew way.. we had a secret way of storing the potato harvest I would like to share another time.
Have fun !!
Do tell your secret to storing!
I am going to use this basic idea, but try to devise on side with “channels” to secure the boards as I add them, which will allow them to be removed one by one and reused another season – I will post pics if it is feasible.
to the lady that got only one potato from her batch–I am wondering did you feed a Low Nitrogen fertilizer ? high nitrogen would cause no potatoes. Also my other question is did you wait till the potato plants died down? and were they in good sun light most of the day?
there are two types of potato. indeterminate and determinate. one is good for barrel growing and the other can be grown without the hilling. kenebecs for barrel growing.
I have heard this method works only if you use Indeterminate or Late season potatoes. Varieties suggested are German Butterball, and Elba.
If you use a short season potato it will set fruit at the first leaf node and not any above..
Also, the dirt needs to be very loose and friable.
I just bought some from the grocery store to try. At $9.00 per pound from seed catalogs, I would just have to not plant and buy them from the store anyway.
Also, I am going to try pallets that are 20 inches x 4 feet and do them the same way and when they get above that I will put another layer of pallets on.
QUESTION…………….AS THE PLANTS GROW, WHICH REQUIRE ADDING MORE BOARDS AND DIRT HOW DOES THE PLANT LEAVES THAT ARE COVERED MAKE MORE POTATOES? DOES ONE BREAK THE LEAVES OFF AT THE STEM OR ?……..
WE MADE A “POTATOE CONDO LAST YEAR, PLANTED FIVE SEED SETS AND ADDED MORE BOARDS AND DIRT TO A LEVEL OF 3 FEET. THE HARVEST WAS ONE POTATOE FROM TWO BOXES TWO FOOT SQUARE AND TEN PLANTS.
WAS IT BAD SEED OR BAD FARMING IDEA?
Fred,
I’m really not the person to answer this, one of our members contributed this article. Hopefully somebody else will see your question.
I have had this experience, later learned it was due to me planting grocery store potatoes. Do not try to plant potatoes from the grocery store, they are treated with a chemical that inhibits the growth or sprouting of “eyes”. You must buy seed potatoes to plant or organic potatoes from another home gardener. Good Luck!
I bought organic grocery store potatoes. At $9.00 per pound from seed catalogs, forget it.
Or wait until your grocery-store spuds begin sprouting, as they so often do! I haven’t bought “seed potatoes” OR sets in many years. Instead, I use my late-winter sprouty ones, cutting the larger ones into pieces with at least one sprouted eye apiece. Lay the long sprouts flat on the ground and cover them with soil, just like leggy tomato plants, and they’ll be fine,
I would use screws as there easier to remove at the end of the growing season and you can re-use the boards and screws. Deck screws are a handy man’s best friend.
What a great idea.
I am not sure how to attach the boards as the potatoes grow.
Do you nail them in then pry them off to get the potatoes, or screw them in?
Thank you for this project.
Ruth,
This is one of the few articles that I did not write on this site, I would assume screws would be best.
Use screw and then they come back off easily and use year after year.