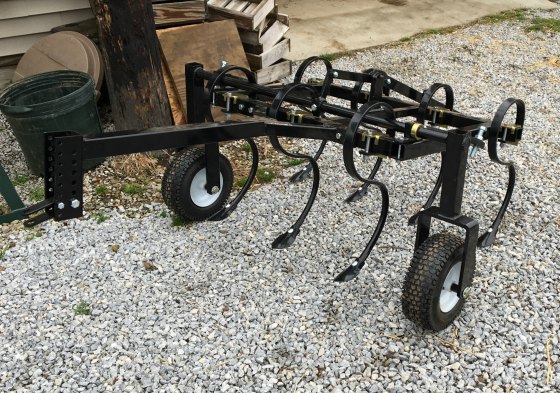
Recently I purchased the Field Tuff ATV Cultivator to keep a small field as weed free as possible. In this brief review of this product I will tell you exactly what I like and dislike about this piece of equipment.

The Field Tuff ATV Cultivator.
When I unpacked the parts of this cultivator I found that many of the components were already partially assembled so that made putting it together easier. Before I bought the cultivator I looked at many reviews online and one thing that came up more than once was the quality of the bolts used to attach the cultivator shoe to it’s bracket. Others mentioned that they thought the bolts were weak and of low quality and actually lost a couple of the cultivator shoes in the field and had to order replacements.

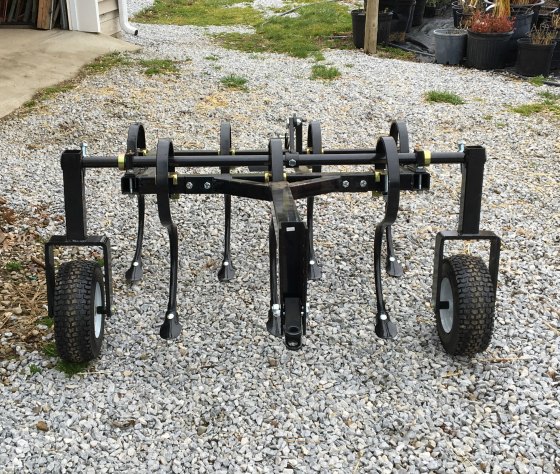
Field Tuff ATV Cultivator, front view.
Not wanting to go through that I thought about replacing bolts right up front before I even used the cultivator. Then at the last minute I thought; “I’ll just make sure the bolts are tight, I’m not going to be dragging it through really hard ground.” As soon as I put the wrench on the first bolt the head literally popped right of the carriage bolt. Needless to say I found that very disheartening and headed to the hardware store for new bolts. I think they cost me five bucks, don’t even remember.
But here’s my point. This thing cost about $400. I would have happily paid another $20 to get real bolts. Actually hardened bolts that are unlikely to ever break under normal use. Why in the world they would sell a $400 product with such low quality bolts is beyond me. I’ve never, not one time, had the head pop off of a carriage bolt in my life.

Field Tuff ATV Field Cultivator, rear view.
My advice?
If you buy this cultivator, and I hope you do, I think it works great, replace the bolts that hold the cultivator shoes on before you lose a shoe or two. Fortunately for me, an online review gave me a heads up of what to look out for. Saved me a lot of aggravation. All in all I really like this cultivator. I put some plants in the field and made the rows 72″ wide so I can make two passes down each row that offset, really disturbing the ground and disrupting any weed growth that is just starting.
I’ve not pulled it through un-plowed ground, nor would I. I don’t have to, I have a 3 point hitch tiller on my Kubota. But I’ve seen videos where others have and it seemed to do a good job of breaking up un-plowed ground.

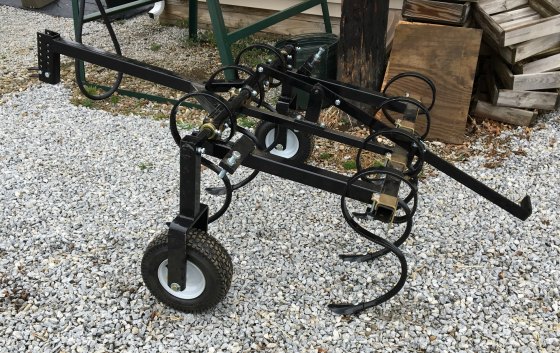
Side view of the Field Tuff ATV Cultivator.
In this photo the cultivator is in transport mode. If connected to the ATV the hitch would lower, about 10″ off the ground, that would raise the tines high enough that you can easily transport the cultivator without tearing up whatever surface you are driving on. The lever sticking out the back is the lever that changes it from transport mode to cultivating mode. In this position there is a spring clip type of pin holding that lever down, which keeps the wheels in this upright position as you see, raising the tines off the ground.
To switch to cultivating mode all you have to do is pull that pin and raise the handle. That swings the wheels upward, lowering the cultivator tines so they cut into the soil. While cultivating the wheels control the depth of how deep you want to cultivate. There are adjusting bolts on both sides so you can set the depth that you want for cultivating.
You have to get off the machine to switch from traveling mode to cultivating mode so it’s best to have enough room to make one continuous pass while cultivating as you’ll see me do in the video.
All in all I like this cultivator. I am confident that it will do exactly what I need it to do, which is to allow me to quickly make a few passes up and down these rows every two or three weeks to keep the field as weed free as possible. It’s easy to hook to the machine and because it pulls behind my AVT it can make passes very quickly. It’s easier and better than trying to do this with a walk behind tiller or the big tiller on my tractor.
I like to keep the backhoe on my Kubota because I’ve still got a lot of clearing or at least clean up to do so having this cultivator allows me to do that.
About the plants in the field. I think we put in a three different kinds of blueberries, primarily as stock plants so we can Collect Hardwood Cuttings. We also put out about 50 Annabelle Hydrangea for the same reason and both Green Giant Arborvitae and Emerald Green Arborvitae and I have some Dark Green Arborviate to put out as well, to be used, sacrificed really, see this article, for cuttings as well.
Do some of those arbs in this field look a little shaky? Of course they do! I’m not going to put the best ones I have in the field, I put the ankle biters in the field. Given sun and a bit of time they’ll fill in nicely then I’ll murder them!
Anyway, questions, comments, mean things to say? Post them below and I’ll respond.
Do you know what size the square tubing is that the s-times bolt to? I want to be know how easy it would be to find new ones should any need replaced. The ones the volt onto 2” tubes are readily available.
Thanks!!
Sorry, I do not.