
Perforated Drainage Pipe
If you have a place or places in your yard that have standing water and I know a lot of people do, there are ways to make that water disappear and in this post and video I’m going to explain how you can go about that.
Filling with Topsoil Seldom Works.
Typically people try and buy topsoil to fill those low areas and sometimes that works, if there is a way to divert that water and actually get it to drain away, or disperse evenly over a large area where it can both evaporate and seep in. But usually trying to fill the area with topsoil only moves the water to another spot in the yard.
Using the system that I explain in this video you can use perforated drainage pipe collect the water in the wet areas and move that water underground allowing it to seep into the soil.
When you have water that stands in one spot for very long the soil closest to the surface in that area becomes quite compacted to the point that it just won’t accept water from the surface. This is usually just the top couple of inches.
Even at my nursery where my soil drains really, really well, standing water does compact the soil near the surface, preventing that water from seeping into the soil. The secret is to create a porous area using washed gravel that will allow the water to seep into the ground. The water is then collected into the perforated pipe. The water actually seeps into the pipe through the perforations.
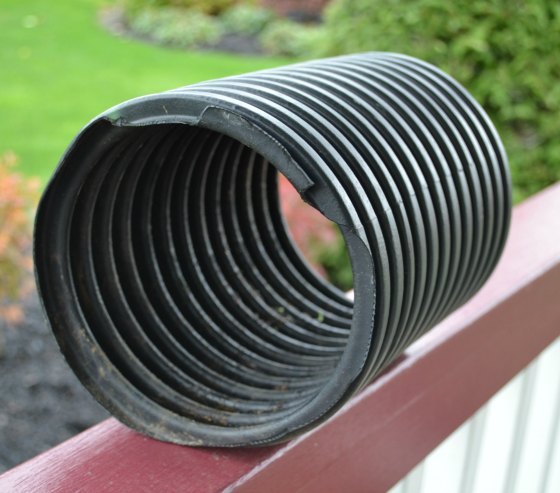
6″ Perforated Drainage Pipe
In this photo you can’t see the perforations but they are there, all the way around the pipe in every other rib. This is evident with the photos where I stuck a knife into one of the drainage slits. I prefer this type of perforated pipe for a couple of reasons.
- It has opens all the way around the pipe. Perforated pipe that is used for septic systems is rigid and only has holes on the bottom of the pipe.
- This kind of pipe is flexible so you can easily turn corners with it at any angle.
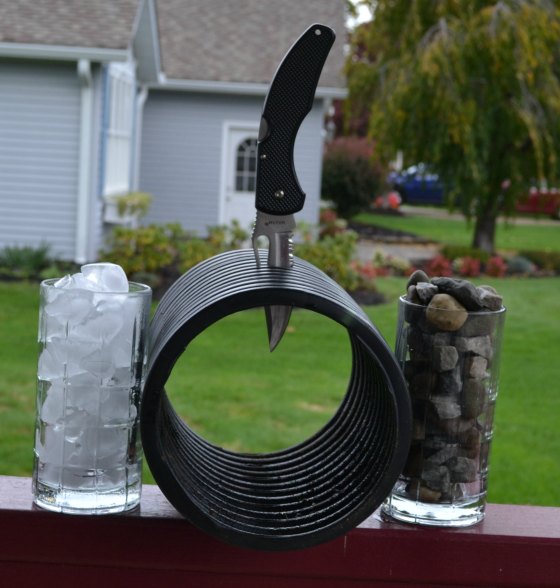
A knife indicates where the openings are in this perforated pipe.
The French Drain System.
This system is also known as a french drain. Basically you dig a trench, put washed gravel in the bottom of the trench, the more washed gravel the better, then a perforated drainage pipe, usually 6″ or larger but 6″ works well. The cover fill the trench complete to the top with washed stone in the areas where you actually want to collect the water. The rest of the trench can be back filled with same soil you took out of the trench, but in the areas where was was standing before you started fill that trench to the top with washed stone.
By using a perforated pipe that is 20, 30, 4o, or 50 feet or longer the water has plenty of room to spread out underground and eventually seep or leach into the ground. Most importantly, that perforated pipe needs to have a little bit of fall as it runs away from the area where the water is collected at the surface. In other words, the pipe needs to run down hill ever so slightly. 6″ of fall over 100 lineal feet is probably enough to make sure the water finds it’s way all the way to the end of the pipe.
Lots and lots of Washed Gravel.
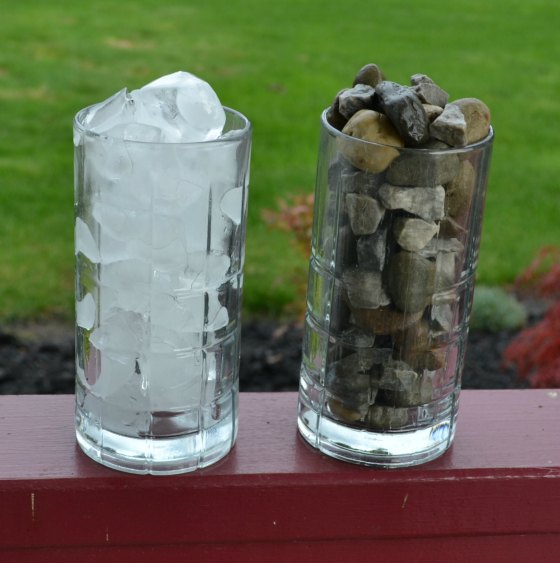
Comparing Washed Stone to Ice Cubes in a Glass
Just Like Ice Cubes in a Glass of Water.
To enhance this system further you should put from 18″ to 24″ of washed gravel under the pipe. To understand how important washed gravel is under the pipe think about a tall glass filled to the top with ice. The glass is completely full. Or is it? It is not because even though the tall glass is completely full of ice, you can still add many ounces of liquid beverage to that glass because of the voids between the ice cubes.
That’s how washed gravel works. Even though the washed gravel fills up a lot of space in the trench, a great deal of water can seep in and around that washed gravel and eventually all of that water seeps into the ground.
This system allows you to move water from the surface of the soil and relocate it and disperse it over a large area underground. It’s exactly how a septic system works. A septic system has leach lines that allow almost clear water to spill out of the septic tank into a line that runs into a small distribution box where that water is divided up and diverted in several different leach lines giving the water ample time and space to leach into the ground. The solids that go into a septic tank separate from the water in the tank and only the water leaves the tank.
Make sense?
That’s exactly how french drains work. They work just like leach lines except instead of the water coming from a tank, it is collected from the surface of the soil where it would otherwise stand and become stagnate.
It’s also important to completely cover the perforated pipe completely in the trench with washed stone. This helps to keep soil from seeping into the pipe. You want the pipe to remain clear so it works for a very long time.
Fancy perforated pipe!
These days you can actually buy perforated pipe that is coated with stone like material then a mesh material over that to keep the pipe free of dirt and debris while at the same time allowing water to seep in.
Questions, comments, mean things to say? Post them below and I’ll respond.
Hi Mike,
Great video. I’m in South Florida and I just discovered a type of soil called “Marl”, a base soil that is mostly limestone, mixed with sand. It sets up very hard, like concrete, but it is not impermeable to water, making it the soil of choice for building up low lying lots.. i have a, client who wants to build a Food forest on top of it. I got started, very challenging but we planted small plants and pots between 45 to 100 gallons, and now I’m having terrible terrible draining issues. Where do you live? I’d love for you to come and look at the site.
Sadiqa,
I’m in Ohio. I’m thinking you need to create drainage that runs off your garden and not depending on water seeping through.
Thanks Mike for your suggestions. I watched your video and heard you say to dig down pretty deep (24″ i believe below the perforated pipe and add the #57 washed stone). How wide of a trench would you suggest?
Jim,
6 or 8 inches would be fine, but 12″ wide would be better.
What do you put at the end of the French drain? I have a PVC pipe running from my sump pump that is flooding the yard by my deck, I was going to run more pipe downhill away from the deck area, but don’t know how to end the drain. Thanks!
Matt,
All you need is a cap. The pipe should be perforated and laid in a bed of gravel that will allow the water to escape.
I have a spring that runs down my yard. It is like a swamp until mid July when it dries up. It runs downhill for about 150 yards. The swamping area is approximately 20 feet wide. What would you suggest to dry it up?
Matt,
Either grading to divert the water or french drains.
Problem with standing water at edge of screened porch. After heavy rain there is a pool of water – we have been considering digging down a couple of inches, applying some weed screen, then topping with lava rocks hoping to allow the water to seep deeper into the ground. Is this a viable solution? Is there something more successful that we could try? The grade of our back yard, unfortunately, is higher further away from the back of our house (re-grading is not an option).
Scott,
I’d dig along the porch just a few inches deep then dig a trench out away from the porch so any water that gets in the trench runs out into the yard and away from the house. The further away from the house you get the deeper you want to dig. You can even put a 4″ perforated pipe in the trench or even a 6″ pipe. Then fill the entire trench with washed stone and cover with soil and seed. Up by the porch I wouldn’t cover with soil, I’d fill that part of the trench to the top with stone.
I live in the North Georgia mountains and created a standing water problem myself. We live in a small valley and are surrounded on 3 sides with mountains. We put in a driveway which is what created the problem. When it would rain the water would stand until enough gathered to flow over the driveway. It would sometimes take weeks for the flooded area to drain. What I did was put in vertical drywells. The area is approximately 200 sq. ft. Using a one man power auger we dug 23 holes 4 feet deep. We then took the cloth used to cover the perforated pipe and cut them in 4 foot lengths. We tied one end of the socks and filled them with gravel which were then dropped into the drywells. If we get 2 -3″ of rain in 24 hours now we will still get some standing water but it gone in a day. The whole effort (except gathering materials) took us about 4 hours.
Bill,
Nice job and thanks for sharing. This should give a lot of people some ideas.
Thank you! I was just wondering if I could do that as I have limited space and a grading issue. Great to hear that the idea works!
have wild onion spread over garden. not fit to dig out, how do I get rid of it?
Irene,
I’d smother it with cardboard, mulch over the cardboard.
I’ve had some success with a rain garden – cannas do quite well to absorb/aspirate the moisture. Others are cardinal plant, bee balm and gamagrass. I have french drains too!
Mike,
I would like to add that you need to have soil that “percs” (percolates), in order for this to be 100% effective. Here in my part of Georgia, people try to do this in clay soils that are as hard as concrete, and wonder why it doesn’t work. I might advise digging a test hole to the depth that you need, and fill it with the hose. Come back at certain intervals to see how quickly the water level goes down to know whether the water in the drain will percolate. If it hasn’t completely drained in a few hours (or overnight in my case), you may need to try something different. Even if you have a few inches of decent soil at the surface, the stuff underneath could be hard as a rock.
Love your emails!
Great points Scott, thanks for bring up the perc tests before you start digging.
My daughter lives in Las Vegas and they have a cement like layer called coliche under a few inches. When landscapers want to plant a tree or bush, they drill holes through the layer so the water and alkali can escape and the tree can make deep roots.
Wow Charline, that’s crazy to have to do that just to plant a tree.
Thanks Mike, amazing as always. This works, I’ve tried it.
Mike: I’ve used your post hole approach in the past with success, though I had to use a powerful auger (like on a skid steer) to bust through the cement-like clay and then I had go about 5 feet down before the standing water would drain out of the holes. The clay was that thick. Also, I filled the holes with sand rather than gravel. You would think the sand would clog at the top of the column with soil, but it hasn’t happened yet. Thanks for your advice.
You’re welcome Paul, thanks for sharing.
We had a contractor do this in our yard and it did not get rid of the water.
I think we needed more drainage pipe than just do two going into the main
pipe to the road drainage sewer. It was disappointing. We cannot do
much with the yard because of all the water. If you do this yourself make
sure you put enough drains in. My husband thinks it is fine because it is a
little better, but our patio area still gets flooded. I would love to have new
patio or build a deck, but there is no sense in putting money into something
that will just get destroyed.
Brenda,
It has to be done in such a way that water on the surface can find the drains which often means that lateral lines are needed to carry water to the main line or lines. And things also have to be graded in such a way that water flows to an area where it can be picked up by the drain pipes.
Hi!
Just read your page for the first time. Thank you and God for sharing information on
gardening. Most people hold on to their new found information. God shared the earth and you will truly be blessed.
Jul
Thanks for all your info! Can you tell me where do we find the pipe with a cover to keep the soil from getting into the pipe? We did something like this several years ago and now the pipe has so much dirt in it that it does not drain very well.
Some big box stores sell the perforated pipe with a fabric like sleeve over it to keep the soil out while letting water pass through. You can make your own using a roll of cheap weed barrier, just wrap the pipe with it long ways. Hope this helps.
I am sitting on 1500 cubic yards of pond muck. I realize the humic content lowers pH two high fives low sixes. Working on a concentrated solar thermal rotary Kiln for drying organic material. Would this be decent for potting soil or general-purpose gardening soil?
Steve,
I’m guessing that it would be way too sticky. A small amount, maybe 20% added to bark mulch might be okay. Would probably be good for grow beds if mixed with some really aged wood chips.
Steve: I think you would be better off making some raised garden beds and filling them with garden soil mix. Make sure you get garden soil MIX, not top soil or plain garden soil. The word MIX is the key thing to look for.. If you want to make your own “perfect” garden soil mix the formula (according to Mel Bartholomew of Square Foot Gardening fame) 1/3 compost, 1/3 peat moss, and 1/3 coarse vermiculite. You can go heavier on the compost if you like. You can actually use 100% compost if you want although the peat/compost/vermiculite mix is better. Don’t listen to those who recommend mixing half top soil with your compost. Top soil is for growing grass. Don’t “water down” your compost with top soil. 100% compost is much better.
I enjoy the tips,they do work well, looking forward, to spring, to sell my new rooted, plants can’t wait to get started… love you Mike…
Thanks for the info Mike, Great stuff!
I need help to get on Graigslis please. I’m not very good with a computer.
Poor Mike!! As if we don’t ask him enough questions!!
Jerry Cull: it’s craigslist – maybe that’s the problem.
What do you recommend when the standing water is the water table?
Herman,
You can’t change the water table, all you can do is build up to keep out of the water.
Thanks Mike; you say it so much nicer. You must stumble sometime, but I’ve never seen or heard it. YOU GO, Mike!
Thanks MamaPat, when I stumble it’s big!