Bats are typically underrated and not given the credit they are due.
Besides being the only mammal that can fly, the majority of North American bats are also nocturnal insectivores.
This means that they feed on the insects of night, including mosquitoes. Actually, a small bat can eat more than 600 mosquitoes in just one hour! They consume beetles, wasps, and moths too.
Therefore, bats nesting near your house are a positive and natural way to keep pesky bugs out of your yard. Give them a place to stay and you will reap the benefits all year long.
The following is a simple step-by-step guide for both parents and kids on how to build a bat house together.
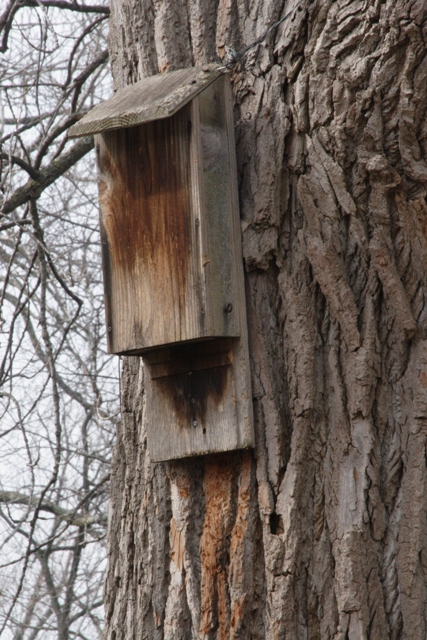
Bats are very particular about where they will nest; for that reason, the house will need to be constructed in a specific way.
The outside of the house must be painted according to your location, so that it is dark and warm inside for the bat during the day. If you live in the North, a dark color will absorb the sunlight and keep it toasty.
However, if you live in the warmer South, a light color may be better.
The space where the bats will enter the house must only be about three quarter-inch thick, along with a small gap that will allow air circulation.
Even though it is small, do not let that fool you. Dozens of bats and their pups will be able to live in the house.
Making it dark and cramped is the correct way for how to build a bat house, because they are attracted best to these areas for nesting.
Building a bat house is easy enough to do in one afternoon, in approximately three or four hours. For making the bat house, make sure you take stock of the tools you have and make a trip to the hardware store for those you do not.
The total cost of the bat house should not be more than $60. You will need to have:
- Measuring tape
- Straightedge
- Combination square
- Spring clamps
- Safety glasses (two pair)
- Jigsaw
- French curve and circle template
- Drill fitted with a quarter-inch drill bit
- Caulking gun
- Paintbrush (preferably two-inch)
- Foam roller (preferably four-inch)
- Scissors
- Staple gun with three-eighths inch staples
- 2-by-4-foot section of half-inch exterior grade plywood
- One six-foot 1×2
- Half-inch deer netting
- Exterior latex non-toxic paint
- Low-VOC adhesive caulk
- One-inch deck screws
- Three half-inch deck screws
Remember to keep safety in mind while working on the construction. Children can do a lot of the work that is involved in constructing the bat house, including taking measurements, driving screws, and painting the exterior.
However, parental guidance and assistance will be necessary throughout the process, especially to help with the sawing.
Keep the jigsaw in the hands of an adult at all times. Make sure everyone wears safety glasses when the saw is being used too.
Begin by using a tape measure and a straightedge to mark up the 2-by-4-foot piece of plywood. You will need one piece that is two feet wide and 26 inches long, as well as one that is two feet wide and 22 inches long.
Once it has been marked, clamp the plywood to the worktable. After placing safety glasses on, use the jigsaw to cut the plywood on the lines.
Next, print out a template for the bat cutout, which are easily found on the Internet. Or, create your own using a French curve and circle template.
This is a great way for kids to help with drawing the bat wings.
If you cannot find the French curves, you could also trace cans or cups in order to make curves of varying sizes. Afterwards, lay the bat shape out onto the edge of the shorter piece of plywood.
Clamp the plywood and bat design onto the worktable. Make sure the whole bat hangs over the edge of the table. Next, use the driver to drill holes just inside the points of the bat template.
This will make it much easier to turn the jigsaw blade as you cut the curved portions. Go ahead and cut out the bat design when you are ready. Cut the shape closest to the edge first, and then cut the entire bat.
Make sure you work slowly and cautiously since both halves of the cutline must look clean. When you reach a drill hole, stop the saw and turn it before continuing.
In order to raise the front panel up off the back for a space to house the bats, strips of lumber will be needed around the edges. Cut three pieces, one 24-inch piece and two 19-inch pieces, from a 1×2.
Then, use a caulk gun to lay a bead of caulk around the face of the longest 1×2 piece. Place it on top of the larger piece of plywood so that the edges line up.
Clamp it in place and drive one-inch deck screws through the 1×2 and into the plywood. Continue doing this every six inches so it is held sturdily in place.
Take the two shorter pieces and caulk the ends where they meet with the top piece. Clamp them down and attach them in the same way with the drill. If any caulk oozes out, make sure to use a damp rag to wipe it up quickly.
Now, the bat house is ready for some paint! Using the paintbrush and roller, paint the exterior surfaces in the color that has been chosen for your specific climate.
Make sure that all of the wood is painted and well sealed. It may need more than one coat, depending on how dark the paint color is. Then, let the paint dry fully.
After time has elapsed for the paint to dry, unroll the deer netting and lay it flat against the plywood on the inside of the back. Use a staple gun to attach the netting to the inner edge of the 1×2 and along both sides.
Pull it taut to avoid any sagging when the bats hang from it. Extend the deer netting completely over the bottom edge and wrap it around to the back. Once you have it securely stapled on all sides, use scissors to cut off the excess.
Using the caulking gun, caulk along the face of the 1x2s of the back section. Next, position the front piece on top of the 1x2s. Check to ensure that the bat shape is facing the bottom and the top edges line up.
Clamp it into place with the spring clamps. Drive one-inch screws through the face to secure it every six inches. Caulk the remaining uncovered sections of the 1x2s and place the cutout onto them.
Make sure you leave a half-inch gap between them for air circulation purposes. Clamp this piece in too, and attach it with a single one-inch screw on both sides.
Once you have finished the construction, take the bat house outside for hanging.
The best location for the house is under the eaves of your home. Attach the bat house by driving 3 half-inch deck screws through the corners and into the siding.
Make certain that the bat house is at least 15 feet off the ground and not near any bright lights that could disturb the bats. Choosing a place that faces the south is ideal because it will get plenty of sunlight to keep the bats warm.
That was not so hard, now was it? You now know how to build a bat house like a pro!
The design is specifically constructed to attract bats, so you will see increased bat activity in your yard rather quickly. The bats will enjoy their new stylish house, while you will enjoy not having to lather up with so much bug spray this summer.
You missed bat bricks https://www.nhbs.com/bat-brick, that page also has a link to bet tiles.
Mike did you know bats are the highest carrier of rabies in the Us? A few years ago I had work done on my house and after workers left I saw a bat in the house. I tried to get it out with a broom and felt it fly by my arm. After getting it out I felt something sticky on my arm. I washed arm and saw two very tiny holes in arm. Called doctor the next day. She said call CDC. CDC said they don’t treat people with insurance so I would have to go to hospital and be sure not to have both kinds of shot in same arm or they may not work. Hospital said I had been bitten but wouldn’t listen on the shots and put everything in same arm. I tried to explain what CDC said with no luck. I called CDC back to see if my next group of shots could be in other arm but was told it had to be the first group and was told to have my doctor order a special test. She ordered the test and it took a few days to come in and it had to be sent to Fla. It takes weeks to get back. If the test would have come come back positive it would have been too late to treat. I was also told I was lucky that the bat was foaming at the mouth and looked for bite marks as they have had a lot of people who didn’t know they were bitten until full blown rabies as the bats mouth is so tiny you don’t feel a bite.. There is no cure once full blown only death.. It is also so expensive. Hospital charge was 20,000 for first round of shots. A drugstore offered to give other follow up shots free but the medication for shot after Ins. was still over 500.00. After this I wouldn’t want to do anything to attract a bat.
Gale, wow, that’s a crazy story! I don’t blame you for not wanting to ever see a bat again.
mike, back in the 90s I talk to a lady who was over the reptiles at the Atlanta zoo she sent me plans of how to build Bat boxes, the ones I was building bats would die in them, I used no paint or stain, yet come spring the bats were dead in their box, so one day I was watching TV and this lady was on a show talking about how she would care for bats, called her and she sent a lot of paper work on how to care for them, to my surprise the answer to my question was within them, placement and insulation within the box is so important, being careful to contain the insulation, them need to stay warm in cold months, a cavity in side the box, much like a box within a box with insulation between them with a small opening in the bottom for entry, and as for the bats, once them mate its for life so when they move in to the box it theirs, one owner till they die, built a few for me and my friends with a lot of success, hope this helps……..
Thanks Terry, I truly appreciate this expert advice.
20 Free plans for building bat houses.
http://www.eparks.org/wildlife_protection/wildlife_facts/bats/bat_house.asp
Bless you, Kristi B.
I don’t actually live in the United States of America, but we do have bats over here in the UK, so I’m interested in looking at some of the plans, if not all of them, to see if I’m able to construct something for our place. Thank you, so much.
Mick
x x x x
x x x
P.S. Please don’t be offended, or alarmed, at the ‘x’s’. It’s merely a logo, of sorts, that I’ve used for the past 40-odd years.
The Internet is a ‘visual’ tool. It demands pictures.
Dear Johnny,
I just took a look at your blog. Last update was February of this year and I saw a great deal of text, text and more text. We update this site several times a week and include dozens of orginal images that we take ourselves. Can we include all of the photos that we’d like? No, it’s not humanly possible. In order to include photos of a bat house I’d have to build a bat house and you can bet yourself that eventually I will and it will be photographed and shared on here. But until then, I have a couple of businesses to run and thousands of plants to tend to. So if anybody wants photos right now, I suggest you google “bat house images”.
Thanks Mike….. Love your blog..That is exactly what I did! O googled it! I am a 76 year old widow and can’t wait for it to warm up enough here in Mid Michigan so I can work out in the garage comfortably and get started on it. NanaJo
Nanajo,
You and I both are chomping at the bit to get out in the warm weather. It’s been a long winter here in Ohio and Michigan.
Actually they don’t suggest hanging them in trees, predators (cats) can get to them. Most of the plans I’ve seen either hang them high on the side of a house or on its own pole, 12′ to 16′ high.
Question; The only Southern exposed tree I have in my yard is a 30′ pine. Will bats roost in pines? Thanks! Jeff
Jeff,
I don’t know why not, cut I truly can’t say for sure.
You need pictures for us ole guys, all those words would go nice with pictures. Just a tbought
Rich,
You’re probably right. But in order for us to get pictures we’d have to actually build a bat house, photograph the process, edit the photos as needed, reduce their file size then upload them to the Internet, then insert them into the post. And we do a ton of that. This site is loaded with original photos. It is grossly time consuming and right now there is no time. If you follow the Mondays’s with Mike series we are slamming busy getting things done. Truth be told, we try as hard as we know how. When I looked at that post I knew it needed photos. But we can’t use photos from other sites, they have to be our own original photos. So if I ever find the time to actually build a bat house you can bet that I will photograph the process.
Mike,
People who can read your post will or will not get interested.. I just spent better than an hour on you tube and google looking for info on Indiana bats. I am really interested, as I have found bats in both my basement and unfinished 2nd floor. I did not touch them as I them! So, they are in the neighborhood altho I am not near water. Couple of miles to a small lake and more to more lakes and a river, so I guess they are not as picky as I have read.
LOTS of plans and posts on bat houses. I am planning on having one up next spring, and it will be pretty much double the size of the one posted, as I have read that having double chambers with holes for them travel from the inner to the outer is better for temperature selection for them. If we want them, we have to care for them!
Thanks for this post, and may your readers decide that it is worth trying! I would love to have fewer mosquitoes and flying beetles and pests in my backyard/garden!
Let’s help the bats out. They are losing habitat, and we DO NOT need more chemicals to control pests when God Gave US critters to do this for us.
Now, about groundhogs and rabbits……..
Mike,
People who can read your post will or will not get interested.. I just spent better than an hour on you tube and google looking for info on Indiana bats. I am really interested, as I have found bats in both my basement and unfinished 2nd floor. I did not touch them as I moved them! So, they are in the neighborhood altho I am not near water. Couple of miles to a small lake and more to more lakes and a river, so I guess they are not as picky as I have read.
LOTS of plans and posts on bat houses. I am planning on having one up next spring, and it will be pretty much double the size of the one posted, as I have read that having double chambers with holes for them travel from the inner to the outer is better for temperature selection for them. If we want them, we have to care for them!
Thanks for this post, and may your readers decide that it is worth trying! I would love to have fewer mosquitoes and flying beetles and pests in my backyard/garden!
Let’s help the bats out. They are losing habitat, and we DO NOT need more chemicals to control pests when God Gave US critters to do this for us.
Now, about groundhogs and rabbits……..
You’re right David, good luck with your bat house.
Bats are great pollinators too!
Some plans with pictures:
http://www.batconservation.org/bat-houses/build-your-own-bat-house
http://www.batconservation.org/sites/obc.drupalgardens.com/files/201302/Bat%20House%20Plans%20with%20Pictures.pdf
http://www.fws.gov/Asheville/pdfs/beneficialbats.pdf
Pictures would definitely help most people to make one of these. Thankfully, I found the same directions on This Old House by searching for “How to Build a Bat House.”
No step by step instructions with pictures? 🙁 I don’t get how to make it.