Nothing can add more Pizazz to your yard than a beautiful flower and or perennial garden.
As long as it is weed free and you can keep it that way. Here’s a step by step guide to making that happen.
Step one. Site location.
Unless you are creating a garden of shade loving flowers, you’ll need a sunny location that has high visibility in your yard so the garden can be enjoyed by you daily and by those who visit your home. Pick a spot that you can see from the spot where you relax the most.
Step two. Removal of grass, sod, weeds or other vegetation.
There are a number of different ways to remove the vegetation from the area to choose for your flower garden.
You can cover the area with a thick layer of newspaper or cardboard then use something over top of that to hold it in place while you wait for the grass and weeds to die. This is a good place to use Weed Barrier Fabric. Over top of the cardboard just to hold it in place. Do not use it in your flower bed. Read My Rant about Weed Barrier Fabric. If you choose to cover the area with newspaper or cardboard to kill the grass and weeds I suggest you leave these materials in place for at least 8 weeks to make sure your efforts are successful.
The fastest but not necessarily the easiest method is to remove the grass and weeds from the bed before you start. The most effective way to remove grass and weeds from a potential planting bed is with a good, heavy duty nursery spade. Like this one!
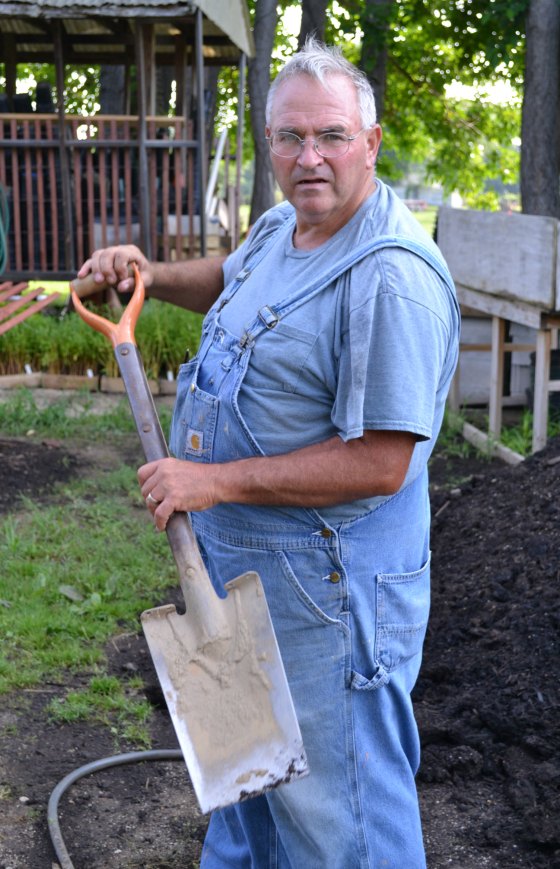
A heavy duty nursery spade.
A spade like this will set you back at least $89 if not more. This tool is worth every single penny. The $20 spade that you pick up at the hardware store or big box store will not compare. They are too light and flimsy. A good spade is heavy and rigid. Once you use one, you’ll grab it for just about every job you do. Think about a flywheel. Flywheels are heavy for a reason. They build momentum and once moving they are not easily stopped. It’s the same with a good heavy duty spade. Once the weight of this tool is in motion, it will not stop or bounce off of roots or hard soil. At least no where as easily as a light tool.
For your viewing and entertainment purposes, Duston and I, along with the donkeys, made a movie about using a nursery spade to remove grass and weeds. Make sure you watch the movie, most people go about this all wrong!

Watch the movie!
Where can you buy a good nursery spade? Just do a Google search for Nursery Spade and you’ll find plenty. If it’s priced under $75, you really need to pass and move on to a better spade.
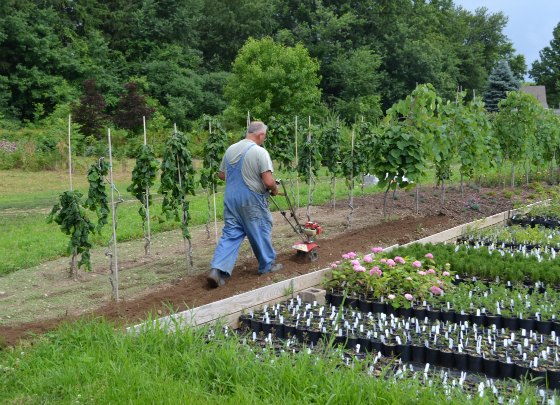
Rototill the soil to get rid of sod and weeds.
You can rototill the soil to rid your planting bed of grass and weeds but this has to be done over and over in order for it to be effective. You’ll need a good tiller, one that is capable of breaking up sod. I love my little Mantis Tiller, but it’s not designed to break up sod. You’ll need something heavier at least for the first tilling. After the first pass the Mantis would be perfect for working the soil to make sure the weeds and grass are completely dead.
You have to do this in steps. Till the area really well, then you have to let it set for a few days to allow the grass and weeds to dry out, then till again. Wait a few more days and till again, just continuing this process until all of the grass and weeds are completely gone.
You will never rid the soil of weed seed, so you might as well forget about that.
Keeping weeds in a flower garden at bay.
You can’t see it in this photo but I just put in a very large perennial garden. The area that I am tilling here is the last 20% of the bed that I haven’t planted yet. All summer I’ve been trying to keep this free of weeds. I till it and 7 days later it’s full of little tiny weeds that would be three feet tall in two weeks if I don’t keep it tilled. If I could find the time to finish planting it and mulch it, keeping the weeds out then would be a breeze. You cannot keep bare ground free of weeds. It’s impossible without a lot of effort.
Once you have the bed prepared you have to follow through and plant right away or weeds will be coming up in a matter of days. If you leave bare soil exposed to the air and sunlight for anytime at all it will completely fill with weeds in a matter of two or three weeks.
Once you have all of weeds and grass either removed from your planting area you should work some good, rich organic compost into the soil. You can buy bagged compost or rotted cow manure. Anything that is organic would be great. Peat moss? Ahhhhhh, maybe. Peat moss has the ability to hold moisture, but that’s about it. I’d prefer to use something that has some nutritional value.
Your ready to start planting flowers!
If you truly want your flower garden to be as weed free as possible you’ll want to plant the garden in small sections, then using a thick layer of newspaper, or a single layer of cardboard, you’ll want to cover the soil in between the flowers or perennials as you plant them. If you use newspaper, use at least 8 or 9 layers. If you need cardboard, somebody told me that auto body shops dispose of a lot of cardboard, you can start stock piling it ahead of time.
Plant a small section of flowers, cover the areas in between with newspaper or cardboard, then apply at least two or three inches of a good mulch over the cardboard or newspaper. Do not use compost, use a wood type of mulch like pine bark, hardwood bark etc. Weeds will easily grow in compost so you want compost under the cardboard, not on top of it.
How to Win the Battle of the Weeds.
Keep in mind, cardboard and newspaper are organic and will decompose completely over time.
There are two things that work incredibly well to control weeds. Cardboard or a heavy layer of newspaper, and a good thick layer of mulch. The reason they work so well is because they block the sunlight. Weeds need sunlight to grow. If you deprive them of sunlight, you win the battle of the weeds.
But, but, but . . . these things are temporary. They only work for so long, then as they decompose the weeds have a chance of growing again. But the upside is that as they decompose they actually improve the quality of the soil in your flower garden. To really stay ahead of the game you should apply a new layer of mulch each season.
What about Preen? Does that stuff work?
Yes, Preen does work at controlling weeds. Preen is a pre-emergent herbicide that will not kill existing weeds or plants. It is a weed prevent-er. It prevents weed seeds from germinating. So in order for Preen to really work you have to give it a fair chance by allowing it to start with a flower garden that is completely free of weeds.
If you follow the steps outlined above, then apply the Preen and re-apply it as soon as you see a few weeds, you can keep the flower garden weed free. But before you make the second application, pull any and all weeds the apply your second application of Preen.
The Secret to making all of this work?
Diligence my friend. Diligence and perseverance. You mow the lawn at least once a week right? Weed the flower garden on the same day, every single time you mow. It should take you about 60 seconds, and while you’re at it you get to admire the beautiful flowers. If you see many weeds at all, make another application of Preen or mulch.
Did you catch the magic in this article?
Sunlight. Flowers love sunlight, but so do weeds. The secret is to give the flowers plenty of sunlight and the weeds none. As the flowers, especially perennials, grow to a larger size they do a great job of blocking sunlight to the soil. Weeds hate that! If you have a flower garden that is completely full of beautiful perennial flowers, the weeds won’t have a chance. Even if they do germinate under the canopy of the flowers they will be small and spindly, easy to pull.

Her name is Ally, she’s our gardening companion. Goes to work with Pam and I everyday. She hate’s getting her picture taken. Can you tell?
Never let the weeds get ahead of you.
Trust me. This is doable. Use cardboard and newspaper, cover those with mulch. Use Preen for added protection if you like. This does work. Bare soil? Bare soil is a bear to keep weed free! Why? Too much sunlight.
Questions or comments? Post them below.
What are your thoughts on the information coming out about the dangers of PFAS chemicals which are now ubiquitous in recycled paper such as cardboard and newspaper? Ive been using in for at least 20 years and certainly contaminating my soil with it.
Sarah,
Because they are in so many products I don’t think the amount in newspaper, directly applied to soil would concern me. From what I’ve read they are in clothing, food packaging, even cookware. If it’s a serious concern regulators need to take action. https://www.cdc.gov/biomonitoring/PFAS_FactSheet.html
Hi Mike .. you use a variety of the techniques we use, and lots of techniques we don’t use. So to start with, we don’t have a tractor or tiller, and we don’t use hoes or other digging or soil chopping implements.
We get a truck load of composted horse manure and spread it on the soil, 1/4 – 1/2 inch deep or so.. We get cardboard from an appliance store — washing machines, fridge boxes etc. open out to large, easy to use pieces of cardboard (we remove tape, staples, etc). We use the cardboard to cover the composted manure so no light gets thru to sprout the weed seeds. We then cover the cardboard with 4 or more inches of straw — from large round bales.
To plant tomatoes, we use a bulb planting tool to cut a round hole down thru the straw/cardboard/compost and a few inches into the soil. For row crops, a farm knife to cut a 3″ to 5″ wide slash down into the soil — and as long as we wish the row to be.
i like to do the compost/cardboard/straw sometime in late winter so it has a chance to settle a bit. And rain moistens it so the plant roots have a moist environment to grow into. Some time in April or May when i lift the cardboard to peek under, i see lots and lots of earthworms crawling around — which tells me that i’ve done everything right.
The straw we use has — at most, only a few weed seeds in it, so we have only minor weeding to do until mid summer. .
Jim,
Great info, thanks for sharing.
HI Mike,
Love reading all the helpful articles on weeding and preventing them. My problem is we have several Rose of Sharon bushes with mulch underneath them. Weeds aren’t the problem – new seedlings from the bushes are growing in the bark mulch. Other than picking the thousands of them out by hand, is there a way to prevent them from starting? Preen doesn’t seem to help.
Dianna,
Preen and other pre emergents only work when the beds are free of weeds and seedlings before being applied. Then they have to be applied fairly often, usually lasting about 60 days at best.
Is it ok to use card board and 8 pages of newspaper or will that be too much ?Also can you use this method when planting lavender?Some people think the newspaper would be ok but the card board might hold water too long and lavender doesn’t like wet feet but good drainage .I read it is best to use pea gravel or small stones as much for lavender.Do u agree?Also does this method work for planting and preventing weeds with lantana? i plan on using mulch from cut up tree branches for the lavender even though it is in the same bed as the lavender.I would appreciate a quick reply as i am ready to plant my plants now.
Donna,
Both cardboard and newspaper would probably be fine. Wet soil really has more to do with how well the soil drains. Pea gravel could do more harm than good if the water doesn’t have an easy way to get out of the bed.
Thanks for your reply ,my bed slops so hopefully the water will drain.I read your article on amending clay soil .My bed soil is really hard and difficult to till,I don’t have a tiller.How deep do u have to till before adding your amendments?Do u have any info. on preparing a bed for lavender as well as any other info. on growing lavender?Have u grown it and if so what kind did u grow.?Please share your link if u do.
I am wondering if it would be smarter to just mix my old soil ,(pulled from last seasons bed),sand and compost mixture (i have left over ) and have 2 bags of sand and add some decomposed granite (would probably have to buy more bags) and pea gravel (might need to buy more) and add a little bite of compost and add it to the top of my hard clay soil to a height of 4-6 in. I already dug 10 in-11 in wide holes about a foot deep ,thought i could just add my potted lavender to the hole but read and found out that my plants may become bound to that container hole and will not spread(do u agree?), so I have to prepare the whole bed.What do u suggest i do?My bed is about 200 sq. ft. with plans to plant one row of lavender (12 plants) 3 ft. apart with a 2nd row of 11 lantana to be planted in between my 1st row of lavender.What do u suggest i do?
Donna,
Don’t over think this, it really is more simple than that. Of course a roto tiller would make it all easier. But when I was landscaping, probably a thousand homes in 20 years, I never tilled a bid, simply put topsoil over top of the clay and planted away. You’d be amazed at plant roots can work their way through.
Thanks,I ended up renting a roto tiller and added compost etc,to my hard compacted soil .My soil in my bed is now deep, 12 in. plus. It looks and feels SANDY but light, fluffy and hopefully welll-aerated.
I have a fews ? Most lavender growing sites I read,(from real lavender local and distant farmers I wrote too and some from the internet) said after tilling their hard compacted soil and adding amendments to make their soil as stated above, they did one of the following,which should I do?
A 1), A2), A3), A4), A5)
A)This is in regards to mounding your soil or to just planting shallow, where the top of your soil is level with the ground
A 1) they mounded their soil in rows and then planted their plants in individual 12 in. high mounds
A 2) they mounded their beds (not sure if that meant they made one long mound and planted in that one long mound or also added individual mounds to that one long mound and planted in those added higher mounds or just made individual mounds?
A 3)where it was hard to till they dug and chipped to make a hole and then made a mound
A 4)where we could till(2-3in.deep)the soil we raked the soil into one long mound per row.
A 5)plant shallow, top of soil should be level with the ground. (no mounding).Totally different
These other 2 sites ,B 1) and the 2nd sight, B 2a) http://homeguides.sfgate.com/plant-munstead-37544.html said the following in regards to how big ones hole should be and the 2nd sight which includes not only B 2a) , but also B 2b), B 2c) and B 2d)
elaborated with further planting instructions, B 2,b) , B 2,c) regarding the height of plant, (The soil is just a little higher then the hole.) and B 2,d), adding a water basin.
B 1) dig a hole just big enough for the roots,deep enough and wide enough to contain the roots,saying lavender grows best in cramped conditions.
B 2,a) Dig a hole twice as wide as and equal to the depth of the container.
In regards to how big ones hole should be:
Which one should I do? B1) or B2a)?
The 2nd sight info.on height of plant in the soil, B 2,b) and B 2,c) states:
B 2,b) Replace enough removed soil to raise the top of your munstead’s rootball 1 inch higher than the lip of the hole. Center the plant on the soil layer and continue backfilling until the hole is three-quarters full. Water to settle the soil and remove air pockets.
B 2,c) Adjust the munstead plant as needed so the top of the rootball protrudes slightly from the hole. Finish backfilling.
Should i plant my lavender as stated in B 2,b) and B 2,c)
2nd sight info. on adding a 2-3 in basin mound ,B 2,d),says the following:
B 2,d) Encircle the hole with a 2- to 3-inch mound of the remaining soil, creating a basin to steer the water directly to the roots. Water again.
Should I add a basin as described? Yes ,No? Do you think the mound will collapse once you add water to it.? Yes,No? Maybe this is a temporary thing to do to initially add water.What do u think?
Another site,,(from a local farmer) also mentioned about making a sort of basin around the plant ,they called it a ditch or well,
C)Make a well or ditch around your plant? Should I make a well/ditch? C 1,Yes ,No?
They said,
after planting their plant in the center of a mound,
C 1) they made a water ditch around the plants to catch the water they gave to the plant,basically forming a well all around each plant.I question this method because I have made a water ditch before around other plants and once I added water to that well it collapsed shortly. Maybe they just mean to do it at first/one time at planting time to water the roots initially.What do u think?
I APPRECIATE YOUR TIME TO ASWER MY QUESTIONS.Looking forward to your advice.
Donna
NEW
Thanks,I ended up renting a roto tiller and added compost etc,My soil in my bed is deep12 in. + It looks and feels Alight , fluffy and hopefully wells-aerated.
I have a fews ? Most lavender growing sites I read,(from real lavender local and distant farmers I wrote too and some from the internet) said after tilling their hard compacted soil and adding amendments to make their soil as stated above, they did one of the following,which should I do?
A 1), A2), A3), A4), A5)
A)This is in regards to mounding your soil or to just planting shallow, where the top of your soil is level with the ground
A 1) they mounded their soil in rows and then planted their plants in individual 12 in. high mounds
A 2) they mounded their beds (not sure if that meant they made one long mound and planted in that one long mound or also added individual mounds to that one long mound and planted in those added higher mounds or just made individual mounds?
A 3)where it was hard to till they dug and chipped to make a hole and then made a mound
A 4)where we could till(2-3in.deep)the soil we raked the soil into one long mound per row.
A 5)plant shallow, top of soil should be level with the ground. (no mounding).Totally different
These other 2 sites ,B 1) and the 2nd sight, B 2a) http://homeguides.sfgate.com/plant-munstead-37544.html said the following in regards to how big ones hole should be and the 2nd sight which includes not only B 2a) , but also B 2b), B 2c) and B 2d)
elaborated with further planting instructions, B 2,b) , B 2,c) regarding the height of plant, (The soil is just a little higher then the hole.) and B 2,d), adding a water basin.
B 1) dig a hole just big enough for the roots,deep enough and wide enough to contain the roots,saying lavender grows best in cramped conditions.
B 2,a) Dig a hole twice as wide as and equal to the depth of the container.
In regards to how big ones hole should be:
Which one should I do? B1) or B2a)?
The 2nd sight info.on height of plant in the soil, B 2,b) and B 2,c) states:
B 2,b) Replace enough removed soil to raise the top of your munstead’s rootball 1 inch higher than the lip of the hole. Center the plant on the soil layer and continue backfilling until the hole is three-quarters full. Water to settle the soil and remove air pockets.
B 2,c) Adjust the munstead plant as needed so the top of the rootball protrudes slightly from the hole. Finish backfilling.
Should i plant my lavender as stated in B 2,b) and B 2,c)
2nd sight info. on adding a 2-3 in basin mound ,B 2,d),says the following:
B 2,d) Encircle the hole with a 2- to 3-inch mound of the remaining soil, creating a basin to steer the water directly to the roots. Water again.
Should I add a basin as described? Yes ,No? Do you think the mound will collapse once you add water to it.? Yes,No? Maybe this is a temporary thing to do to initially at at planting to add water .What do u think?
Another site,,(from a local farmer) also mentioned about making a sort of basin around the plant ,they called it a ditch or well,
C)Make a well or ditch around your plant? Should I make a well/ditch? C 1,Yes ,No?
They said,
after planting their plant in the center of a mound,
C 1) they made a water ditch around the plants to catch the water they gave to the plant,basically forming a well all around each plant.I question this method because I have made a water ditch before around other plants and once I added water to that well it collapsed shortly. Maybe they just mean to do it at first/one time at planting time to water the roots initially.What do u think?
I APPRECIATE YOUR TIME TO ASWER MY QUESTIONS.Looking forward to your advice.
Donna
Mike please onlyr read the first set of questions,the other 2 sections starting with new were you drafts ,forgot to erase them .They repeat most of the info. i previously asked u so ignore those sections. thanks,
Donna
Donna,
You are trying way too hard. At this point your bed is prepared I’d just plant the lavender. No good reason to mound the beds unless you have drainage problems.
Thanks Mike i will take your advise. .Wish me luck.
Donna
RE:,,,HOMEMADE WEED KILLER::
white vinegar, Dawn detergent and Epsom salts. Mt sister says this works well for her, but by now my weeds have gotten so thick around the perennials I don’t know if that is still a solution. Have heard ROUND-UP IS QUITE POISONOUS.! (Unless it’s been so diluted that it’ no longer effective,)r Are there any commerciial products that are both SAFE & effective,??,,,,,,,,,,,,,
Shermie,
There really is not weed control product that you can use near other plants. Weeds that are that close to plants have to be pulled.
isn’t corn meal a preemergent
Pat,
Corn meal is sometimes used as a pre emergent but when you look at the rate of application it takes a lot of corn meal to truly be effective.
I gave a lawn that was mostly sod. But has been about taken over by Wiregrass (east coast) or Johnson grass (west coast.) I think I’ll have to Roundup the whole section or the Wiregrass will grow back with a vengence. I have dug out sections and have constantly patrol the edges for the invasive stuff.
Does the vinegar mixtures work on Wiregrass as I would prefer to avoid large amounts of Roundup? Thank you for all of your helpful videos and articles. Holt
Holt,
My personal opinion is that the vinegar will not give you the long term effect that you need. Roundup translocates to the roots of the plant which is why it is so effective. See this http://mikesbackyardnursery.com/2010/09/quick-easy-technique-to-fix-areas-in-your-grass/
Mike, please give a video on propagation of rhododendrons, and azaleas. please!PleasePlease Mac McGee also let me know when the members area will open for pay membership?
Joseph,
The members area will be open on August 1st but only for a short time. http://backyardgrowers.com/join Azaleas are pretty easy if done now, just search easy summer propagation on this site. Rhododendrons like to be done during the winter over bottom heat.
I have hard clay soil that I keep composting and amending. My biggest issue is wiregrass which may be the same as crabgrass. It is a tough grass that is the first to turn brown in the fall and the last to turn green in the spring. I laid roofing shingles as a path to block out sun and make a path between veggie beds. After a year, if you pick up the shingles, the grass roots are still alive underneath. No matter how much I pull up, there is still more. Round up helps but hard to not kill surrounding plants. I think it has roots to China. If a piece breaks off, it will be back growing in a few days.
Tina,
Roundup will do the trick but you have to stay with it until it’s completely gone.
Mike
I have been using cardboard in my garden this year along with mulch over it .I also use compost from where they grow mushrooms .it has compost, horse manure & lime. so far I am delighted with the results because I didn,t plow the middles . I like the results so far I am using soaker hoses to keep everything watered . because we are in a drought. here in Georgia. we have had less than one inch of rain in three months.. thank GOD that I can water it from my well.
thanks
Marshall
Marshall,
That’s great, I’m glad it’s working for you.
There are 4 shovels I use on a regular basis. Having mostly sandy soil, some of it full of old Black Oak tree roots, a heavy spade is not really needed.
The most used ones are my square point and round point, although the round point is about due for replacement. In narrow areas of my gardens I use a trenching shovel, the second one now, as the first was finally worn down to only a 3-1/2 inch length blade. The last one, rarely used now, is a short handle contractor’s square point, but came in very handy when digging out the footings trenches underneath our manufactured home for a new foundation.
Digging in the new expanded garden revealed numerous tree roots, and the square point shovel, with the blade nicely worn to a sharp point, worked quite well in cutting through all but the thickest roots with little extra effort.
Large roots were dug around and then cut with a chain saw. Those were left from the many old Black Oak, Black Walnut, Maple, and Sassafrass trees that were removed. Some of those Black Oak were over 150 years old, 30 inches in diameter, and hollowed out by squirrels and carpenter ants to the point where the trunks were only 1-1/2 inches thick.
If you have old trees that you’re worried about, use about a 5 pound rock and strike the base of the trunk. If it sounds like just a ‘thud’, you should be OK, but if it sounds hollow, and especially if it’s been drooping hollowed out branches, you might want to consider removing it before it does it on its own, which may cause damage to anything close by, including your gardens.
By the way, green Sassafrass logs cut to proper lengths make excellent fuel for smokers for most meats! Great flavor!
Hi Mike, I saw the HLWS for the first time several years ago when you were showing how to propagate them. I have been looking for one ever sense and am having a hard time. I have never seen them offered at local nurseries and am nervous about mail ordering them. However, I would have no issue ordering from you if you sell them that way. Do you? and if so, how can I purchase one from you? I live in NY and am disabled so driving to Ohio really is not an option for me.. I look forward to hearing back from you.
Hope,
I no longer sell them, I sold all that I had. At one time just a couple years ago I had hundreds of them, all gone!
What are HLWS? Thanks!
Kathleen
Kathleen,
HLWS stands for Harry Lauder’s Walking Stick. Don’t you just hate acronyms?
You said there is a receipt for killing weeds which includes, vinegar liquid soap and something else that I cannot remember or amounts .Could you repeat?
Jo,
Just search weed control on this site and you’ll find a couple of articles.
Mike, my problem is that grass grows inside of the plants in my flower bed,which are mostly day lilies. How can I get rid of that? i can’t seem to pull it out. One time I tried digging out a plant, pulling out the grass and replanting the plant. But that is so much work because I have a LOT of plants in that flower bed.
I love all of your articles and videos. Thank you!
Nancy,
Once the grass gets to that point it has to be pulled or you have to dig the plants and divide them. It you wait until winter you when the daylillies are dormant you might be able to pull the grass easier or treat it with an non selective herbicide. But you’d have to be really careful with that.
Great Video Mike, and I can see I did not have the right Spade for the job when I did my garden. You made it look so easy and you got it done in a very quick time. My next big investment along with a good set of pruners.
My garden is fairly weed free, but my neighbor lets it all go to seed and all the milkweed flies over the fence to sprout everywhere. I am tempted to jump the fence and Roundup the whole place.
Hi Mike,
I had a Sod lawn put in several years ago, now it is being overtaken by some broad leaf type weed. My question is if I kill the broad leaf weeds will the sod still be viable? I live in upstate N.Y.
Thanks,
Bob
Bob,
Yes, if you get rid of the weeds your sod will be just fine. “Sod” is really nothing more than a vehicle used to deliver instant grass. Once it’s established it simply becomes grass. So you can treat it as you would any other lawn. As long as you still have plenty of grass plants in the lawn you’ll be fine. If it’s really thin you can overseed right after treating the weeds, about 3 days later. The weeds will die, the grass seed will grow. I’d wait until the temps are down into the 70’s if you are going to over seed. Right now it’s a bit too hot.
I have found that sheet metal roofing placed on sod (held in place with a few cinder blocks) will actually “cook” grass and weeds in 3 weeks. As a bonus, earthworms come up during the night and drag the vegetative residue down into the soil. Even my small tiller can turn over that cooked sod after 3 weeks under recycled roofing metal.
As a side-note, putting down 8 sheets of newspaper over freshly-mowed sod or weeds and then covered with topsoil and compost is a simple way to make raised beds. The old sod and weeds will die under the newspaper (no need to till first, the earthworms do the work) while the new plants will have no trouble putting roots down through the damp, aging newspaper.
I am currently doing this exact same thing in the back pasture. I have rototilled it 3 times and last night went out there with the pitch fork or whatever you call that thing that’s waist high with tines that are really tough. It’s pliable alright. Next I’m going to cover it with dry straw and cover it for winter with black plastic to mulch it so to speak. I don’t have all the great language of gardening down yet.
Next in the spring I’ll have the nursery come out and dump potting soil on top I have worked that soil down l0 inches deep. I hope its deep enough. I can’t afford to have 3 yards of soil dumped on top of cardboard unfortunately I wish I could, but I don’t. I’m figuring on the black plastic keeping it moist and dead under there for months.
Then in April when my seedlings I’m going to sell are ready for outside they will go in there for a couple months until I can pot them and sell them in May. Then when they are potted up I’ll til i back under and cover it again with black plastic and keep smothering whatever is under there.
It better work. I am simply out of other ideas.
Cathy
Cathy,
Not sure what kind of seedlings you are growing, but May is never a good time to dig anything out of the ground. Digging season starts at Thanksgiving and ends in early spring before plants leaf out. Once they leaf out we quit digging and don’t dig anything again until Thanksgiving. If you can get them out without doing any root damage it might work, but it’s risky.
what brand spade, do you use in the move on how to have a weed free flower garden
Max
Max,
There are lot of brands of spades and most importantly, as long as you spend around $80 or more you have a good “nursery spade”.
Mike, I’ve read the different articles about the right mulch for a vegetable bed and
my question is; Is there any vegetable outside of Blueberries and Strawberries that
prefer a mulch other than hardwood. I used hardwood and newspaper clippings last year and
they seemed to work well but wasn’t sure about some of the vegetables such as squash, etc.
Please advise.
Danny,
I think hardwood bark mulch is as good a mulch as any. It will break down into excellent organic matter for your garden so I think that makes it a good choice. Most people don’t mulch a vegetable garden but doing so won’t do any harm. But I would fertilize the garden before you plant.
I have used straw as a mulch in my vegetable garden. Hay will work. but be aware it’s full of grass seeds,
Hello all experts! We have a question from a reader:
I am new to flower gardening. My objective is to grow my own flowers from seeds that I harvest in the fall. I would like to see a road map (step by step process) from start to finish.
ie. When do I harvest the seeds? How do I store them? What type of soil did I us? When do I plant them in the early spring? Do I plant them indoors or outside? If planted indoors, do I need to grow them in a hot house enviorment? Etc, Etc.
Hope I explained what I am looking for.
I have done my beds as you suggested. My question is this: Will my tulips be able to push through the newspaper and mulch or was all this a death sentence for them? Thank you for your help.
Renee
Appreciated the great information on spades, and giggled my way through the video. I tried to be attentive, but those donkeys – my gosh, they are such a riot!
I appreciate you explaining how a spade is the better tool for certain tasks than a shovel. I would not have automatically picked the heavier spade, because I would have assumed I could handle a lighter one better and thus been more effective, but your explanation makes total sense.
I have to say, Mike, I am continually amazed at the amount of information you share so freely. I love how members of your family are also involved (and Fergus, Finnegan and Ally!), and the obvious passion you have for what you teach. Thanks a million. You’re an inspiration.
Hi Mike, I really enjoy your website and have learned much from you. I live in central west Fl and would like to know what type of mulch and any specific brand that you can recommend for around my ixora shrubs. Right now I have rubber mulch down but that is pricey and I need to add more but I want to use something else. Thank you, Maggie…love the animals
Maggie,
Mulch varies from region to region but any organic mulch that will hold moisture and decompose over time would be perfect. Hardwood bark mulch, pine bark mulch or whatever else they sell in your area.
Thank you. I wonder if my local nurseries would sell better quality mulch than the the home improvement stores.
Mulch is pretty much what the label says. Just check the bag.
oh, my gosh, I luv your dog!!
Just simply ,” Thank you!”
HI! Thank you for spending a few minutes of your precious time with my family-we were just passing by and I saw your sign!! Our granddaughter really enjoyed feeding the donkeys and thanks for the tip on Geneva on the Lake-a great stop. We are from Illinois and I am currently doing my best to start a small nursery-have some plants started and my ‘garden slave’ (husband) has been putting in a water line just for the nursery.
Do you sell in the early fall as well? I have several plants I am going to market and see what happens-this will be my first attempt at selling. I love being in the ‘dirt’ and to get paid for it will be a real blessing.
I am battling purslane weed at the moment!!!!! Any ideas as to how to eradicate this stuff??? We have really had some challenges this year, starting with a huge pecan tree falling right in the middle of all and some health situations but we trust the Lord and carry on.
Thanks again Mike and Pam. You are “real people” and not all the hype!!
Terry
Rinse off the purslane and throw it into your salad! It’s related to portulaca flowers, and a tasty nutritious snack. I am growing a beautiful cousin from Chile, Calandrinia. It is a hardy succulent with bright pink, poppy like flowers. We are having a terrible drought in California, and anything that takes little water is popular.
I wish I had soil like yours but I have Carolina red clay. It is either dry and hard like terracotta or on the occasion it is wet it is extremely sticky. I do have a very good spade however that is called the King of Spades. It is the most treasured tool in my arsenal.
Gary,
Compost, compost, compost. Just keeping adding compost to that poor soil and eventually it will get better. The compost will keep the clay from sticking together quite so much.
My soil is just the same, only black! We are living on the ancient fringes of San Francisco bay, and the silt that gradually filled in this part is sticky when wet. Cocoa bean hulls are a good mulch if they are available to you. Rice hulls, anything cheap and plentiful. Sand does not work. The particles are heavier than the clay (adobe) and will sink out of depth.
If only that worked in Arizona! That spade will just deflect off the hardened clay and leave a scrape mark! Plus, if you have crab grass, all you did was take the tops off and the roots will send out replacements quickly! The only effective choices are a mattocks or rototiller in the desert. Plus, the more I compost/fertilize and water, the faster that stuff comes right back like wildfire. I pull up mounds of the stuff and come back the next day to do it all over again. Is there an organic solution or am I doomed to pulling it up by hand?
http://www.fertrell.com/weedban.htm
“WeedBan works by stopping secondary feeder roots, causing seedlings to die. It’s effective against dandelions, crabgrass, creeping bent grass, foxtail, lambsquarter, purslane, redroot pigweed, smart weed and barnyard and Bermuda grass. Because it’s made from a corn syrup byproduct, WeedBan is completely safe. Its nitrogen content makes an excellent, slow-releasing fertilizer.” This company carries natural and organic products.
Thanks Kathy for the link.
Question, This year , like every year, I plant Zucchini plants. This year, after removing a couple of fruit, within 3 days the whole plant would lay down and die? Never had this before? Even the next day you could see the plant go from super strong standing up to , slight wilt. The 2nd day, more droupe, the 3erd day, flat on the ground and gone. What was the cause for this? Usually you have to take a chainsaw to the plants to get rid of them!
I give?
Rich,
I don’t know the answer but I’m guessing you’ve got some kind of stem rot, damping off type of situation that is making the stems extremely weak. Could be cause from an overly wet and or humid condition in the garden.
Cut worms, they chew right through the stem just below soil level, usually just as the plant is flowering nicely. I haven’t found an organic solution, but would really like to know one.
I got about 3 squash before I had to pull my plants out. The aphids hit from out of no where! Is there a preventative treatment for aphids, or do I have to wait until they attack. We never notice them until it is way out of control. Any help you have would be appreciated!
Renee
squash vine borer often chews into zucchini stems. You’ll see the “sawdust” around the hole. Just take a paper clip or piece of wire & put it in that hole & wiggle back & forth. You should pierce the bug & your problem is over.
My husband’s grandmother taught us to prevent cut worm damage by wrapping the plant stem in newspaper (about 3″ strip per plant wound around the stem just above the roots) at the time of planting. She said it made it so they could not get through to the stem. Hope that helps. For what it’s worth, we have never had a problem with cut worms and we’ve been gardening for 30 years.
Crushed egg shells around plants cuts the worms & kills them.
Do you have gophers? They could be eating the roots. My daughter makes big cages of chicken wire and buries them under the plants. They were killing her Cecile Brunner rose vine so we dug up the whole thing and did the chicken wire trick. Works!
Hi Mike,
We have a lot of trouble with grasses so I spray my ground with round-up and let it set at least a week, then if needed touch up with a second spraying. Last year when I put my vine crops I never had to till, just pulled a few weeds around the plant site. This year, I sprayed a section as needed. Worked great~
Monica
Thank You so much for showing me how to properly use a Garden Spade. I never would have used it in that manner if I hadn’t watched your video.
I also loved your two assistants, the donkeys. Are they just pets? Their very curious animals aren’t they?
I learn so much from watching your videos. I enjoy them a great deal and wonder why you do not have a DIY Garden Show on T.V.? You would be perfect for this and I know I would be watching every episode.
Thank You again Mike!
Sandy from Southern California
Thanks Sandy. Yes, the donkeys are just pets and yes they are extremely curious and a bunch of fun!
I always enjoy your informative videos. I always learn something new. Have been using preen for a couple of years now but have never done a second application.
I have 3acres part marsh, part woods and the lawn.
I got garlic mustard. I got most of the 2 yr plants out last year but this year the one year plants that I missed last year over took the property. Now that they have flowered and blown all over, I’ll be covered again next year.
I also have creeping Charlie in the flower beds which comes out pretty good with a metal rake but messes up my grass if I use it on the lawn.
Any suggestions for getting the Charlie out of my lawn and killing the garlic mustard permanently??
Diane,
Any good lawn fertilizer with weed control will take the creeping Charlie out of your lawn. The thicker the grass the few weeds you will have if you can improve the lawn. The weed control that I mentioned in this article will work for about anything if you are persistent.
Mike I love all of your information and love your over-alls.. Just a little hint for Pam, If she would sew a Blue-Gene band ( like a shoulder strap) up high across the shoulders at the top of the back and attach it to your present Blue Gene Straps that are on the Blue Genes, your left strap would not keep falling off and be a pain to you … Just thought I would let you in on the helpful hint … Would not have to keep pushing up that strap that is falling down on the arm …. Love your program and love your hints. Vauda
I love this article going to use it for my hosta beds. I have one bed covered with a tarp but this is year 2 and the weeds are coming thru have to recover. Not doing anything this year had hip replaced July 1 just on the mend now. Look out next year.
You mentioned having problems keeping the unused part of your garden weed free until you are ready to plant in that spot. Use the newspaper and mulch there as well, it will keep the sun off the area- keeping the weeds down and when you are ready to plant you can pull the newspaper and mulch into a pile and reuse it once you are done planting. A little extra work but less work than weeding and tilling.
Spade looks like this one here!
http://www.amleo.com/spade-leonard-tapered-blade-full-strap/p/A13M/
A classic and one of the most useful tools in my arsenal.