This is a good winter project. At least it was for me.
These wooden plant propagation flats are really quite simple and easy to make.
I used pressure-treated wood so they would last and I’ve never had a problem with treated wood around my plants or rooting cuttings so don’t be concerned about that. Everything you read online is not true.
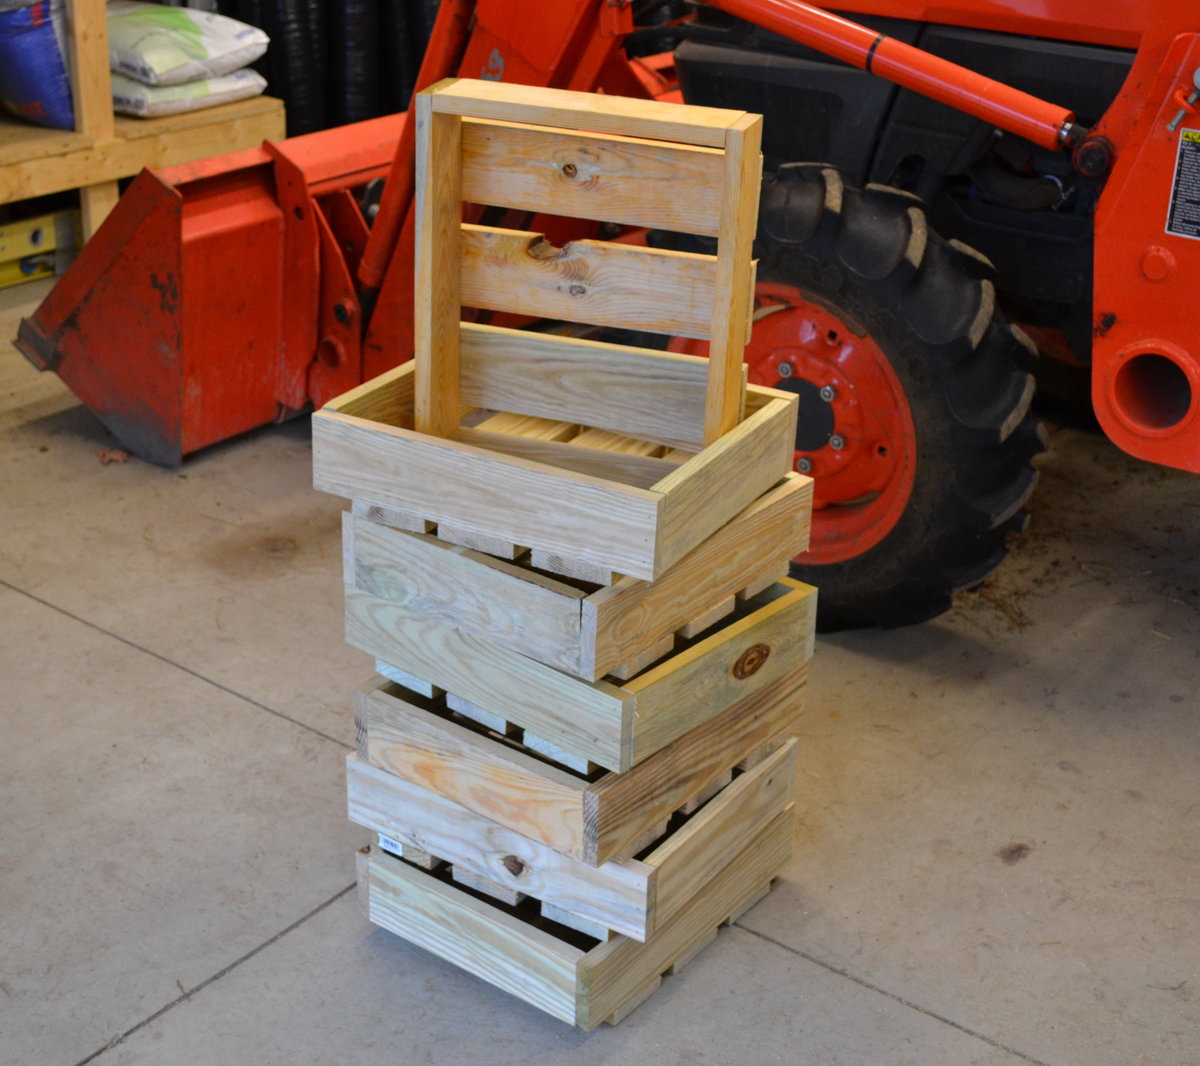
The boards that I used are all treated one by four material and there are only three dimensions to remember or write down.
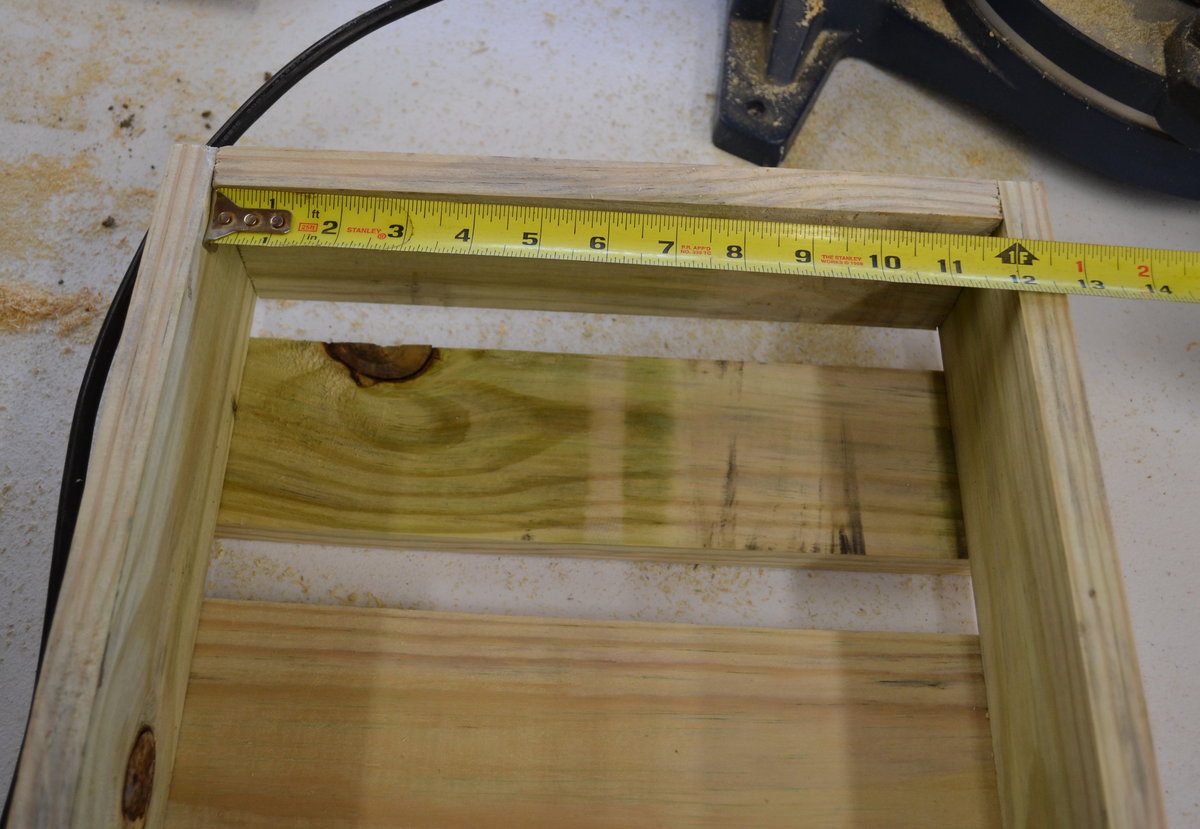
Each flat has two end boards that are 12″ long and note that they are placed on the inside of the sideboards.
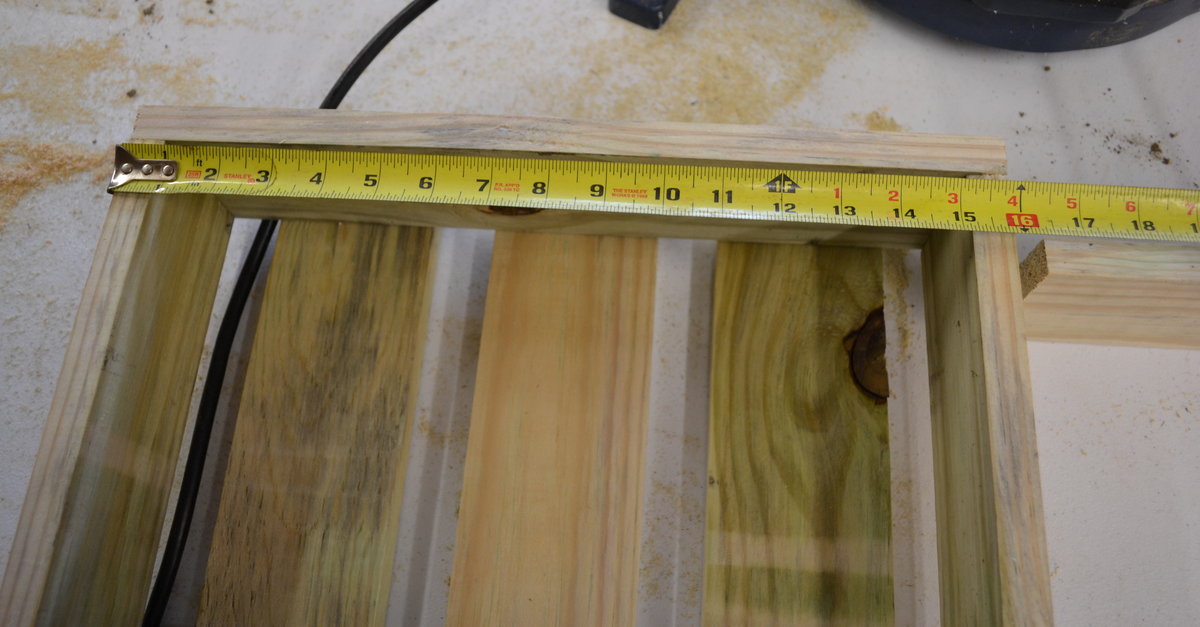
Each flat has two side boards that are each 16″ in length.
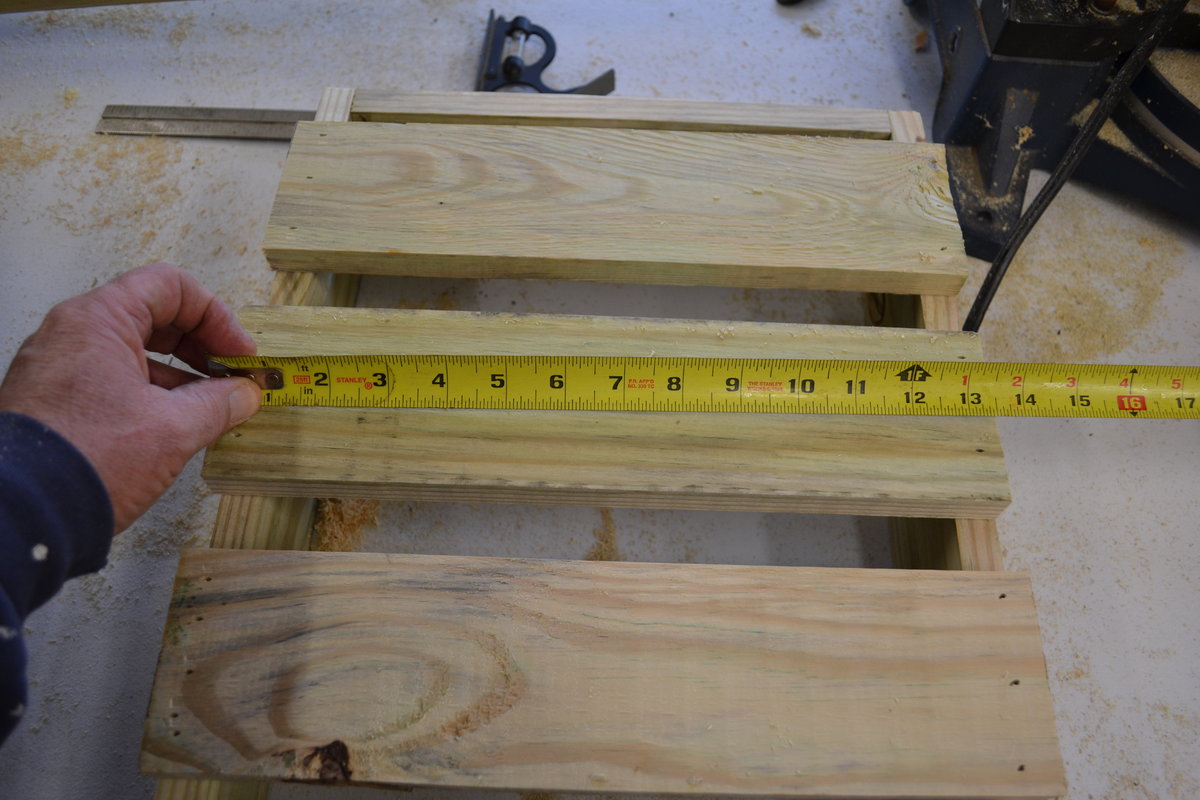
Each flat has three bottom boards that are 13.5″ long, that way they can extend to the outside of the side boards. Any small nail is sufficient to nail the boards together.
I just happen to have a brad nailer so I used that with 1.5″ brads. If I didn’t have the nailer I would have just purchased small nails and hammered them together by hand like in the old days!
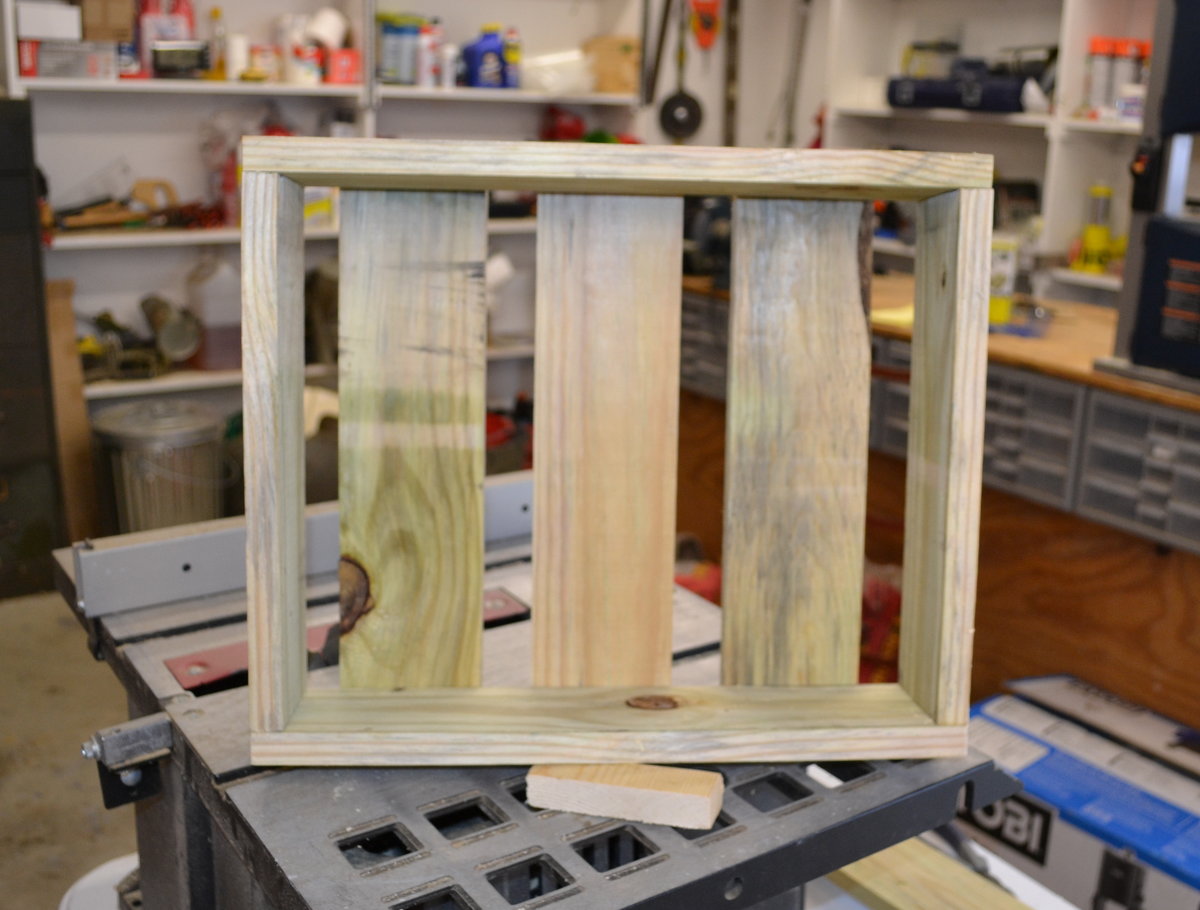
Yes, there are rather large gaps in the bottom of the flat and we often root cuttings in coarse sand. So will it fall out the bottom of the flat? Yes, if the sand is dry it will for sure fall out the bottom of the flat.
What we do is line the bottom of the flat with a couple of layers of newspaper, put the sand in, stick the cuttings and then move the flat to where it’s going to stay until the cuttings are rooted.
By the time the newspaper rots the sand will be wet and packed and as the cuttings root the roots will bind the sand together pretty well.
You can also use something lighter like a light fluffy mix that contains peat and perlite.
The nice thing about these flats?
They are 3.5″ deep and that makes a nice, deep flat for rooting cuttings. They’ll last a long time and sun and cold won’t make them weak and brittle. With the bottom boards being positioned as they are these flats will also do a little root pruning for you.
Root pruning is good.
This is how it works. The cuttings start to root and as the roots grow toward the bottom of the flat they will eventually poke out the bottom of the flat.
If the flat is sitting flat on the ground the roots will go out the bottom of the flat and root right into the soil making it difficult and stressful on the plants when you are ready to move the flats later.
Breaking roots during the growing season is not a good thing. It can easily shock the plants causing them to wilt and possibly die.
Because these flats have 3/4″ of air space between the soil and the inside bottom of the flat the tiny roots hit that air pocket and the tips are killed. Believe it or not that’s a good thing.
When the tip of the root is killed it can’t root into the ground, and once the tip of the root is dead the plant will go into survival mode and create lateral roots to replace the main root that was lost.
This makes for a very dense root system and really healthy little plants.
It’s called air pruning and was developed many years ago.
The first record of air pruning that I know of, at least on a commercial basis was a grower who started growing tree seedlings in cardboard milk cartons with the bottoms cut out. The bottomless containers were placed on a bench that has a wire screen bottom.
Once the roots reach the bottom of the container there’s nowhere for them to go, they hit the air, the tips are killed.
The plant then produces a lot of lateral roots inside the container. Each time a root tries to escape out the bottom of the container the tip is killed and more lateral roots are produced.
Root pruning on tree seedlings is essential and it used to be done manually.
Tree seedlings typically want to grow one really long taproot to anchor the tree deep into the ground. That’s a good thing in the forest I guess, but in a nursery setting, it is not good because nursery trees have to eventually be harvested to be sold.
So growers used to transplant their tree seedlings two or three times just so the small trees would develop better root systems. When the art of air pruning tree seedlings was invented or developed, whichever applies, all of that changed.
Some growers who produce tree seedlings still do it the old way and there’s nothing wrong with that, but many are now using the art of air pruning to produce a stronger, healthier tree seedling.
So if you get the chance to buy some tree one year old tree seedlings, expect a high rate of loss because a one year old seedling that has never been transplanted is likely to have a struggle and a pretty low survival rate.
Here’s a little inside baseball for ya!
In the industry tree seedlings that are not grown in an air pruning system are sold as . . .
1-0. A seedling that is one year old and has been transplanted zero times.
2-1. A two year old seedling that has been transplanted once. That’s a much better plant than the 1-0.
3-2. A three year old seedling that has been transplanted twice. That little baby is going to have an awesome root system, and it’s rate of survival is going to be the highest of the three grades, and it’s got two full growing seasons on it’s little brothers. Therefore a faster finished tree for you.
And of course the price of each goes up with each season of growth and each effort to transplant the tree. The more you spend, the better the plant that you get.
Okay. That’s a little inside baseball. Don’t spread it around. You know how the Internet is. One person finds out and the whole world knows!
Not sure if it’s currently for sale, I don’t know when you’ll be reading this. It’s only available when we have the time to fill orders.
Questions? Comments? Post them below and I’ll do my dangdest to get back here and reply to them for you.
It seems to me like these frames COULD easily be made from repurposed pallets. Many places have pallets they dispose of, so your only cost would be collecting pallets, labor and fasteners. One bit “plus” is that most pallets are not treated lumber, so there’s that as well.
Hi Mike
My neighbor has a peonies bush. She said I can take some cuttings. Will peonies root this way? Should I stick them with the root compound and then sand? Cover them with white bag?
Morgan,
Probably not, peonies are propagated via division.
Howdy Mike, Bob here, from Southern MD. A member since the 80s.
Why not 1/4″ un-nailed ratwire and newspaper in the bottom?
And, what do you cover them with for the Winter? Straw?
Robert,
You really don’t something in the bottom that the roots can tangle around. I either use cardboard or newspaper and if the soil is damp enough I probably don’t need anything at all. I don’t cover them at all during the winter, you don’t want to create a home for critters. But I now do all my hardwood cuttings at the very end of winter, about 3 weeks before they leaf out and it works really well.
Hi Mike.
Can I use anything else insted of the
aquarium ?
Yessica,
Anything that will hold in moisture and allow some light will work.
Really enjoy all the feedback from fellow gardeners. Have been starting my own cuttings for ten years now. Have many shrubs and berry starts that we sell every year. My wife got interested in bamboo years ago. Our first bamboo root we got at the dump that someone was throwing away and have accumulated other varieties free from Craigslist. Now we are getting into cacti. This is first year will try selling starts of cactus. We also grow many veggie and flower plants that we sell early spring into the fall. Will be starting early veggies here soon to sell at first sale. One question I will ask is if anyone has ever started rhododendrons from cuttings? Have done many azaleas and conifers but cannot get timing right for rhododendrons. If you had success please let me know.
Les,
Rhododendrons are usually done in the winter, over bottom heat.
Can I start Lenten rose plants from stem cuttings?
Jack,
I’m sure you can, try this, http://mikesbackyardnursery.com/2015/01/easy-summertime-plant-propagation-techniques-can-home/
Do wish I had all of this information 30 years ago when I was more active and had more space. Enjoy reading each and every posting. Great information and and assistance to those who learn by reading and doing.
For anyone that is concerned about using treated wood, they could simply substitute cedar or redwood boards for this project. Of course it would cost a whole lot more, but hey, you get what you pay for right??
Thanks for another great idea. Since I bought myself a nice miter saw for Christmas I may have to put a few of these together over the winter if I get a chance.
Have a great holiday season, and keep up the great work.
David
Twisted Sprout Nursery
Galsesburg, IL
I love, love your website and backyard growing system,I have learned so much from both. Right now I am using the info for my own personal propagation. I bought 1 red twig dogwood and pruned it midwinter, then stuck them in sandy soil. 1 of them rooted!!! Wish I had bought the system before I yanked out the overgrown rose of sharon, I could have propagated it and had a better size.
That’s great, for plant propagation, and it dose work, in the mean while, I gave my mom some, roses reasonlly, I didn’t want to through out them after they willted. So I took off the flower, cut the bottom of the stem just below the last node, on a slant,took out a potateo put a whole the same size as the stem width, dump the stem in some rooting compound, put the stem in the potateo whole I made, anchor it in a bowl and stuck it in a dark cool area,and about 3 weeks got roots, quests I’ll be selling roses in the near future..
That’s great, for plant propagation, and it dose work, in the mean while, I gave my mom some, roses reasonlly, I didn’t want to through out them after they willted. So I took off the flower, cut the bottom of the stem just below the last node, on a slant,took out a potateo put a whole the same size as the stem width, dump the stem in some rooting compound, anchor it in a bowl and stuck in a dark cool area,and about 3 weeks got roots, quests I’ll be selling roses in the near future..
Big Mike! Gotta start by telling you what an absolutely wonderful inspiration you’ve been for me over the last couple of years. After getting crushed in the tree felling accident and sustaining the neck,back and knee injuries by being driven like a nail by a thirty something foot 12” thick red maple widow maker I️ really wasn’t in high spirit. I️ stumbled across you in a video on YouTube then started looking at the videos you’ve made to aid your fellow garden family and friends and you lite a fine fire and rekindled my love of plants and gardening work. The part time work has helped heal not only my body but also my soul as every plant I️ create or help out or save has made the world a healthier and more beautiful place for everyone to enjoy.
I️ can’t help but think I️ need to repurpose some wood pallets into seedling condos! LOL. I’m thinking I’ll use the air stapler to tack some landscaping fabric (we might have found a use for it!) to hold in my soil??? Think it will drain fast enough? Those 1/4” staples about 1-1/2” long will hold the boards together as well??? Do you use an air nailer to shoot yours together? I️ just love the 1/4” staples over brad nails for holding things like this together as that connected double nail really holds well!!! God Bless you and your beautiful family and friends there as your shared knowledge inspires so many…. you’re a good man! Happy Holidays…us bigger fellas can really enjoy the extra fine vitals this time of year! ????????
Feels weird refering to you as “DirtBoy” but thank you and I’m glad you are inspired. I used a brad nailer on my flats, the staples would be far better but the brad nailer worked fine. Not crazy about the fabric, the roots might tangle in it and make it challenging to get them out. Cardboard or paper would be far better, it will decompose and not be a problem.
Several years ago my wife Laura & I bought your book—-really have no interest in making money of gardening or propagation but have found you to be one of the most interesting and informative sources 0f gardening information on the planet. I have passed forward your web site to several of my friends & family. I miss your little yellow dog as I know you do as well. You folks are great !!!!! KEEP UP THE GOOD WORK !!!!! GOD BLESS
Thank you Bill, I appreciate that and I most certainly miss Ally as well. I get that not everybody wants to do this for profit, but job, my goal, is to simply help as many home gardeners as I can. Some take advantage of our members area, many do not. That’s fine. The members area, http://backyardgrowers.com/join, is really for those that want to profit selling small plants from home.
You did a good job on the flats. I have another question if I may ask. I pruned my butterfly bush and so far it hasn’t come back out and it’s just dry looking wood with no green at all on it and it’s loose in the soil. I hope it hasn’t died. What can I do / That’s if it’s not dead.
Thank you,
Sandra,
Not much you can do other than tamp around the plant a bit and water it to make sure the roots have dried out. They often die back and come back from the roots. Pruning it was the right thing to do.
Hi Mike, I love reading your advice and watching your videos. The box propagator seems like a great idea but one thing is leaving me puzzled. With cuttings, I’ve always been taught that hygiene is critical. In classes I’ve taken on propagation we are drilled over and over again about starting with sanitized pots, tools and growing media. Using wood for cutting propagation – doesn’t that open the system up to contaminants? And, if so, how do you sanitize it? I know it’s pressure treated, but I’m thinking that doesn’t get rid of bacteria and fungi which can prove fatal to fresh cuttings, no?
Deanna
Deanna,
I hate to burst the bubble that others have placed you in but I don’t sanitize anything, ever. Not my propagation boxes, not my pruning shears, nothing. Raising plants is like raising kids, you want them to be tough with strong immune systems. In a greenhouse type setting maybe. A greenhouse is like an incubator for all kinds of destructive things. But outside? Mother Nature takes care of all of that for me. I do not have a greenhouse on my property.
Thank You Mike
Have you shared information on your choice of tractor? like size, HP, preferred brand, features, new, used, diesel, gas, hydrostat etc. and why. It would be a great help to have benefit of your experience as I choose to purchase.
Ken,
I have a 37 HP Kubota with front end loader and detachable backhoe. Diesel. Perfect size for me, we cleared this entire property with it. See this video
http://mikesbackyardnursery.com/2011/07/mikes-new-nursery-from-the-beginning/
Hi, Mike,
I am glad this subject came up. TREES!
I am having fun starting lemon and orange trees. Was wondering if you would shear the tops of the trees the same way you shear off the tops of the bushes as you demonstrate in your videos?
Don’t you have to let a tree get some height before you start trimming it?
Joe T
Joe,
The answer is no, trees are trimmed differently to obtain a straight single stem. See this; http://mikesbackyardnursery.com/2014/04/how-to-grow-tree-seedlings-into-beautiful-trees/ or this on turning flowering shrubs into trees; http://mikesbackyardnursery.com/2014/04/how-to-grow-train-flowering-hydrangea-shrubs-into-tree-hydrangeas/
Thank you, Mike. You’re a wealth of plant information.
Joe T
Hi Mike, Have a couple of questions – first, can you use these flats to start vegetables and flowers? If so when should I make sure to have air to the bottom for air pruning and should I use sand or potting soil to start vegetables and flowers.
Second, my cousin has a red delicious apple tree that I would love to get starts from and was wondering if you were going to offer the cup things (sorry, can’t for the life of me remember what they are called) for rooting right on the tree. Have missed out every time you have offered them as I wasn’t on line at the right time, so hoping to get in on the ground floor this time.
Last but not least, do you let people tour your gardens?.
Thank you very much for your posts! Really enjoy them.
Monica
Monica,
Yes you can use these flats for vegetables. Start thinking about getting the flats up off the ground a bit once the plants start growing. You don’t want them rooting into the soil below the flats. Use potting soil, not sand for starting seeds.
We no longer sell the http://airpropagator.com but you can get them from their website. People are welcome to visit our place anytime between April 1st and the end of October when we are around usually all day.
Thanks Mike! Visiting your nursery in on my bucket short list. Will try the website.
Hi Mike,
What do put in the bottom of the flat to prevent the soil from “falling through the cracks” so to speak?
Hans,
Newspaper or cardboard works just fine and won’t tangle with the roots, it decomposed at just about the right time.
Wow I was just wondering the same thing glad I saw this.
I as thinking about using weed sheets but this will save me a dollar.
Hi Mike,
Can you grow tree seedlings in these flats?
Matthew,
Absolutely and once the seedlings are starting to get established you can put boards under the flats to raise them up and create air space under the flat. What that does is air prune the seedling, preventing them from developing a really long tap root. That air pruning forces the seedlings to develop more fibrous roots which makes for a better seedling.
I am in Zimbabwe Africa
can I get any of your books as I seen that Only in the states I follow your gardening tips but am a bit worried as our weather is so different
Ann,
Our digital products are available anywhere, including Our University and members area. http://mikesbackyardnursery.com/2015/10/backyard-nursery-tools-of-the-trade-things-to-turn-you-into-a-successful-grower/
Mike:
I’d love to get started, and these plant propogation flats will make the perfect winter distraction. Just one question: I finished a small deck (more like a back porch) a few years back and have many remnants left over. They’re not 1×4″ but just typical deck boards (pre-treated, of course). Can I use them, cut at the specified dimensions or do I need to rip off the rounded edges and cut them down? Do I need to adjust the measurments to accomodate the same spacing between the bottom boards (i.e., make the side boards longer)? It would be a great way to use up the “left-overs” without burning or trashing them.
I look forward to your response — PLEASE.
Jan
Jan,
Sure you you can use. One thing about what we do, even though it may seem like it at times, it’s not rocket science. You take what you have and you make it work for what you need. Flats that are less shallow will work and of course a flat can be as deep as you make it. You just use more rooting material. The gaps on the bottom can be much closer. Mine are almost too wide, we line them with newspaper or packing paper, just the bottoms.
Your original plan was using the upside down aquarium with limited light. do you keep your propagation flats in sun or shade?
Sylvia,
Depends on the time of the year. My hardwood cuttings are not shaded at all. But softwood cuttings should still be shaded unless you use this automated system. http://mikesbackyardnursery.com/mikes-plant-propagation-kit/, even then some shade helps but I did not shade my cuttings at all this summer. All of my summer cuttings are done with the automatic system.
Mike,
How do you keep the sand or rooting mixture to not pour out the slits on the bottom of the flats? Those are awful big openings and I can just see the sand pouring out.
Pat
In Virginia
Pat,
You’re right. We line the bottoms with several layers of newspaper or we use a brown packing paper. I really made these to be used with potting soil which stays in the flat better. With hardwood cuttings, http://mikesbackyardnursery.com/2015/01/easy-winter-time-plant-propagation-can-home/, I often stick them in a potting soil, but not always. If I’m sticking them in a bed then I use sand.
Hi Mike, I transplanted some Maple trees , Not sure how to tell if they are Norway, ,silver , or crimson king maple trees, but they grew from seed and transplanted them in my garden in the fall and I transplanted six of the tallest ones in the fall to my hunting land so deer would not chew the tops off and they did not leaf out this spring but are growing out of the base.,. What did I do wrong? I wonder if I should have transplanted them in the spring instead, Please let me know what I did wrong.
These trees are 3 years old after I transplanted them. and were over six feet tall.
thank you Neil B.
Neil,
If you transplanted your trees during the growing season that might have shocked them. Transplanting season begins around Thanksgiving after a really hard freeze. Not a frost, but a freeze. Then continues until spring. Once plants leaf out in the spring transplanting season is over. Your trees are not Crimson King, Crimson King cannot be grown from seed but has to be grafted.
My father inlay says transplant during months that end in R.
Rick,
Actually that’s pretty good advice, but if you are digging a plant and doing root damage in the process which is usually the case, the September and October are too early. Mid November is usually the earliest you can do that. But if you pulling cuttings out of a flat and not doing root damage then those months that end R are good.
Hi Mike, thank you so much for all that you share!
I cannot purchase your gardening system right now, it is not available until next month. My question may be covered in your books but I will have to wait a while for that. I am 77 and who knows if I’ll be here that long. How do you get labels for the plants that you sell individually?
Your ideas, I am sure will help me financially. I can’t wait for this cold snap to cease so I can get started.
Michael,
Many people when just starting out just hand write the labels. Some print labels on an ink jet printer. We print ours on a thermo ink printer made for labels.
Hi Mike,
I’ve been “rescuing” discarded venetian blinds for years, cutting them with scissors into 4-6″ pieces, and writing plant names, date of planting/up-potting/etc. on them, and sticking them in pots or flats, or out in the beds where I plant whatever it is. I’ve found that “permanent markers” are NOT permanent – sunlight and rubbing alcohol fade or dissolve the ink. (Same for grease pencils. They don’t last.) However, a good old-fashioned #2 pencil or the wide carpenter’s pencil works FABULOUSLY! It’s indelible and lasts as long as the label does. I cut up an entire blind at a time, keeping the pieces in a can or (my favorite) a Coffee Mate creamer canister with a lid – including the pencil and a pencil-sharpener inside with the label pieces.
Mike,
Totally a newbie here, i bought your trial run at $7.00 this morning and I’m excited to start growing something :-))
I also wanted to let you know that I made 7 of your propagation boxes all by myself after watching your video this week-end. I haven’t handled a drill before in my life but my husband let me borrow his and showed me how to work it, it was too heavy for me to make more than 7 of them, so for Valentines he said he would buy me a baby drill :-)) I had fun making them, thanks so much for the video!!
I looked on your buy and sell board for the 1st time today, how do you know what a good deal is, does that take just day by day looking so you learn or is there a better way, such as info for your zone, (i’m in zone 6) I would like to try some hardwood cutting since I bought the sand and made the boxes! Thank-you!
Hi Mike,
Thank you for this great advice! I’d like to ask you: how long do you keep the rootings in those flats and when and where do you transplant them?
Jean,
Of course it depends on what time of the year we stick the cuttings and what particular plant. But usually during the growing most things are pretty well rooted in about 8 weeks and from there we either put them into a pot or in the ground for another growing season.
Ok thanks Mike,
Actually I’m planning to do hardwood cuttings of willow shrubs. So I stick the cuttings in those flats sometime in february-march, by april they should start growing (that’s when spring starts in here), should I then transplant them by the beginning of june? Will the roots be strong enough by then to be manipulated? And what if wait until fall, will the roots all be entangled by then?
Jean,
We probably won’t pot up our hardwood cuttings until about mid summer. It will be that long before they are fully rooted. Especially this winter, being so cold, they won’t do much rooting at all until spring, so it will be summer before they have a nice root system.
Hi Mike,
Are you exchanging the wire on the bottom of the propagation flat ,as it is in your book, for the newspaper? Or can you use either one? Is one better than the other? Or use both? Just trying to keep it straight in my mind.
Stacia
Mike I have an olive tree that has grown all over the place. How and when do I prune this tree
Crystal,
I really no nothing about olive trees, but a tree is a tree and if it needs pruning I’d prune between and now and early spring, and prune it as much as you want. Once pruned it will grow out and fill in nicely.
Mike
The newspaper goes on the inside bottom or beneath the 3 slats?
Wayne,
Inside bottom. We just did 1,200 cuttings using these flats today and it worked great.
Mike,
I have sand cherry in 2 and 3 gal. pots. Do I prune those back as hard as you do on your pruning sand cherry video?
Scott
Scott,
That really depends on whether or not they need pruning, but in most cases they really do need a fairly hard pruning at the end of the growing season.
Just purchased the $47 system today and I am eager to get started.
Two questions please:
I am into sustainable food gardening and I was wondering what fruit & nut trees are the easiest to propagate to quickly establish an organic orchard?
Thanks for your help.
Tom
Tom,
That really depends on what zone you are in. Most fruit trees are budded or grafted onto a specific rootstock. Other fruit plants can be propagate via softwood cuttings. If you want to grow your own fruit trees best thing is to grow some root stock from seed so you have something to graft to. Many orchard owners buy the trees they want wholesale from a grower who specializes in the grafting and budding. But anybody can learn how to do it, but you do need the rootstock before you can get started budding.
Tried your web page (http://freeplants.com/wanted.htm) and found that a popup jumped up overlaying the page so the page can’t be seen. The popup also stayed at the top of the page with the it’s own top off the screen where I can’t get at it, so I can’t do anything with it.
Just letting you know since I think I would be interested in your site and info if I could get to it. I doubt I’m the only person having this difficulty and it’s no doubt frustrating many potential readers.
BTW, I’m running Firefox in Linux.
Thanks Pete and I do understand. That pop up is for an Email training course. You should be able to close the pop up. This page doesn’t not have a pop up. http://mikesbackyardnursery.com/2013/03/how-to-make-65%C2%A2-per-square-inch-in-your-backyard/
I love silver maple trees & would love to grow & sell them. I have about a 6yr. old tree that has thousands of seeds each year. I need to learn how to start the seeds & when to repot them.
Thanks! Mary
Hi i am getting a greenhouse soon and Would like to know if you know how to heat it cheap i live in Tn. And it just got _ 2 and cant afford a big heater thanks mike
Will it have a concrete floor?
Hi Mike,
Is this something that I would need to get a business license for?
A.P. That depends on where you live and what you city or state requires. In my system I explain all of those details. No matter what you do you certainly want to do it the right way.
Hello, Mike and Crew.
I Love the Idea of “Air Pruning” Seedlings root systems. I do not (generally) use containers (pots). I grow Large Berry Bushes (9 different species), Apple rootstock, grapes, and flowering bushes for the bees. Most of them are sold as 3-2 specimens. They move to a new section of the nursery each March/April). We are USDA Zone 5. Could I avoid “re-heeling in” the bushes? Many Thanks.
Bill in Idaho
Bill,
That’s really why tree seedling growers have gone to air pruning systems so they don’t have to dig, replant, dig again. They use containers designed to air prune the roots and don’t have to do any transplanting. It makes for a superior product.
Hi,
Will these work for starting seeds too or just for cuttings?
Thanks!
Krink,
They’ll work great for starting seeds.
What do you think about lining the bottom of these with professional landscape cloth? roots should still grow through.
Kathy,
I don’t like that idea because the roots would become entangled in the fabric do more root damage when you remove them from the flat. That’s why something biodegradable works so well. It does it’s job early on, but eventually disintegrates.
Hi mike. Im 68 and wanting to try your ideas. Im at ground zero. so be gentle and let me know how to start. Im in newaygo MI and its cold but i have a southern 6′ sliding door I can use. Liminited money but willing to give it a shot. Been watching you for a while and you got my interest. Mike.
Mike,
Among a great number of our growers 68 would make you one of the youngin’s. We hit ten below two days ago so it gets pretty cold here as well. Getting started is pretty easy, just pick a few plants that you want grow and dive right in. Worst thing you can do is study it to death before you get started. Just get started and make sure you have fun! You’ll do fine. http://freeplants.com/wanted.htm
your stuff is good but i just will leen out some land and get some trees started
Mike I live in Texas where soil is a premium–lots of rocks. My question is how do I get the acidity back up in the soil? I would love to put some plants in that require more acidity. We have some beautiful Mountain Laurels but that is about the only native that I can get to grow outside of cactus, lol.
I live in Arkansas where we also have less soil than rocks! The best thing to do if you haven’t already is to contact your local Cooperative Extension office and ask about soil testing. It is very easy and here, is free. When you get your report back, it will tell you exactly what to amend your soil with and how much you need to use.
get compost then wood chips to cover it it will holed water
it might hold water
Compost heavily using winter oak leaves for the bulk.
This fall I transplanted 8-10 blackberry vines. A while back I noticed that something had cut them to the ground. I also noticed that there were no vines laying there. After reading your post on mice, I have concluded that that was most likely my problem since there were no tracks in my garden and no vines. I also have a very healthy population of gray squirrels who may be the culprits since some of the vines were close to the size of a pencil. What is your opinion?
Also, this will answer another question, will they survive being trimmed to the ground. Some web sites advocate trimming and others don’t. This spring will tell.
Danny,
I’m sure the plants will survive and probably even thrive. Mice? Sounds a little excessive for mice. Rabbits or groundhogs?
Noticed an online web site that talked about a $250.00+ charge to join your blog site, is that true, you have to pay to play???? Mike
Mike,
Several years ago my Backyard Growing System was $297. As of this writing, it’s only $47.00 and contains a great deal of information.
I need that statement clarified. $47 ?
Is your blog site the same as BGS ??
If it is, I paid a whole lot more the $47.
And more than $297.
Are we talking about the same thing ???
Thanks, PHIL
So if I understand correctly, this particular type of boxes are mainly used to do air purning only?
And are these boxes placed directly off the dirt ground? or does the bottom board of the flat
give enough space to allow the air purning and still be able to set the box on the dirt ground.
Denise
Denise,
I will use these boxes for any kind of plant propagation that I intend to do. They are 3.5″ deep, that’s excellent for sticking all kinds of cuttings. They can set right on the ground, few roots will make it into the soil.
I live to hear from you. Especially when it is only 13 degrees out. Hugs and prayers
Thanks Marie, I appreciate that.