The base of a raised garden bed is on the ground and its soil sits directly on the ground, whereas the bed of a standing garden bed is on legs and its soil sits on a wooden or other material base.
The benefit of a standing garden bed is that you can work it without needing to bend over or kneel on the ground. This is preferable for people with back pain or who have trouble bending, or for those times when the ground is dirty, wet, or uncomfortable on the knees.
If working a raised garden bed is an issue for you, or you want to maximize your garden space, in essence creating twice the gardening space of a raised bed in the same vertical area.
This article will show you how to build both a raised garden bed and a standing garden bed in one wooden structure… a standing raised garden bed!
Another great benefit of this design is important in drought areas. This setup helps conserve water, as the drainage from the standing bed will drip down onto the raised bed beneath.
Tools Needed
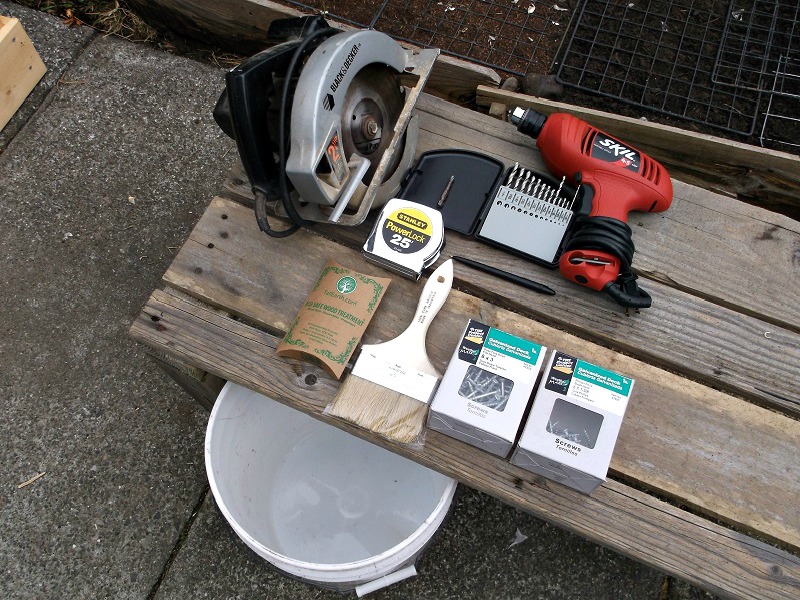 power drill,
1/8” wood drill bit (for pilot holes),
1/16” wood drill bit (for pilot holes),
3/8” (or similar size) wood drill bit (for drainage holes),
Phillips screw bit,
circular or hand saw (if you don’t have the wood pre-cut by the lumber yard),
bucket large enough to hold 1 gallon of water,
paint brush.
MATERIALS
(3 baseboards) 46”long 1” thick x 1′ wide pine boards (mine are actually 11.25” wide),
(4 legs) 3′ long pine 2×4’s,
(2 leg tops) 34” long pine 2×4’s,
(2 ends) 34” long 1” thick x 1′ wide long pine boards,
(2 sides) 4′ long 1” thick x 1′ wide pine boards,
(1 center support beam) 34” long (2×4 or 1” thick x 3.25” wide pine board),
(40) 8 x 3” galvanized deck screws for attaching 2×4’s to 2×4’s,
(12) 6 x 1-5/8” galvanized deck screws for attaching 1” thick boards to each other (and to a 2×4 if your center support beam is a 2×4),
1 gallon size TallEarth.com ECO-SAFE Wood Treatment (provides 150-200 square feet of coverage),
cardboard enough to cover raised bed area on ground (optional),
garden soil.
CONSTRUCTION
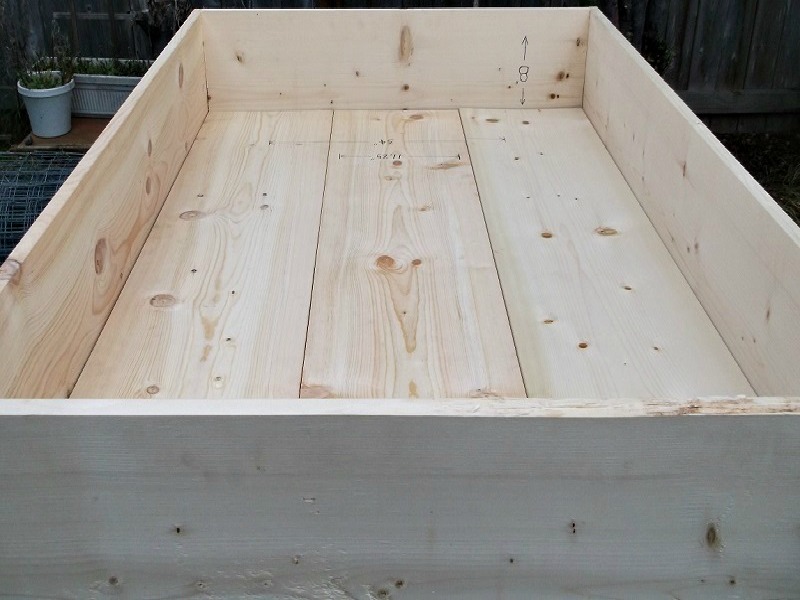
I designed the standing bed around three 1′ wide pine boards that will be the base of the bed, although the boards are actually only 11.25”. No more than 3′ wide beds are best for adults, so reaching the center of the bed is easy, so these boards are the perfect width.
The bed length can be as long or as short as you like. For this project, the bed is 4′ long.
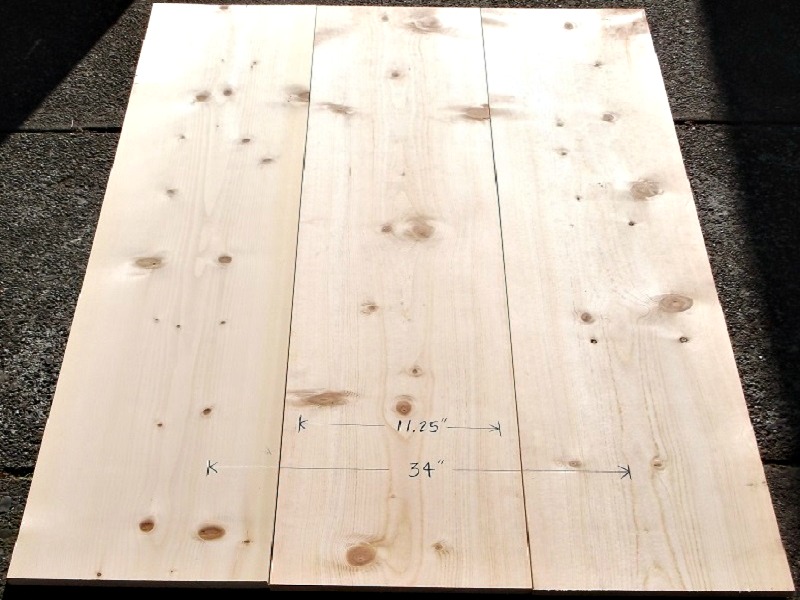 Set the 3 baseboards (46” long) down on the ground tight against each other.
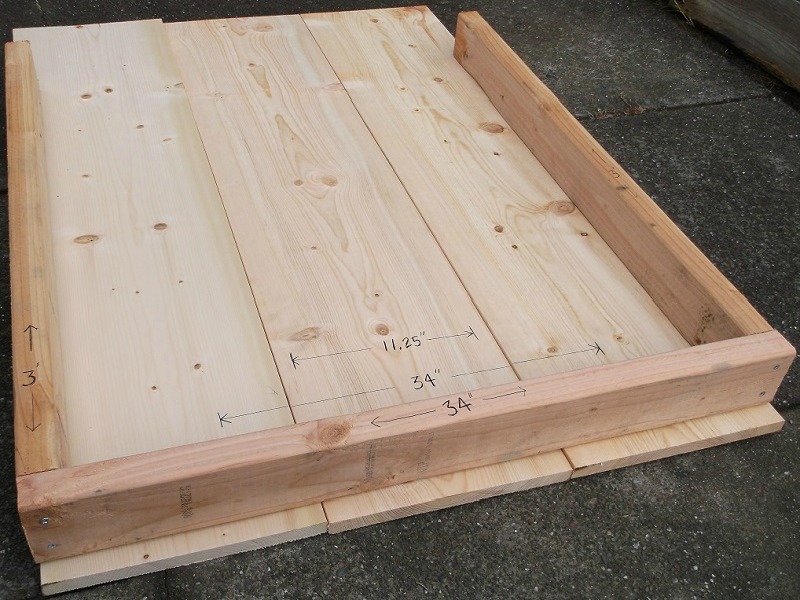 Set two 2×4’s cut to 3′ long (or your desired height, but I recommend no more than 3′ long… these are the base legs) atop the baseboards at the sides.
Set another 2×4 across the baseboards, where it will be attached to the top of the legs. This is the 2×4 your baseboards will rest on. Measure and cut this 2×4 to be only very slightly longer than the baseboards are wide.
Drill pilot holes with a 1/8” drill bit through the top 2×4 into the legs, and secure with 3” long galvanized deck screws. It might help to drill your holes slightly off-center so there will room near the center for more screws later.
Repeat steps 1 through 4.
Clear your work space and set down 1 of the (2) 34” long end boards, it is the same length as your top 2×4.

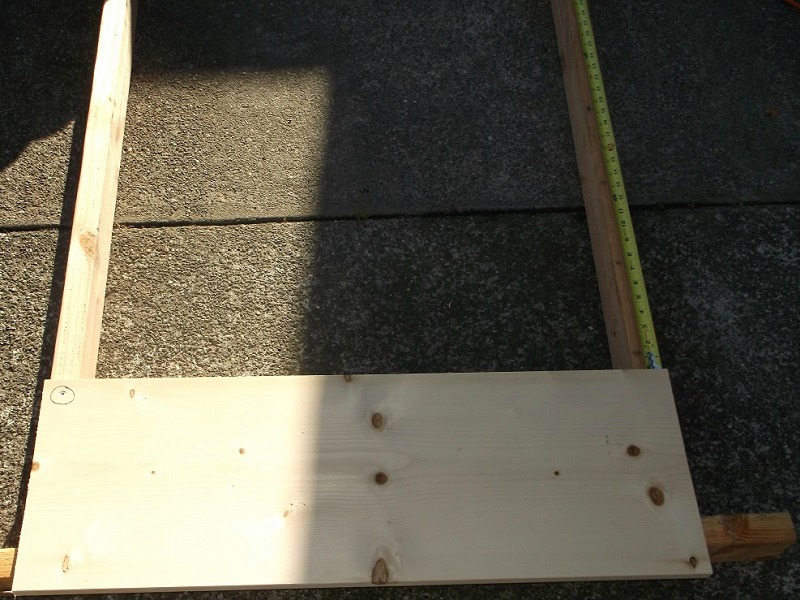 Set 1 of the legs with top 2×4 you just screwed together onto the 1′ wide board and square it up at the desired bed depth (mine is 8”). Mark the sides of the board at the height of the top 2×4.
Remove the board from underneath the legs and top 2×4. Set down another length of 2×4 about 6” away from and parallel to the top 2×4. This will support the board you just marked so you can screw it into place.
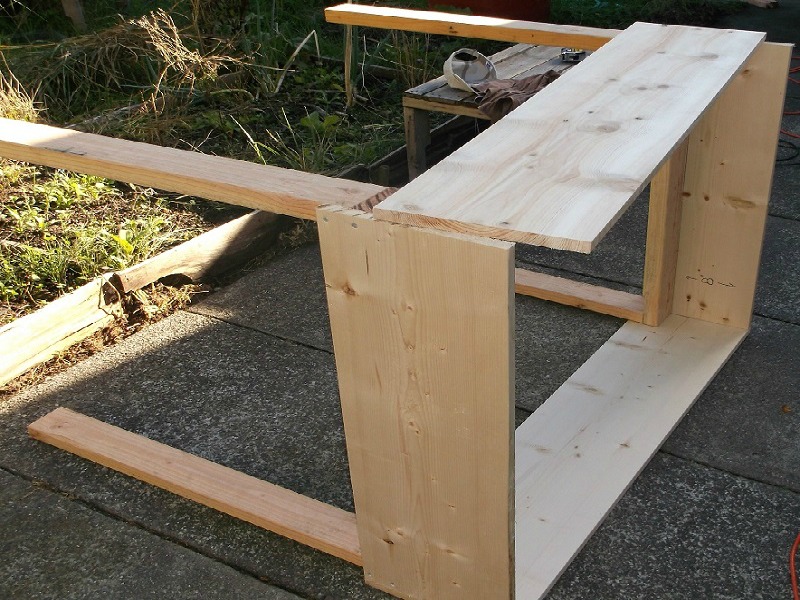 Place the marked board on top of the top 2×4 at the marked height. Square it up and check the distance from the bottom of the board to the bottom of the legs is the same on both sides. Drill (2) 1/8”pilot holes through the board and into each leg, and drill in your 3” screws.
Repeat steps 6 through 9. Now you have the 2 end pieces of your standing bed.
Set the 2 end pieces on their side parallel to each other and set 1 of your (2) 4′ long side boards flush with the end piece boards. Square it up, drill 1/8” pilot holes, and drill in 3” screws.
Turn the standing bed onto its other side and attach the other side board in the same way.
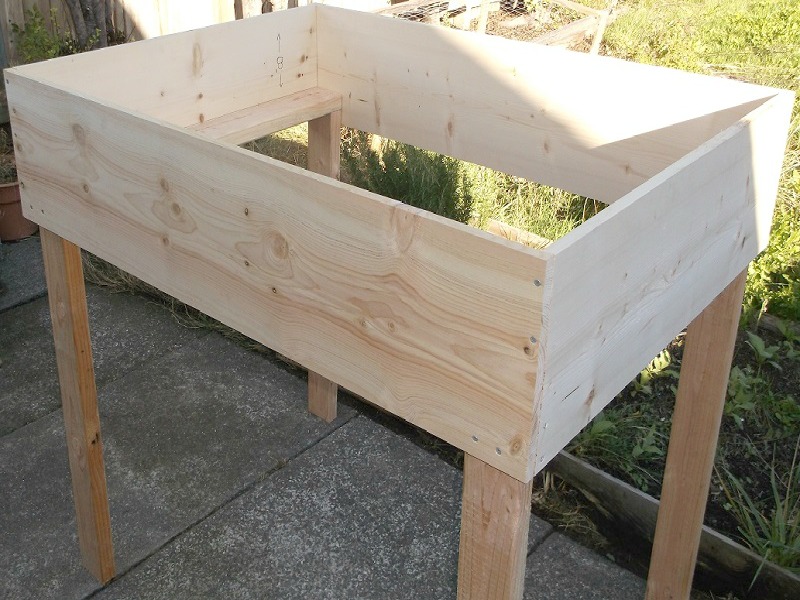 Set the standing bed up on its legs and set in the base boards. Do not attach them.
 Remove the center baseboard, and draw a line on both side boards just under where the baseboards are.
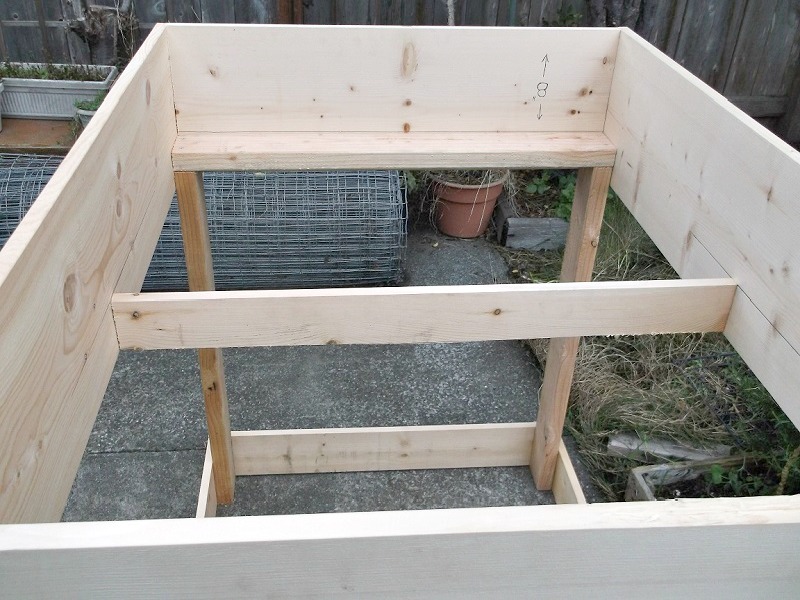 Remove the baseboards and set the standing bed on its side again. Set in the exact center, between and exactly flush underneath the lines you just drew, your support beam.
 This support beam can be a 2×4 or a 1” thick piece as wide as makes it more or less flush with the bottom of the side boards (mine is 3.25” wide), through which you will drill pilot holes into the support beam and then drill screws.
Set the baseboards back in, and drill 6 equally spaced drainage holes through the center of each baseboard with a 3/8” or similar size wood drill bit. Don’t drill the drainage holes into the top of the legs or the support beam. Remove the baseboards.
Set the raised garden where you want it to be in your yard, preferably a place with good well-drained soil, and set cardboard down, lining the interior of the raised bed on the ground. This will make it harder for weeds and grass to grow through the soil you will add to the raised bed.
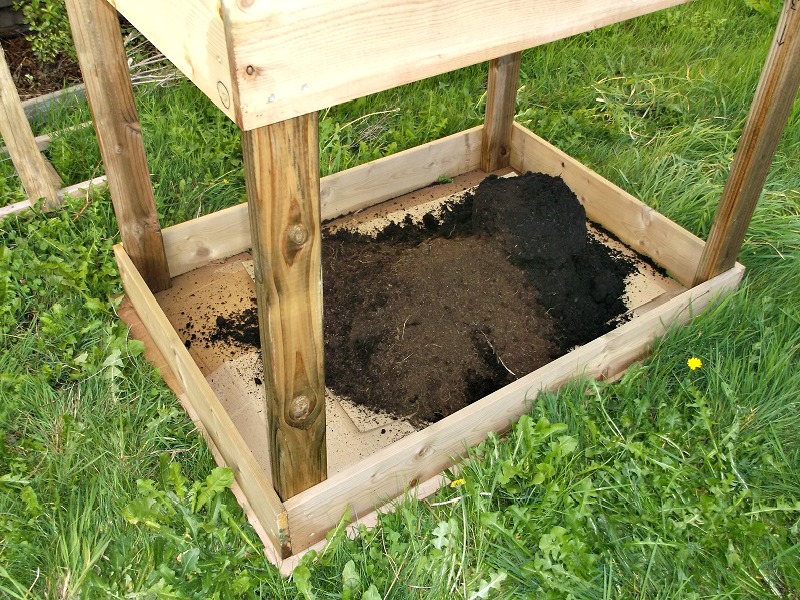 Fill your raised bed with soil atop the cardboard, and fill your standing bed with soil as well.
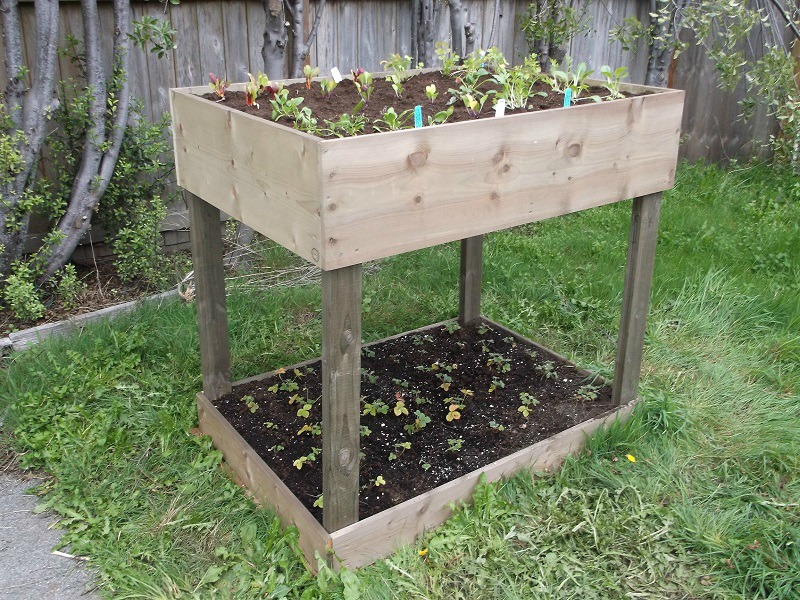 Add your seeds and/or seedlings and water them… DONE!
About Troy Boylan
 Ecoculture Village Founder & President; Anthropology BA, Interdisciplinary Studies: Ethnobotany BS. Two things I think are worth anything at all… all things wilderness and ecoculture.
Mike you always have GREAT articles. A little tweak to the bed would be to Roof tin or polycarb panel for the upper base, in place of 1×12″s. It would be quicker and tins can be painted to retard rust You may need an extra center support depending on length. Panels come in varying lengths at Big Bx stores.
How often would you suggest changing the soil.We have city soft water and it is full of salts?
Ed,
I’d probably amend the soil yearly with fresh organic matter and then you shouldn’t have to change it completely.
Great article Mike! This will save my back and keep the rabbits at bay! hahaha
Treated wood would be safe? Thanks again.
Be careful! I bought a lot of WHITE, BLUE, & PURPLE marigold seeds off eBay. They came from Asia. They were ALL FRAUDS. Got your standard red,orange and yellow. They were not the only bad labeled seeds. One sent zinnia not marigold another sent Zinnia instead of Plumeria. Don’t buy bulbs in the cold winter from there. mine came moldy. I could go on. What good is money back if you lose a growing season!.
Just found this post – better late than never! How long could I expect this raised bed to last, please?
Treated wood? 20 years would be my guess.
Wow! Such perfect timing for an article. I just received my first 2 garlic bulbs from Seed Saver which will fill the top part of the standing garden my husband made for me about 10 years ago. I will be getting a shipment of another type of garlic from Hood River Garlic next week and had nowhere to put those bulbs. My husband would have figured out what to do, but since he’s gone it’s up to me. Looking at this standing garden was one of those”duh!” moments for me. Add the bottom bed, of course!
Thanks so much for this article. My garlic will all happily have a place to live and grow this season.
Thanks for the information! I have back problems, so I need to use a raised garden bed so that I’ll only have to stand to take care of my plants, rather than hunch over. I’ve been trying to make one, but I’m not sure about the dimensions that I’ll need to know to build it correctly. It’s good to know that I’ll only need 3′ wide beds to make reaching for the center of the flower bed easy. I would probably have a difficult time reaching for it if it were any larger, so it’s a good thing that I found that out before I made a 4′ or 5′ bed by mistake.
I have been searching for some good sassafras tea Nothing comes close. I would like to plant my own we just purchased 6acreas. We do you recommend I get starts for this?
Also I bought my son a worx wheelbarrow I was wondering if you have tested it. Would love to know your opion on it.
Tavebeaty,
I really can’t help with the source for Sassafras starts. and the Worx wheelbarrow? I’ve never seen one. I’m no help at all!
Hi Mike. Thanks for your great work teaching us about gardening. Can you please teach us about grafting?
Great stand-up planter. Kinda takes “raised bed” to a new level. The only thing I would do differently is glue it! Titebond II at every joint. Dry assemble the pieces, then undo and glue.
Have a wonderful holiday season!
My mother taught me how to make fudge over 50 years ago … well handed me the recipe. “Dirt Farmer” is next on the list.
Have had a raised garden for a few years now, in Florida. We are snowbirds. Garden in all seasons. guess it is in the blood. Still soak up all the info. we can. Enjoy learning and experimenting. Merry Christmas to all the gardeners out there. Mike and Pam come down to Fl. and be our guests for the winter, promise we won”t pick your brain. MERRY CHRISTMAS WALTER AND LORANE
Walter and Lorane,
Spending the winter in Florida sounds awesome, but we have a lot of ties here in the cold north. And two donkeys to care for. We have son and daughter-in-law who are expecting their first baby around Jan 1st, 2015 so off to Baton Rouge it is! But thank you!
In the fall, I saved a lot of the dried flower heads of the annuals in our yard. I want to plant the seeds from them during the winter, so that we can plant the young flowers in our yard in the spring. I have seeds from Gerber Daisies and Marigolds and I live in north Georgia. When should I start the plantings indoors?
Thanks for your advice.
I have a video showing my application of the wood treatment product to this project here: https://www.youtube.com/watch?v=6xX-Dtm-Ua0&list=UUFTeiCKhy3KYXvWYQT4verA
I would recommend that you treat the wood prior to assembly but after all the boards have been cut. That way your will have all the end grains treated, otherwise you may get decay starting at the end grains of the wood and that would shorten the life of the bed. I would also consider putting the 2x4s on the outside of the bed and clear to the ground to give better stability. Good job.
As per the cost… it came to roughly $100. I thought about using pallet wood to construct the standing raised bed garden, as I usually make things out of pallet wood, but I chose not to in order to avoid getting anybody’s hopes up concerning the oftentimes very difficult and frustrating task of separating the pallet wood. It is not always difficult, but often enough so that I thought it would be more appropriate to buy all the materials including the galvanized screws, which in my area (the north coast of CA) will last much longer than the already rusty nails found in pallets. Also, the wood treatment might be harder to apply to pallet wood as it is typically not always even and whole anymore. I also thought about using a plastic liner in the bed, but I wanted to try the TallEarth.com ECO-SAFE Wood Treatment to see how long it would protect the bed in this very wet climate. By the way, TallEarth.com has agreed to discount any purchases by 10% if using the promo code: ECOCULTURE.
Thank you so much for all of your wonderful ideas and plans. I wish you and your family a very Merry Christmas and Happy New Year!!
Thank you Mary and happy holidays to you!
With no disrespect intended to the obvious expediency of making use of stock materials obtained from your local lumber yard, it seems to me that the same type of garden surface modifications can be built from cost free pallets that are disassembled and rebuilt into the very same but slightly modified sized configurations suggested by your detailed photo assembly plans.
Both the 2×4 items and the base and deck boards included in cost free used pallets obtained from local sources can be arranged to closely duplicate the functional design of the raised deck planting area as well as the surrounding impoundment of improved soil within the base securement of the support legs. Keeping in mind that any need for lengthening the base and deck boards can easily be accomplished by the addition of a short piece of same joining the same material placed end to end.
Additionally, the same fasteners, usually nails, used to assemble the pallets can frequently be reused… it provided the disassembly has been carefully and logically done.
Jerry,
You’re right, there are many gardening uses for used pallets and this project could easily be one of them. There are plenty more, potting benches etc. made from pallets.
Merry Christmas to ya’ll. I am going to try dirt farmer fudge tomorrow. I don’t have elves to help though.
This is a great idea. Especially for herbs. I garden in 55 gallon recycled plastic barrels. My friend that got me hooked grew everything from corn, beans, okra, tomatoes, you name it. I think he had about 80 or so. My tomatoes yield more I guess due to confining the roots. I also toss in a few coke cans or plastic bottles in the bottom saves on soil and also keeps the soil from compacting in the bottom.
Keep up the good work. I love reading everything and have for many many many years.
Lela, Good luck with the fudge, let us know how it turns out.
WHEN IS A GOOD TIME TO ROOT PEACH CUTTINGS IN S.C.,AND WHAT THE BEST WAY
Kenneth, Ideally late spring/early summer would be the ideal time to root softwood cuttings of peaches. More details here http://www.freeplants.com/homemade-plant-propagation.htm
Thanks you so much for the emails and all the great information. Merry Christmas to you and all your family. May you have a blessed New Year 2015!!!!
Thank you Vergie, Merry Christmas to you!
Thank you so much for all the good ideas.
Merry Christmas to you and your family as well.
Thank you Marcelle and Merry Christmas to you!
This is beautiful. Any idea what the approximate cost is with new materials?
Sage,
I can’t help with the material costs. This article was contributed by one of our loyal subscribers Troy Boylan. Maybe he’ll see this and gives an idea of cost. And as somebody else suggested, you could use used pallets.
MERRY CHRISTMAS AND HAPPY NEW YEAR TO YOU AND YOUR FAMILY, MIKE. :
I ALWAYS ENJOY YOUR MESSAGES. MY HUSBAND WAS THE WOODWORKER IN THIS FAMILY
BUT HE DIED IN 2014, SO NO MORE PROJECTS ARE BEING DONE., BUT I STILL LIKE TO READ
YOUR EMAILS. THANKS.
Rachel,
I’m sorry to hear of your loss but I hope you continue to garden. It’s one way to stay close to your late husband.