Step 1: Obtain Pallets and Hardware
You will need 4-6 pallets that are similar in size. Check the pallets for any nails that may be loose or sticking out.
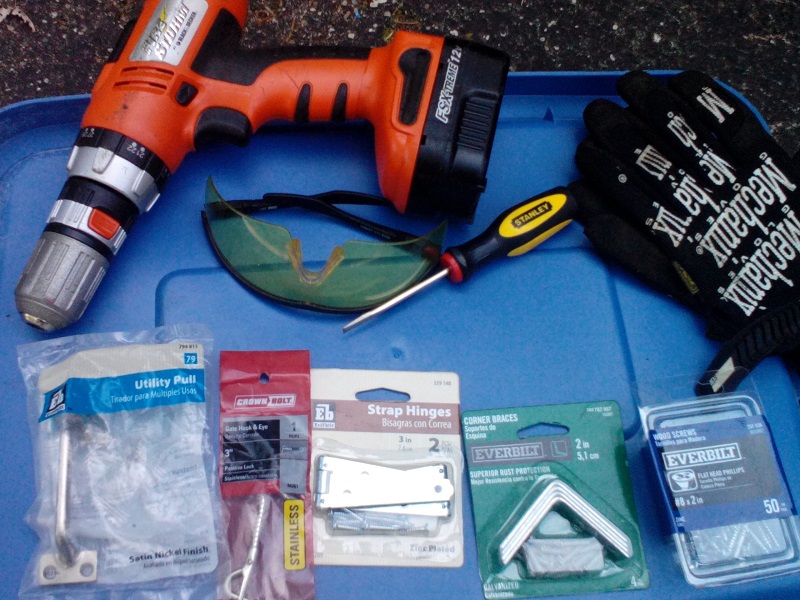
A power drill, screw driver, hammer, 4-6 L brackets, 2 heavy duty strap hinges, wood screws, one gate hook and latch, cupboard handle/utility pull, and for your safety – gloves and safety glasses.
I purchased all the hardware needed for less than $20 at Home Depot. Optional is chicken wire and zip ties.
Step 2: Decide on a Location
The site should be level, and well drained. Situate it in a sunny spot, ideally facing south to trap solar heat.
Build over soil to take advantage of worms, beneficial microbes and other decomposers which might migrate up into your pile.
It is also a good idea to have it located convenient to a water source and your home.
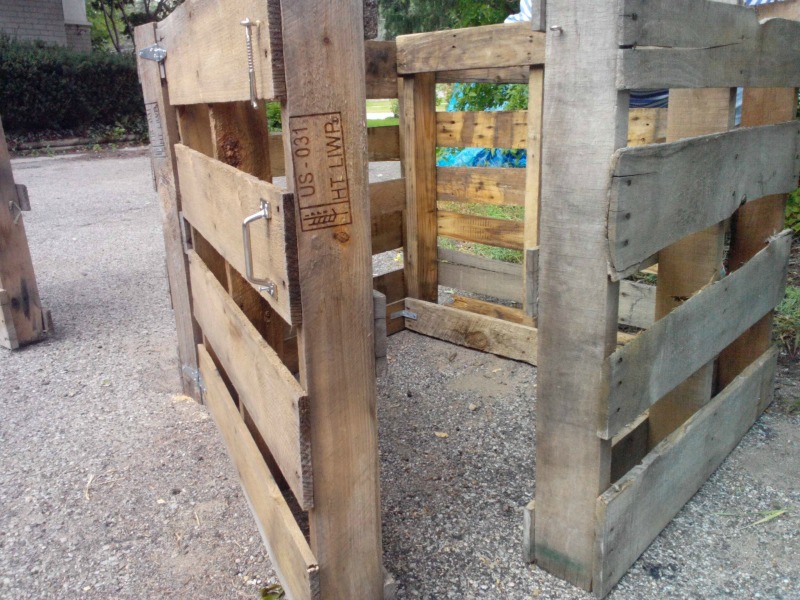
Step 3: Assembling the frame
Fit the sides together. Save the nicest or sturdiest piece for the front as you will be using it like a fence gate. When you have the determined the order, hold two corners together while you pre-drill holes for your screws.
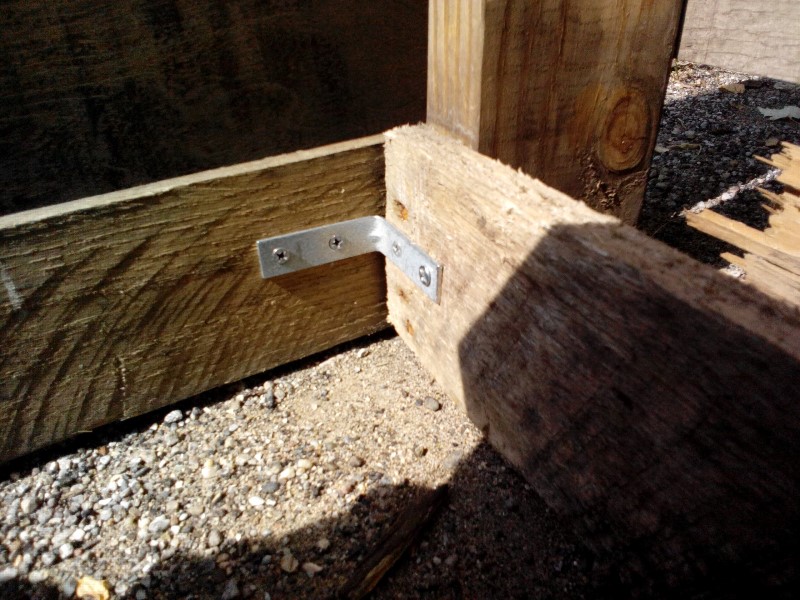
Hold your corner L brackets in place and drill your holes. You’ll want to place one bracket at the top and one at the bottom on the two back corners of your bin.
If you can’t afford brackets, I have seen people use zip ties to hold the pallets together.
Step 4: Installing the Strap Hinges
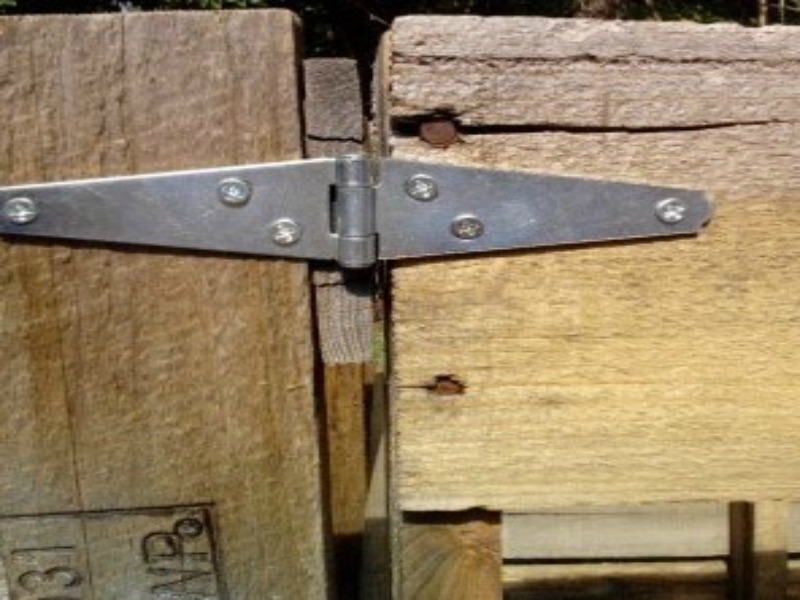
Once you have the three sides together you’ll install the front using the two strap hinges. Hold the front against the side and install the hinges.
I placed mine on the left side and I pre-drilled the holes before screwing on the hinges.
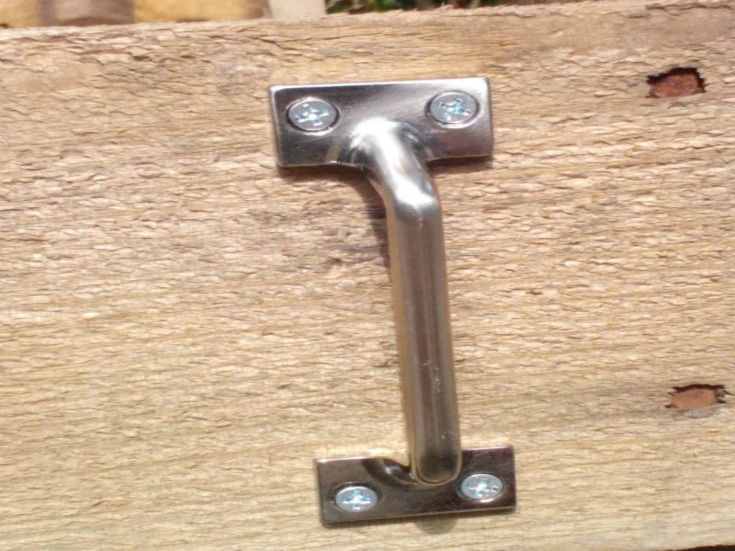
On the right side I installed a door handle and hook and latch, both are optional and you can use anything you have laying around for the handle and a bungee cord to hold your door shut if you prefer.
Chicken wire around the outside is also optional (attach with a staple gun) if you want to keep the critters out of your bin, but I’ve never had a problem with that.
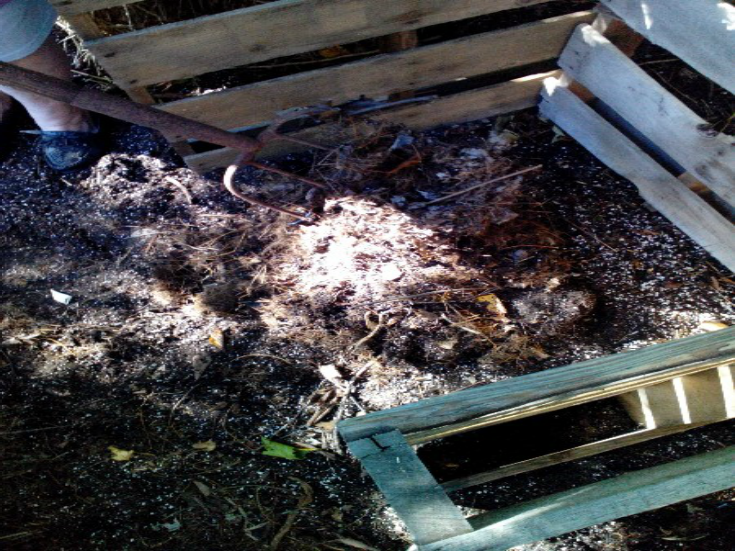
Step 5: Compost Maintenance
Add leaves, grass clippings, coffee grounds, tea bags, egg shells, fruit and vegetable scraps to your compost bin.
Avoid adding meats, dairy and greasy foods which attract pests.
Using a pitch fork, turn your pile often to prevent tree roots from growing up into it and forming mats. Also oxygen is essential to the composting process.
After turning the pile water it if it seems dry. You can toss an old carpet on top of your pile to keep out the rain if it seems too wet and speed up the process.
For more composting ideas click here.
ABOUT THE AUTHOR:
Karyn Flynn is retired and spends her time gardening, raising bees, chickens, and propagating trees, shrubs and flowers for sale. She is also a life long crafter who enjoys working on projects with her grandchildren, currently it is fairy gardens, bird feeders, butterfly houses and solitary pollen bee nests.
Hey Mike, Thank you so much for the plans on creating a pallet compost pile bin. I’ve been wanting to create one for a long time but wasn’t sure how. I’m so thankful, excited and gratefully blessed to have found your creative work on composting.! Thank You So Very Much! Have a Wonderful Blessed Day and Weekend to Come!
PS. Found Your Plans On The Spruce site.
Thanks Mike
I have property I have to move onto soon, I’ve been caring for mom in town for 4 years and that is ending. I have tried to get a start up there on some compost because I too have hard clay. I have been thinking pallets so this is perfect timing. I took bags of leaves I could get from friends up there last year and every time I delivered more I could see elk and deer poops all around what was the leaf pile. It was the case every time so the pallet idea will be a must, with the wire I’m sure. Wasn’t exactly sure how I would put it together so this will be perfect for me. A friend of mine made a present to me of a set of large hinges exactly like what was used here, he picked them up at a yard sale just a couple of months ago, it must be a sign.
I might be a good idea to keep the carpet on the top of the pallet walls or find carpet that is eco-friendly without chemicals in it, as conventional carpet can have chemicals that can leach into the pile & damage the compost.
Great way to recycle. I use old electrical wire (no. 12) to tie the four corners at the top and bottom. It is easier to take apart to scoop out the finished compost..
Wood slatted sides for a compost bin work great. Keeps out big critters, lets in air, keeps it contained and looks good… but the pallets are really heavy and for me, opening a pallet size door is not easy. I have used wire fencing with great success.. Use sturdy posts, sturdy fencing (not chicken wire) and you can open the “front gate” easy..
Photo please.
Hello!
I am using pallets in my garden every year. I turned hardwood pallet into a stunning vertical garden near to the house. It became a blooming balcony, where I can change flowers and experiment with colors 🙂
Really recommend you to use different solutions with wood materials!
I have been composting for years. I have a large heavy clay garden and dump tons of compost to losen it up. I have neighbors bring their grass clippings every week and I mix it with wood shavings and saw dust form a cabinet shop along with ground up leaves and chicken manure. You will know when you get the right mix because it will heat up quickly. I keep a 2 ft thermometer in the pile and today when it was 40 degrees outside, the pile was 165 degrees. Each week when someone brings new grass clippings I throw on some brown material and mix the new stuff in with the old using my small tiller after wetting it down. I don’t use any frames – just piles up to about 4 ft high, then move on to another one. Last Christmas my daughter gave me a sign to put up in my greenhouse. It says Dad’s Greenhouse, Beware – Trespassers will be composted.
Wow! Tons of great ideas and input from everybody. Thanks to all and I will be using your info in the future. Happy composting and gardening,
Katie
After years of adding organic matter to the cement-hard clay that is my garden, I gave up and now only used what I call grow boxes (above-ground wooden boxes filled with a mixture of my own compost, peat moss and vermiculite).
That said, I have tried many compost containers over the years – tumblers and bins of every material and make – I hate them all. I have a very simple recipe and method that will produce finished compost in 6 to 8 weeks instead of 1 to 2 years.
I collect all the leaves in the neighborhood every fall and suck them up through my leaf blower to shred them. They stay in their plastic bags until spring when we start mowing the lawn. I also collect bails of straw from the neighbor’s Halloween decorations and shred them with my leaf blower and bag it. Then in spring, every time we mow the lawn, we make a pile of the lawn clippings, add about equal parts shredded leaves and a generous helping of straw. I then mix it with my small gas-powered tiller which saves me from all sorts of back-breaking work with a shovel and pitchfork. This is then piled up, and sprayed down with a hose for moisture and left until the next week’s lawn mowing when a new pile will be made.
The next week, I start by mixing the old pile with my tiller and mound it up as before, I then mix the new pile and mound it up to the left of the older one. After 6 weeks, I have 6 small piles in various stages of decomposition. The oldest pile will be ready to use in my garden, or pretty close to it, which leaves a bear spot in my “compost factory”. I then move all of the other piles to the right as I mix them with the tiller. If I don’t need the finished compost yet, I merely keep adding to a finished pile that grows bigger and bigger all summer long. By the end of summer I have plenty of finished compost to refill all my grow boxes and fill up any new boxes we add to the garden. SO EASY AND FAST!
The grass speeds up the decomposition of the leaves by adding all that wonderful nitrogen. The straw seems to keep things fluffy instead of compacting. If you get the right mix of green and brown, there is absolutely no smell and your neighbors will never know you are composting on the other side of the fence. And best of all, I never have to use a shovel to turn the piles or any bins to contain it. (And my husband loves the fact that he doesn’t have to do the back-breaking work).
Candy,
This is great, thanks for sharing.
I love this idea! I notice above on the make a pallet compost they say to add your kitchen food waste but the guy above in the TEDx video says to do exactly as you do! I want to buy one of the barrel compost bins as I don’t have the strength to do a compost pallet but your idea sounds great. Do you have pictures you can maybe share? Or you should do a tutorial on your composting! Thanks for your compost share.
I have to ask, what size is your yard? 6 piles in various stages of decomposition plus enough grass to get these 6 piles going sounds like you have a somewhat abundant amount of outdoor space to facilitate this method (which sounds wonderful, by the way!)
I’m just wondering how much space I would need to duplicate your method – it doesn’t sound like someone with a tiny yard would be able to employ it.
Thanks!
Hey Candy! Well, this post is super old so I’m sure you’ll never see this. But I would love to see photos of the whole process! I’m going to try to put this into practice and I am a visual learner. I hope this does work though! It would be great to have a an easy compass system that doesn’t take a lot of shoveling!
I have enough leaves to cover 40 feet by 15 feet 4 feet deep in leaves. I also have horses so I throw the manure in with it. End result is dark black dirt in a year. I live in N.W. Florida where the ground is sand, sand, and more sand. My neighbors were surprised when they saw my garden soil was moist. One asked me how often I watered my garden once every 3 days. The gardens around me needed to be watered daily or they would wilt/dry up beyond recovery. Leaves are indeed an excellent source of nutrients.
Another controversial addition to the garden for fertility is biochar.
http://www.motherearthnews.com/organic-gardening/making-biochar-improve-soil-zmaz09fmzraw?pageid=1#PageContent1
no time to watch the video. reading is much much quicker. but i think i already read this post.. good instruction. will watch the video another time. “January thaw” right now and i’ve got a ton of work to do in only a couple days.
Just watched the Michael McGrath video about composting leaves that you recommended. Terrific!
He mentions using worm bins and I agree; my sister has amazing worm bins and an amazing garden built on hardpan soil in Rhode Island.
My husband has not (yet) agreed to a worm bin “tower” in our basement, so I DESIGNED A SIMPLE WORM BIN from plastic storage containers from Staples(?). One bin fit inside the other and the inner bin has small drainage holes at the bottom, and air supply holes at the top, and a layer of barely moist coconut core as a place for the red worms to live at first. It worked great and the worms loved it.
HOWEVER, I got careless and distracted, putting kitchen garbage in regularly, and never giving much thought to when it was time to dump the compost and start over. BIG MISTAKE. Even though the bin did not smell bad, the substance in the bin became soggy and (I am ashamed to say) mushy, though the worms kept going. I put this “compost” in my garden.
Woe is me! I got serious SNAILS – big ones. Perhaps this is the cost of not humanely caring for the living creatures I put myself in charge of.
I read somewhere, thought it was Mike’s comment, that there’s no need to turn the compost over cuz it doesn’t happen in Mother Nature so why would we? Just an observation. VKC
Lucy,
You are right, for the most part I don’t bother to turn my compost pile simply because it’s a matter of time management and energy. Each day I prioritize my day and turning the compost pile will never make it anywhere near the top of that list. I have far more important, productive ways to spend my time. Decomposition happens with or without my involvement so I spend my time in other areas. On this page, I show off the three bin system that I devised years ago so I wouldn’t have to turn my compost.
Leaves are a tremendous asset and have taught many a 4-H gardening group how to utilize these gems that Mom Nature provides. I have one concern though and do caution my kids about using leaves from an area where lawns are constantly being treated throughout the growing season. How much of the herbicides used by these companies actually end up in the leaves themselves at the end of the growing season? I really don’t care to continue the chemical cycle in my compost.
Katie,
I believe the amount to be insignificant. Very much so. Not something that I would be concerned about.
The purpose of turning compost is to aerate the pile and accelerate decomposition. Turning also helps to ensure that the compost is relatively free of anaerobic bacteria. It is also effective for heating or cooling a pile (depending on the stage of maturity). It is most definitely advantageous. =)
My compost bins are going on six years old—I made two side by side, using the middle pallet as the center. Difference is the gate. I cut mine in half and hinged it to the center pallet.. Both front bin pallets were cut in half. When using compost from one side it’s easier to get it out by swinging the 1/2 gate to the other side. One bin has compost ready to use while the other is decomposing. I also placed a leather topper from an old truck on top of the decaying compost to keep the heat in and sometimes uncover for rain water.
what a way to complicate things – all that hardware I mean – I use the 4 pallet method – but instead of the hardware – I repurpose old speaker wire or strips of polar fleece to tie the corners of the pallets together – top, middle and bottom – I just tie the 4th pallet loosely to keep it easy to open and close – and have a loop to anchor it in place.
Chickens do all of the ‘turning’ for me if I leave the door open for them – and when I want to move it – I can just swing the sides around to reconfigure it – leaving the old compost where it is for easy removal, and the ‘new’ compost bin alongside it’s old position – very easy to do with just one person – no heavy lifting – very important as you get older.
Susie,
Thanks for sharing your ideas of simplicity. I love keeping it simple.
I went with Susie M’s idea. I used old clothesline wire to secure the panels. Works great! Why spend extra money if you don’t have to? Save the money for something else!
Thanks to Mike and Susie!
I shall be assembling this at the weekend!
Great idea. I have never composted in bins, just piles with no boundaries and my chickens do a good job of turning things as Susie said but I can see where her design would be very useful for keeping it under control.
Leave it to Mike, he will show you how to build anything you need rather than buy them commercialy. This is a good Spring Break(LOL) project. Thanks Mike. The Pallets came from a recycle place. Check for old Plastic pots while at the recycle place you might save a bundle on used pots as well. Mine has a 6 foot high stack of old pots from the Landscapers!
i had the biggest compost area, 3 sides had a 4 foot concrete wall n concrete floor, it was amazing, the concrete got pretty warm and that was an extra bonus for heating things up.. GOD bless and thx for all your input.
I have 6 large bins on home done concrete slab over a load of crusher stone and all 3 sided concrete walls that help heat things up.
I did this because I make a lot of compost and have a little Kubota tractor with a front bucket..and welcome the stability of those walls 🙂
I have a bin for leaf compost, one for aging manure, one for grass and weed clippings, seaweed, home grown algae, etc…
I use a separate area to create vermicompost and then transfer finished or near finished compost to one of those large bins…….this way I can take a scoop or less of one thing and mix with others and kind of mix it together in one of the empty bins along with any other additives and directly take to where I need it…..
I cannot describe how much easier and less work intensive this has made the process of keeping up a number of specialty beds…..each requiring a little different nutrient load….
I keep back a little of the same kind of compost each time so the microbes happy will keep on growing…..I dump the new to be composted in the back and then use the bucket to mix and turn it and when ripe bring it to the front all in the same long bin….have a
backhoe on that little Kubota makes this a piece of cake
I have rolled up heavy 11 mil polywoven that is non-leeching that covers over each bin as needed…..
…may seem a lot overdone to some, but you have no idea how many beds I have and just how much time I save by organizing my operation in this way…..for example….I get just the right mix and ph for blueberries and take this to the blue berry “bed” in buckets and then just load the little year old BB in pots right from the bucket I have sitting over where Im sliding them off and onto the bed in line with irrigation system….this way Im handling everything less and decreasing work load raising and lowering bucket that way….
I have thin beds I can straddle with the little tractor and I have a drip system in my in pot plants and spray/mister thats set for a thin bed in others…..figuring how to do this so I can get my tractor down the rows and not damage anything was a challenge for my female mind but I did it.
I read every word Mike writes and started from scratch right here at this site…
…..all I can say is that I didnt know anything really to start with and now, some pretty large trucks back up to my place and I load them up….
I started with 150.00, a single woman with no help and paid cash after two years for my tractor backhoe and then things really started moving forward….I had 1 1/8 acre to start and now own 110 acres and Im debt-free. I still work a FT job nights and put in another 10 per day. Next year I will quit that job and have enough money set aside weather a couple years on event of economic downturn and still provide my customers for free anything they need to keep America going.
Kathleen,
Your very informed comments are much appreciated and congratulations on your incredible success!
Ahhh …. a female mind at work.
Bravo!
Barb, The correct mixture of browns and greens makes a difference, you probably need to add more greens and you can jump start your pile by adding some manure ( I kike to add chicken). Also you need to turn the pile don’t just toss the new stuff on top. The microbes need oxygen. You can buy compost accelerator which is just a mix of the microbes. Sometimes the problem is size, a bigger pile heats up faster a 3 foot square is good. Good Luck
Somebody else asked how wet is too wet? I’ve heard it said, like a wrung out wash cloth, but it is not an exact science, toss in some sticks tp make air spaces and allow the oxygen in to dry it out some.
I’ve had a compost bin for several years and it never heats up. What am I doing wrong? Also is it ok to put pond algae in it?
Thanks
Did you add some moisture? Dry leaves will not compost. Algae is an excellent addition to your compost.
I bought an old wood shipper for $175 it needs the small blades replaced but it definitely works great for the mushroom compost I used in my garden this year. Usually it is all clumped up and by using my chipper it made it nice and manageable and also I got more coverage out of it. I think I may be making me a few of these pallet compost bins and use my chipper when transferring from one to the other.
Do you know what these ugly stink bug–-like beetles that seem to have just hatched? They are brown with a white underbelly..yuk. they don’t stink. I live in the country in sandusky. Oh. Thanks.
Here in Oregon it is the Brown Marmorated Stink Bug that is the bug thug. This Asian sap sucker damages vegetables and fruits and is becoming very bad news for commercial and home growers alike. The BMSB has antennae with white stripes which distinguishes it from other types of stink bugs.
It has migrated coast to coast here in the good ol’ USA
My patrearcal grandmother used a smaller compost box of old plywood and did use all compostable even wood chips and had the garage floor to put a manufactured weed killer in it with black plastic or canvus to retain heat that help kill weeds also . She had the best gardens and hydraingias .(snowball plant ) Pallets are great as most of the work is done and if you want to move it IT IS NO BIG DEAL . Out here in Oregon we have lots of water so how much is to wet ?! Have cleaned many a houses gutters and some of the best soil is stuck up there ! Just saw a gutter planter hung along a fence line and lovely bright flowers all along !!!! We had just a field compost in one area 1992 and threw even rotted produce out not thinking really and got some of the best squash and gords . Bless Yahway . It is after all his system . Hope we did not disturb the microbs daily life for all those that are delicate sensitive !!!
rick
Every time I try something like that I get rats. My last try was to use 2X6’s on top of 4X4’s set on gravel and 1/2 inch hardware cloth on sides and top. The rat chewed through the bottom. My next try will be to put the cloth on the floor. This will make shoveling difficult but may stop the rats.
yea, when i lived in HB,CA.very coastal, humid and wet in spring. had rot and wet dings, but that changed when i got 2 cats at the animal shelter. spring also erupts in eating SHROOMS. my ornamental friends showed me how to git down on this source of meats ( rat) SHROOMS (fungi veggie) with wild rice, OF COURSE. to solve wood rottin ,use common brick to raise bottom of sides. WTH might try rappin bottom in blk plastic. i aint got those worrys no more. tryin the hi-desert and it like the doormat at gates of………….
Get a cat poof no rats!
A complete bin does not provide enough oxigen supply. And I would recommend to use some simple device to crushed plant residues before adding them to the compost heap. Using this approach ensure the rapid production of humus.
Here is a link
I comprehend it looks a horrible device for the Americans but it works very efficiently.
You may try to make another version
and I feel you consider it more acceptable for you there in the US.
Ijust have pile, and now and then get someone to turn it…good soil results. But I have an idea the aI have used for many years….I put down strips of carpet in the walkways. They sometimes begin to grow grass after about a year, so I just turn them over, and use the other side. No weed in the walkways.
I just use news paper in the walk ways and cover with grass clippings. keeps the weeds down and your can just turn it in come fall or spring. It all just breaks down and adds organics to the soil.
Anonymous and Roger …. covering the walkways is also extremely helpful to those in wheelchairs so they can work after rain and not get mired down in mud. We’ve also put old carpet on top of garden soil (with holes for the plants to grow through) and that really helps keep the ground moist. Wonderful ideas from everyone – thank you for sharing!
Thank you Mike for the good work
lofok Augustine
I have been laying a porous material on the bottom of my compost first. The worms and water can get in and out but the compost can be scooped up all the way down to ground level. This has worked out well for years in stead of having a wooden bottom which rots in time. I also use a material called “road stuff” to grow my garden in. You cut 3 sided squares where the plants go. You can water right through it and it is a excellent weed barrier. the design configuration can be changed in 4 ways by turning it over and turning it around. no more weeds is the best feature.
Been there, done that. About 1981 five pallets were wired together to make two bins side by side. They lasted, here in central California, until about 2012. Only the bottom boards had begun to rot out at that time. Perfect size for a retired old lady.
Great article. I’ve never made a compost bin just pile mine up but that’s because I am not good at building things but this step by step makes it seems easy to do. Thanks for the info.
Excellent idea for a nice simple compost pile. I would like to add one caveat, if you don’t mind. You should check the pallets first to make sure they’re not treated with dangerous chemicals–wouldn’t want some of that stuff getting into the compost. Here’s a guide to the stamps found on pallets:
http://www.1001pallets.com/pallet-safety/
An easier method is to use metal T or U posts driven through the pallets to keep them upright. Secure with 12 Guage electric wire at the corners. It’s easy to replace the pallets when they rot in a few years.
Rob, I used to have a compost bin very simiiar to this one. I found that pallets made from hardwood seemed to decompose faster than softwood. Also I would be turning my compost pile from one pen to the other about every other day allowing the empty to dry out for a couple of days. I had this bin for several years with no real problems.
Good luck, Rod.
Hi. Although this seems like a great recycling idea, I’ve found that some things made from pallets rot away in quite a short time. I’ve made a compost heap and three raised beds, but they all disintegrated after about two to three years. However, I’ve also made a fence and wood panelling (for my workshop) from pallet wood and they’ve been OK. The difference is because, for the latter items, the wood isn’t in contact with any (damp) soil or compost. Rob (Swansea : South Wales : UK)
well rats ! My brother called and I guess my Reply got lost in cyber ! South wales internation gardener relations , my dad is welsh decent and both grands northern wales
I believe . Moved to canada in colonial days !
rick
Not all pallets are created equal. Good pallets are made of oak and may out live you. It is less expensive to make them from pine so many times the “free” pallets you can get are these inexpensive pine made ones. Grab whatever you can get and replace ones that rot with new ones, its just a compost bin.
First a question: I’ve been throwing browned puff balls I find in my yard and fields into my compost bin for a number of years. I think to good effect. Am I correct?
Second a question: Are ashes an appropriate source of carbon?
My three pallet compost bins are more like compost stalls… open on one side, Some years I move my compost from bin to bin coarse to ready to use.. I’ve also found a rotary lawn mower can help reduce the size of compost and reduces the need for much of the turning.
Hard wood ashes are ok to throw in the compost pile. Doubt if your balls have any affect on the compost pile.