This post is really for those who have purchased this product, http://mikesbackyardnursery.com/mikes-plant-propagation-kit/ and need a little help getting it set up.
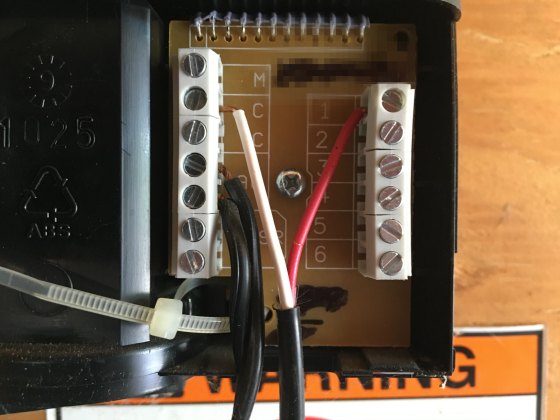
The wiring is pretty simple. The two black wires coming from the power supply pack (see the video) connect to the two terminals on the left that are marked as “AC”. The low voltage wire that goes to the water valve in this photo are red and white. Polarity does not matter so the colors don’t matter. One goes under the terminal marked “C” for common and one goes under the terminal for valve #1, marked “1” on the right. If you add more valves one wire from each valve goes under the “C” terminal on the left and the other goes under the “2 through 6” terminals on the right for valve 1, valve 2, valve 3, etc.
The controller itself is pretty complex and getting it programed correctly first time is a bit tricky. Review to the videos that you received with the system or see the written instructions below.
This video explains how the valve works and how to test the valve if you suspect it is not working correctly. There are a number of valves on the market and they all do the same thing, but operate slightly different.
The valve I use actually has a little plastic screw that I have to unloosen to get the water to come on manually.
This valve has a little lever.
Controller Instructions
First, pull the battery/batteries for AT LEAST 30 seconds. It is better if it is longer, because if you don’t wait the full 30 seconds then put the batteries back in, you need to wait another full 30 seconds. Also, unplug if the timer uses electricity.
These instructions assume you are programming for 10 seconds every 10 minutes. Adjust these times as needed.
Install the battery/batteries in the controller by removing the cover by turning it to the left (counterclockwise). Before you begin programming the controller, read the instructions that came with the controller to familiarize yourself with the buttons on the front of the unit and their functions.
Looking at the face of the timer, you will see a time (12:00) and an arrow under a day of the week at the top of the screen. Use the far right button (arrow) to make the 12 blink, and use the plus (+) or minus (-) buttons to change it to the current hour, being conscious of the AM and PM. When you have set the hour, use the arrow button to make the minutes blink, and make any needed changes. Next, press the arrow button again to make the arrow under the days of the week blink. Use the + or – button to move the arrow under the correct day.
READ CAREFULLY:
This controller will operate six different water valves. Valve #1 is normally used for your propagation beds. The other valves can be used to water plants automatically.
Next, press the button on the far left one (1) time. , this will be the screen where you choose which valve to program. The default valve is 1. Leave this setting alone unless you are programming a different valve. Once you confirm you are programming the correct valve, press the far left button once (1).
At this screen, you will see 00:02:00. Press the arrow button twice (2) to get the 02 to blink. Use the – button to change this to 00. Press the arrow button once (1) to get the far right 00 (seconds) to blink. Use the + button to change this to 10. This is 10 seconds of mist. If you want something different than 10, now is the time to do it, but 10 is a good starting point.
Press the far left button once (1). Press the arrow key once (1) to get the arrow at the top of the screen to blink. Press the arrow button 8 times until you see the word “once” blinking. (Press slowly, if you press more than 8 times, you will have to remove the batteries and start over.) QUICKLY press the + button. Using the + button, change the number to 10. This is the time between misting cycles, and 10 is a good starting point. If you want something other than 10, do it now. Press the left button once (1).
The next screen will have a time, a number of days, and will say “start 1.” The time will be the current time plus about 10 minutes. The number above the word “days” should be 0. Verify these settings, and make changes if needed by using the arrow button and the + or – buttons. If everything is OK, press the left button twice (2) until you see the word “off.”
Press the arrow button to make the word “off” blink. Use the + button to get to a screen that displays a time. Use the arrow button to get the hour to blink, and change this to the time in the morning you want the system to start misting. If you want to change the minutes, press the arrow key to get it to blink, and use the + or – button to change it. Be sure you choose AM. The optimum time is when the dew on the lawn and landscape plants is just beginning to dry off. Press the left button once (1) to advance to the next screen.
This step is exactly like the last, except you will be choosing a time in the afternoon or evening to turn the system off for the night, so be sure to choose PM here. You should choose a time early enough in the evening to allow the cuttings to dry off before the sun fully sets. Press the left button twice (2). You should now be back at the main screen with the time and day of the week.
That’s it! Within 10 minutes, the controller will start the misting cycle. It will mist for 10 seconds, turn off for 10 minutes, and repeat until the timer shuts itself off for the night. It will then start again at whatever time you programmed in the morning.
This article is only for those that have This Plant Propagation System.
Questions, comments, mean things to say? Post them below and I will respond.
Hi Dustin,
The wires that are connected to the solenoid have partly broken and I do t think they are connecting properly. The result is that it does not shut off the water flow.
I assume I need to get a new solenoid since I do t see a way to repair that connection.
Can you advise please?
Thanks,
Gayle
Gayle,
A broken wire would keep the water off. But for the price of a valve at home depot I’d buy a new one. Just get a 24 volt lawn irrigation valve or order one on amazon.
I’m so sorry to bother you again about this. I got a new valve and solenoid from Amazon. Unfortunately the valve’s openings are too big so I tried just replacing the solenoid – it’s the same brand. I hooked it all up and the water continues to flow through regardless of whether I have the valve turned to auto or on or in the middle.
I looked at the video that is for troubleshooting a valve but it seems to just trouble shoot the solenoid.
Does it matter that I may have reversed the wires when I added the new solenoid. Both wires from the Galcon timer are white so I wasn’t sure if that mattered.
I also rinsed out the valve to see if that was the problem and it did not change anything.
Ideas?
Thank you so much.
Gayle
Mixing up the wires shouldn’t make a difference. Put that solenoid back on the on the valve body that it came with and just insert two bushings so the fittings work. You probably a one inch valve, you need to reduce those to 3/4″. Take the valve and the fittings to the hardware store with you.
It takes electricity to open that valve. Unhook one wire and if the water still flows the problem is with the valve body so the one you bought should solve the problem.
Hello Mike,
I am assuming that since this has six valve controllers, and you have valve #1 going on and off all day, the other valves can be working at the same time? Thank you!
Lyda
Lyda,
You can use from one to six valves, each programed differently and running at the same time. http://mikesbackyardnursery.com/mikes-plant-propagation-kit/
Hi Mike,
We are planning our propagation beds and making sure we’ll have everything needed to start sticking cuttings. Will you be getting any more of the Plant Propagation kits? Thank you for your time and effort and you’re a blessing with the wealth of knowledge you share!
Thanks,
Jill
Jill,
We will, they are telling me mid August at the earliest.